Drivetrain#
Introduction#
The drivetrain includes wheels and motors that control how the robot drives and turns. Drivetrains can be found in builds like the Code Base 2.0, Super Car, or a custom robot.
Drivetrains use the Inertial Sensor in the Brain to detect crashes and help the robot move and turn precisely. At the start of each project, the drivetrain calibrates the Inertial Sensor automatically. Keep the robot still for about 2 seconds during calibration, so the robot can move and turn correctly.
There are many ways to code the drivetrain. Below is a list of all Drivetrain blocks:
Actions — Move and turn the robot.
drive — Moves the robot forward or reverse forever.
drive for — Moves the robot forward or reverse for a specific distance.
drive until — Moves the robot forward or reverse until the Eye Sensor detects an object or the robot detects a crash.
turn — Turns the robot left or right forever.
turn for — Turns the robot left or right for a specific number of degrees.
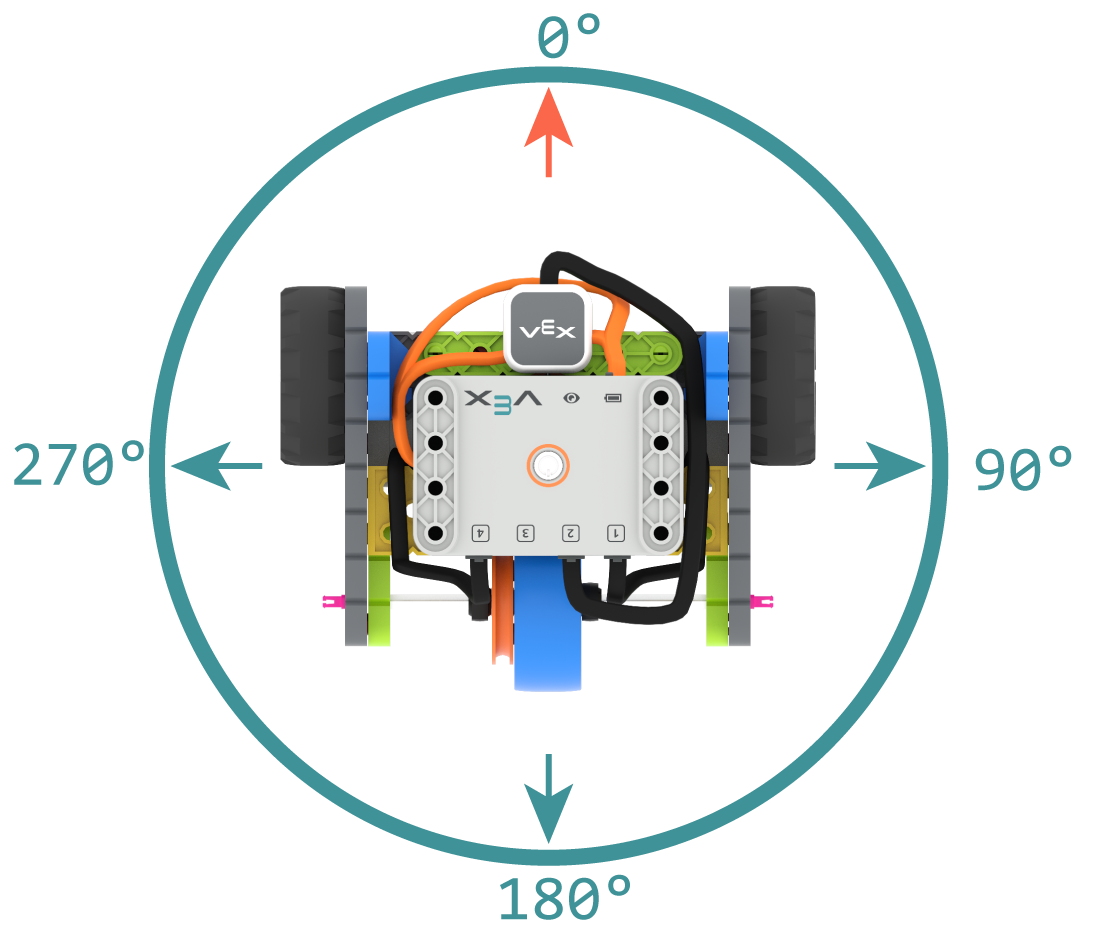
turn to heading — Turns the robot to face a specific heading from -359 to 359 degrees. The robot will turn the shortest direction to reach the target heading.
turn to rotation — Turns the robot to a specific rotation.
stop driving — Stops the robot’s movement.
Settings — Adjust drivetrain settings.
set drive velocity — Tells the robot how fast to drive.
set turn velocity — Tells the robot how fast to turn.
set drive stopping — Tells how the robot will stop moving: by braking, coasting, or holding.
set drive timeout — Sets how many seconds the robot will try to finish a movement.
set drive heading — Changes the robot’s current heading to a new heading.
set drive rotation — Changes the robot’s current rotation to a new rotation.
Values — Check movement status.
drive is done — Reports whether the robot is finished moving.
drive heading — Reports the robot’s current heading from 0 to 359 degrees.
drive rotation — Reports the robot’s current rotation.
drive velocity — Reports how fast the robot is driving, as a percentage from -100% to 100%.
Actions#
drive#
The drive stack block moves the robot forward or reverse forever. The robot will continue to move until it is given another action, like turning or stopping.
drive [forward v]
Parameters |
Description |
|---|---|
direction |
The direction the robot moves: forward or reverse. |
Example
  when started :: hat events
  [Build Used: Code Base 2.0]
  [Drive forward then stop.]
  drive [forward v]
  wait (2) seconds
  stop driving
drive for#
The drive for stack block moves the robot forward or reverse for a specific distance. The project will wait until the robot is done moving before the next block in the stack runs.
drive [forward v] for [100] [mm v] ▶
Parameters |
Description |
|---|---|
direction |
The direction the robot moves: forward or reverse. |
distance |
The distance the robot drives. This can be an integer or a decimal. |
unit |
The distance unit: mm (millimeters) or inches. |
and don’t wait |
Select the arrow ( ▶ ) to expand the block to say and don’t wait, so the next block in the stack will run right away. |
Example
  when started :: hat events
  [Build Used: Code Base 2.0]
  [Drive back and forth.]
  drive [forward v] for [100] [mm v] ▶
  drive [reverse v] for [4] [inches v] ▶
drive until#
The drive until stack block moves the robot forward or reverse until the Eye Sensor detects an object or the robot detects a crash.
drive [forward v] until [object v] ▶
Parameters |
Description |
|---|---|
direction |
The direction the robot moves: forward or reverse. |
condition |
The condition that stops the robot: object or crash. |
and don’t wait |
Select the arrow ( ▶ ) to expand the block to say and don’t wait, so the next block in the stack will run right away. |
Example
  when started :: hat events
  [Build Used: Code Base 2.0]
  [Turn right after a crash.]
  drive [forward v] until [crash v] ▶
  turn [right v] for (90) degrees ▶
turn#
The turn stack block turns the robot left or right forever. The robot will continue to turn until it is given another action, like driving to stopping.
turn [right v]
Parameters |
Description |
|---|---|
direction |
The direction the robot turns: left or right. |
Example
  when started :: hat events
  [Build Used: Code Base 2.0]
  [Turn right and left, then stop.]
  turn [right v]
  wait [2] seconds
  turn [left v]
  wait [2] seconds
  stop driving
turn for#
The turn for stack block turns the robot left or right for a specific number of degrees. The turn is relative to the current position of the robot. The project will wait until the robot is done turning before the next block in the stack runs.
turn [right v] for (90) degrees ▶
Parameters |
Description |
|---|---|
direction |
The direction the robot turns: left or right. |
angle |
The number of degrees the robot turns. This can be an integer or a decimal. |
and don’t wait |
Select the arrow ( ▶ ) to expand the block to say and don’t wait, so the next block in the stack will run right away. |
Example
  when started :: hat events
  [Build Used: Code Base 2.0]
  [Turn right then left.]
  turn [right v] for (90) degrees ▶
  turn [left v] for (90) degrees ▶
turn to heading#
A heading is the direction the robot’s brain is facing, measured in degrees. The turn to heading stack block turns the robot to face a specific heading from -359 to 359 degrees. The robot will turn the shortest direction to reach the target heading.
The starting heading is 0 degrees.
The project will wait until the robot is done turning before the next block in the stack runs.
turn to heading [90] degrees ▶
Parameters |
Description |
|---|---|
heading |
The direction the robot should face as an integer, from -359 to 359 degrees. |
and don’t wait |
Select the arrow ( ▶ ) to expand the block to say and don’t wait, so the next block in the stack will run right away. |
Example
  when started :: hat events
  [Build Used: Code Base 2.0]
  [Turn to face the cardinal directions.]
  turn to heading [90] degrees ▶
  wait [1] seconds
  turn to heading [180] degrees ▶
  wait [1] seconds
  turn to heading [270] degrees ▶
  wait [1] seconds
  turn to heading [0] degrees ▶
turn to rotation#
The turn to rotation stack block turns the robot to a specific rotation.
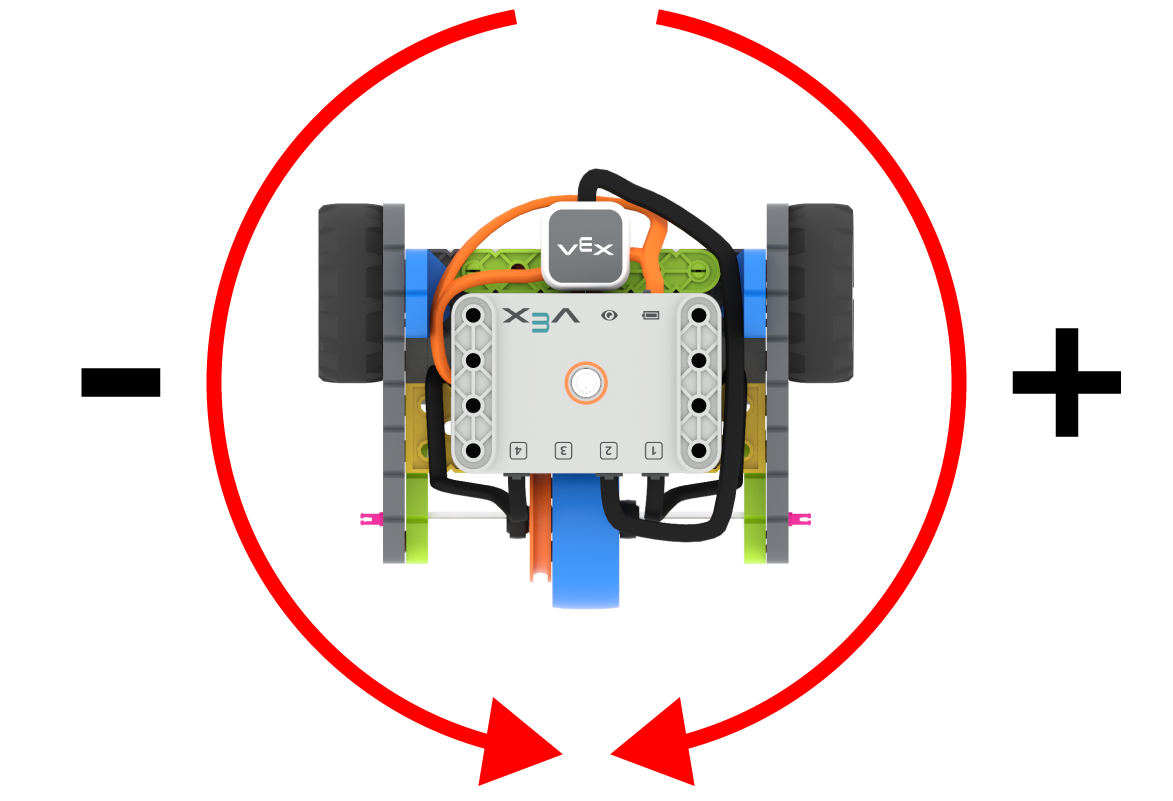
Rotation is how much the robot has turned, measured in degrees. At the beginning of a project, the rotation value is set to 0 degrees. Rotation can also be set using the set drive rotation block.
Rotation values are absolute. This means the direction of the turn depends on the robot’s current rotation. Turning right increases the rotation, and turning left decreases the rotation.
For example, if the robot starts at 0 degrees and you turn to a rotation of 720 degrees, it will turn right twice. If you then turn to a rotation of 360 degrees, it will turn left once, because 360 is less than 720.
The project will wait until the robot is done turning before the next block in the stack runs.
turn to rotation (90) degrees ▶
Parameters |
Description |
|---|---|
rotation |
The rotation value, in degrees, that the robot will turn to. This can be an integer. |
and don’t wait |
Select the arrow ( ▶ ) to expand the block to say and don’t wait, so the next block in the stack will run right away. |
Example
  when started :: hat events
  [Build Used: Code Base 2.0]
  [Make one full turn to the right.]
  turn to rotation [360] degrees ▶
  [Make another full turn to the right.]
  turn to rotation [720] degrees ▶
  [Make one full turn to the left, returning to 360 degrees.]
  turn to rotation [360] degrees ▶
stop driving#
The stop driving stack block stops the robot’s movement.
stop driving
Parameters |
Description |
|---|---|
This block has no parameters. |
Example
  when started :: hat events
  [Build Used: Code Base 2.0]
  [Drive forward then stop.]
  drive [forward v]
  wait (2) seconds
  stop driving
Settings#
set drive velocity#
The set drive velocity stack block tells the robot how fast to drive. A higher percentage makes the robot drive faster and a lower percentage makes the robot drive slower.
Every project begins with the robot driving at 50% velocity by default.
Note: A higher velocity makes the robot drive faster, but it may be less precise. A lower velocity makes the robot drive slower, but be more precise.
set drive velocity to [50] %
Parameters |
Description |
|---|---|
velocity |
The velocity to drive with from 0% to 100%. |
Example
  when started :: hat events
  [Build Used: Code Base 2.0]
  [Drive at different velocities.]
  drive [forward v] for [100] [mm v] ▶
  wait [1] seconds
  [Drive slow.]
  set drive velocity to [20] %
  drive [forward v] for [100] [mm v] ▶
  wait [1] seconds
  [Drive fast.]
  set drive velocity to [100] %
  drive [forward v] for [100] [mm v] ▶
set turn velocity#
The set turn velocity stack block tells the robot how fast to turn. A higher percentage makes the robot turn faster and a lower percentage makes the robot turn slower.
Every project begins with the robot turning at 50% velocity by default.
Note: A higher velocity makes the robot turn faster, but it may be less precise. A lower velocity makes the robot turn slower, but be more precise.
set turn velocity to [50] %
Parameters |
Description |
|---|---|
velocity |
The velocity to turn with from 0% to 100%. |
Example
  when started :: hat events
  [Build Used: Code Base 2.0]
  [Turn at different velocities.]
  turn [right v] for [180] degrees ▶
  wait [1] seconds
  [Turn fast.]
  set turn velocity to [100] %
  turn [right v] for [180] degrees ▶
set drive stopping#
The set drive stopping stack block sets how the robot will stop moving: by braking, coasting, or holding.
set drive stopping to [brake v]
Parameters |
Description |
|---|---|
stopping behavior |
How the robot will stop:
|
If this block is not used, the robot will use brake when stopping.
Example
  when started :: hat events
  [Build Used: Code Base 2.0]
  [Drive, then coast to a stop.]
  set drive velocity to [100] %
  set drive stopping to [coast v]
  drive [forward v]
  wait [2] seconds
  stop driving
set drive timeout#
The set drive timeout stack block sets how many seconds the robot will try to finish a movement. If the robot cannot finish in that time it will stop trying and move on to the next block in the stack. This keeps the robot from getting stuck on a movement.
set drive timeout to [1] seconds
Parameters |
Description |
|---|---|
time |
The number of seconds the robot can try to finish a movement. This can be a whole number or a decimal. |
Example
  when started :: hat events
  [Build Used: Code Base 2.0]
  [Drive as far as possible for 1 second before turning right.]
  set drive timeout to [1] seconds
  drive [forward v] for [25] [inches v] ▶
  turn [right v] for [90] degrees ▶
set drive heading#
A heading is the direction the robot’s brain is facing, measured in degrees. The set drive heading stack block changes the robot’s current heading to a new heading value.
For example, if the robot has turned to face right, setting the heading to 0 degrees makes that right-facing position the new 0 degrees. Then the robot can turn to other positions based on that new heading.
set drive heading to [0] degrees
Parameters |
Description |
|---|---|
heading |
The heading value, in degrees, to set for the robot. This can be a whole number from 0 to 359. |
Example
  when started :: hat events
  [Build Used: Code Base 2.0]
  [Face the new 0 degree heading.]
  set drive heading to [90] degrees
  turn to heading [0] degrees ▶
set drive rotation#
Rotation is how much the robot has turned, measured in degrees. At the beginning of a project, the rotation value is set to 0 degrees. The set drive rotation stack block changes the robot’s current rotation to a new value.
For example, if the robot has made two full turns to the right, its rotation value will be 720 degrees. Setting the rotation to 0 degrees will reset that rotation from 720 to 0 degrees. Then the robot can turn to rotations based on that new value.
set drive rotation to (0) degrees
Parameters |
Description |
|---|---|
rotation |
The rotation value, in degrees, to set for the robot. This can be an integer. |
Example
  when started :: hat events
  [Build Used: Code Base 2.0]
  [Spin counterclockwise two times.]
  set drive rotation to [720] degrees
  turn to rotation [0] degrees ▶
Values#
drive is done#
The drive is done Boolean block reports whether the robot is finished moving. This can be used to control the timing of other behaviors based on the robot’s movement.
True — The robot is finished moving.
False — The robot is still moving.
This block works together with the following drivetrain blocks that have the and don’t wait parameter: drive for, drive until, turn for, turn to heading, and turn to rotation.
<drive is done?>
Parameters |
Description |
|---|---|
This block has no parameters. |
Example
  when started :: hat events
  [Build Used: Code Base 2.0]
  [Turn when the drivetrain is done moving forward.]
  drive [forward v] for [100] [mm v] ◀ and don't wait
  wait [0.25] seconds
  forever
  if <drive is done?> then
  turn [right v] for [180] degrees ▶
  break
  else
  print [Still moving...] ▶
  wait [0.1] seconds
  clear all rows
drive heading#
A heading is the direction the robot’s brain is facing, measured in degrees. The drive heading reporter block reports that heading from 0 to 359 degrees.
The robot’s starting heading is 0 degrees.
(drive heading in degrees)
Parameters |
Description |
|---|---|
This block has no parameters. |
Example
  when started :: hat events
  [Build Used: Code Base 2.0]
  [Display the heading while turning.]
  turn [right v] for [450] degrees ◀ and don't wait
  forever
  clear all rows
  print (drive heading in degrees) ▶
  wait [0.1] seconds
drive rotation#
Rotation is how much the robot has turned, measured in degrees. At the beginning of a project, the rotation value is set to 0 degrees. The drive rotation reporter block reports the robot’s current rotation.
Turning right increases the rotation, and turning left decreases the rotation. For example, making two full turns to the right will report a rotation of 720 degrees.
(drive rotation in degrees)
Parameters |
Description |
|---|---|
This block has no parameters. |
Example
  when started :: hat events
  [Build Used: Code Base 2.0]
  [Display the rotation while turning.]
  turn [right v] for [450] degrees ◀ and don't wait
  forever
  clear all rows
  print (drive rotation in degrees) ▶
  wait [0.1] seconds
drive velocity#
The drive velocity reporter block reports how fast the robot is driving, as a percentage from -100% to 100%.
A positive value means the robot is driving forward. A negative value means the robot is driving in reverse.
(drive velocity in %)
Parameters |
Description |
|---|---|
This block has no parameters. |
Example
  when started :: hat events
  [Build Used: Code Base 2.0]
  [Display the velocity of the robot before and while moving.]
  print [Start: ] ▶
  print (drive velocity in %) ▶
  set cursor to next row
  drive [forward v]
  wait [0.5] seconds
  print [Moving: ] ▶
  print (drive velocity in %) ▶
  stop driving