Controller#
Introduction#
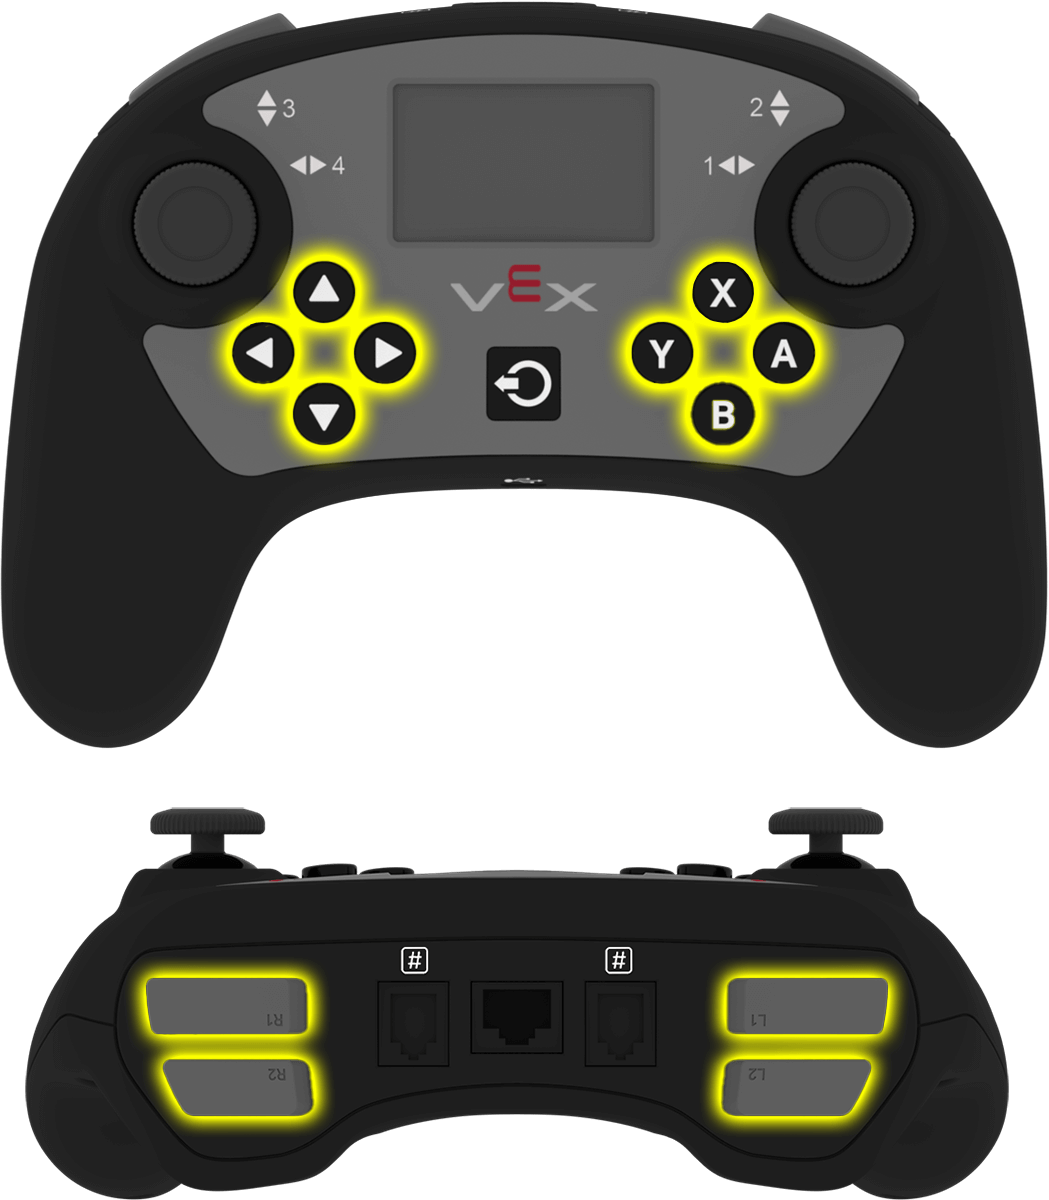
The V5 Brain can connect to a V5 Controller. A V5 Controller has two analog joysticks and multiple buttons that the Brain can use to detect movements and presses.
This page uses Controller1 as the example V5 Controller name. Replace these with your own configured name as needed.
Below is a list of all available methods:
Actions — Turn Controller-programmed actions on or off.
rumble— Sends a rumble string to the V5 Controller.print— Prints text on the Controller’s screen.setCursor— Sets the cursor position used for printing text on the Controller’s screen.newLine— Moves the cursor to the beginning of the next row.clearScreen— Clears the whole screen.clearLine— Clears a screen row.RemoteControlCodeEnabled— Enable or disable Controller configured actions.
Getters — Read button states and joystick positions.
.pressing— Returns whether the specified button is being pressed..position— Returns the position of the joystick’s specified axis.column— Returns the current column where text will be printed as an integer.row— Returns the current row where text will be printed as an integer.
Callback — Run code when buttons or joysticks change state.
.pressed— Registers a callback function for when the specified button is pressed..released— Registers a callback function for when the specified button is released..changed— Registers a callback function for when the joystick’s axis changes.
Constructors — Manually initialize and configure the controller.
Controller— Create a controller.
Actions#
rumble#
rumble sends a rumble string to the V5 Controller.
Usage:
Controller.rumble(pattern);
Parameter |
Description |
|---|---|
|
A pattern using |
int main() {
    // Initializing Robot Configuration. DO NOT REMOVE!
    vexcodeInit();
    // Rumble the V5 Controller to the pattern short-short-long-long.
    Controller1.rumble("..--");
}
print#
print prints text on the controller’s screen using the current cursor position.
Usage:
Controller.Screen.print(value, sep, precision);
Parameter |
Description |
|---|---|
|
The text to be printed on the controller screen. |
|
Optional. A string to inset between values. This must be written as a keyword argument (sep=). The default is |
|
Optional. The number of decimal places to display when printing simple numbers. This must be written as a keyword argument ( |
int main() {
    // Initializing Robot Configuration. DO NOT REMOVE!
    vexcodeInit();
    // Print the number 1 on the screen.
    Controller1.Screen.print(1);
}
int main() {
    // Initializing Robot Configuration. DO NOT REMOVE!
    vexcodeInit();
    // Print the numbers 1, 2, 3 and 4 on the screen.
    Controller1.Screen.print("1, 2, 3, 4");
}
int main() {
    // Initializing Robot Configuration. DO NOT REMOVE!
    vexcodeInit();
    // Print the number 1 on the screen.
    Motor1.spin(forward);
    wait(2,seconds);
    Controller1.Screen.print("motor1 : %7.2f", Motor1.velocity(percent));
}
setCursor#
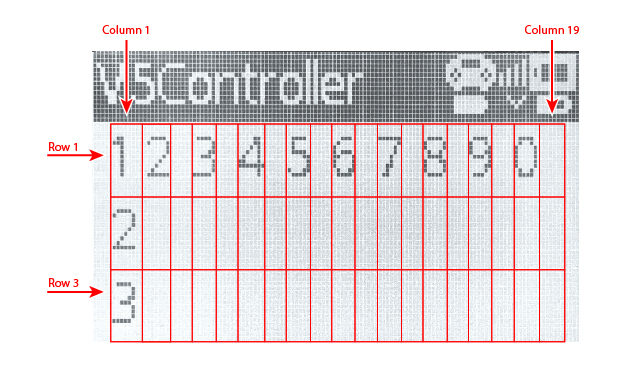
setCursor sets the cursor to a specific row and column on the controller’s screen. The controller screen has 3 rows and 19 columns.
Usage:
Controller.Screen.setCursor(row, col);
Parameter |
Description |
|---|---|
|
The row of the cursor from 1 to 3. |
|
The column of the cursor from 1 to 19. |
newLine#
newLine method moves the cursor to the beginning of the next line.
Usage:
Controller.Screen.newLine();
Parameters |
Description |
|---|---|
This method has no parameters. |
int main() {
    // Initializing Robot Configuration. DO NOT REMOVE!
    vexcodeInit();

    // Clear screen to print to multiple lines
    Controller1.Screen.clearScreen();
    Controller1.Screen.setCursor(1,1);

    // Print text on both rows
    Controller1.Screen.print("VEX V5");
    Controller1.Screen.newLine();
    Controller1.Screen.print("Controller");
}
clearScreen#
clearScreen clears the whole screen.
Usage:
Controller.Screen.clearScreen();
Parameters |
Description |
|---|---|
This method has no parameters. |
int main() {
    // Initializing Robot Configuration. DO NOT REMOVE!
    vexcodeInit();

    // Print text and then clear the screen.
    Controller1.Screen.print("VEX V5");
    wait(2000, msec);
    Controller1.Screen.clearScreen();
}
clearLine#
clearLine clears a screen row.
Default Usage:
Controller.Screen.clearLine(line);
Overload Usages:
Controller.Screen.clearLine();
Parameters |
Description |
|---|---|
|
The line to clear from 1 to 3. If not specified, the current line will be cleared. |
int main() {
    // Initializing Robot Configuration. DO NOT REMOVE!
    vexcodeInit();

    // Clear screen to print to multiple lines
    Controller1.Screen.clearScreen();
    Controller1.Screen.setCursor(1,1);

    // Print text
    Controller1.Screen.print("VEX V5");
    Controller1.Screen.newLine();
    Controller1.Screen.print("Controller");
    wait(2000, msec);

    // Clear row 2.
    Controller1.Screen.clearLine(2);
}
RemoteControlCodeEnabled#
RemoteControlCodeEnabled is a variable that can be set to a boolean that enables or disables controller configured actions from the Devices menu. The controller is enabled by default. It can be set to either of the following:
true— Enable controller configured actions.false— Disable controller configured actions.
Usage:
RemoteControlCodeEnabled = false;
int main() {
    // Initializing Robot Configuration. DO NOT REMOVE!
    vexcodeInit();

    // Drive forward or backward using the left joystick
    RemoteControlCodeEnabled = false;

    while (true) {
        if (Controller1.Axis3.position() > 0) {
            Drivetrain.drive(forward);
        } else if (Controller1.Axis3.position() < 0) {
            Drivetrain.drive(reverse);
        // Press A to use the controller configured actions
        } else if (Controller1.ButtonA.pressing()) {
            break;
        } else {
            Drivetrain.stop();
        }
        wait(20, msec);
    }
    RemoteControlCodeEnabled = true;
}
Getters#
.pressing#
.pressing returns an integer indicating whether a specific button on the controller is currently being pressed. This method must be called on a specific button object, such as ButtonDown (see full list of button objects below).
1— The specified button is being pressed.0— The specified button is not being pressed.
Usage:
One of twelve available button objects can be used with this method, as shown below:
Button |
Command |
|---|---|
|
|
|
|
|
|
|
|
|
|
|
|
|
|
|
|
|
|
|
|
|
|
|
|
Parameters |
Description |
|---|---|
This method has no parameters. |
int main() {
    // Initializing Robot Configuration. DO NOT REMOVE!
    vexcodeInit();
    // Turn right while L1 is pressed
    while (true) {
        if (Controller1.ButtonL1.pressing()) {
            Drivetrain.turn(right);
        } else {
            Drivetrain.stop();
        }
        wait(5, msec);
    }
}
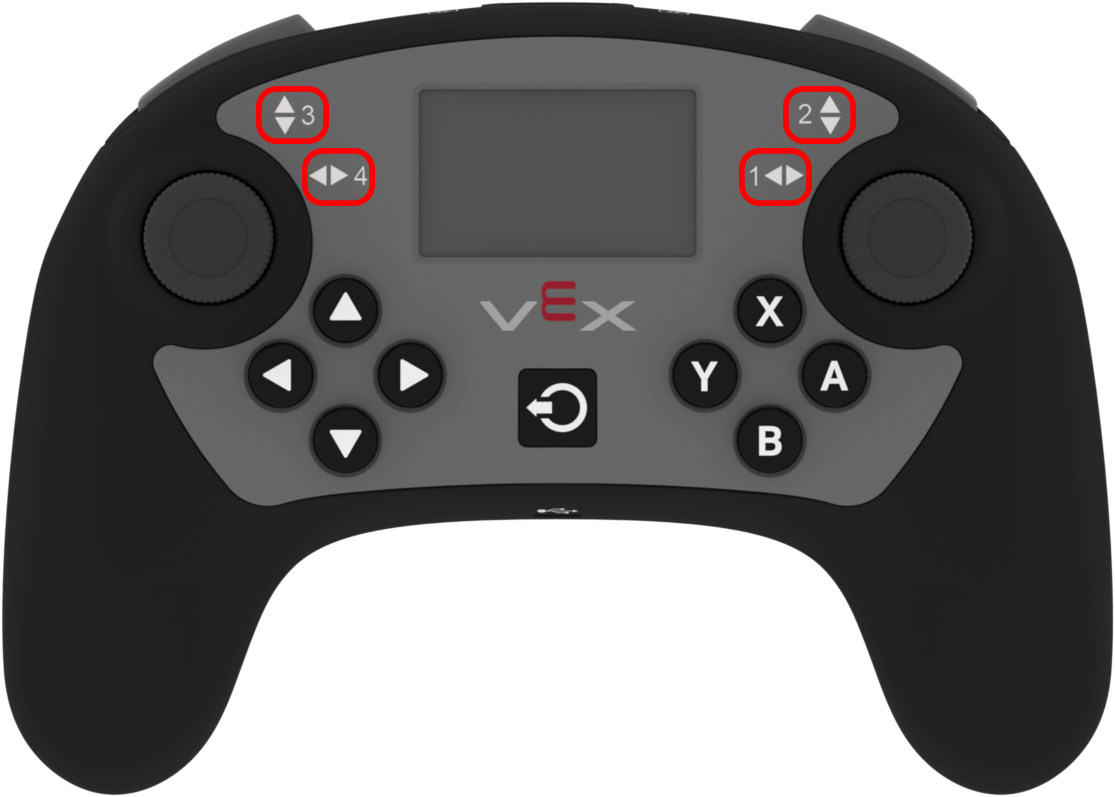
.position#
.position returns the position of the joystick’s specified axis as an integer from —100 to 100, representing a percentage. This method must be called on a specific axis object, such as Axis1 (see full list of axis objects below).
Usage:
One of four available axes can be used with this method, as shown below:
Axis |
Command |
|---|---|
|
|
|
|
|
|
|
|
Parameters |
Description |
|---|---|
This method has no parameters. |
int main() {
    // Initializing Robot Configuration. DO NOT REMOVE!
    vexcodeInit();

    // Turn with the left joystick
    RemoteControlCodeEnabled = false;

    while (true) {
        if (Controller1.Axis4.position() > 10) {
            Drivetrain.turn(right);
        } else if (Controller1.Axis4.position() < -10) {
            Drivetrain.turn(left);
        } else {
            Drivetrain.stop();
        }
        wait(20, msec);
    }
}
column#
column returns the current column where text will be printed as an integer.
Usage:
Controller.Screen.column()
Parameters |
Description |
|---|---|
This method has no parameters. |
int main() {
    // Initializing Robot Configuration. DO NOT REMOVE!
    vexcodeInit();

    // Clear screen
    Controller1.Screen.clearScreen();

    // Print the column number on row 2, column 3.
    Controller1.Screen.setCursor(2, 3);
    Controller1.Screen.print(Controller1.Screen.column());
}
row#
row returns the current row where text will be printed as an integer.
Usage:
Controller.Screen.row()
Parameters |
Description |
|---|---|
This method has no parameters. |
int main() {
    // Initializing Robot Configuration. DO NOT REMOVE!
    vexcodeInit();

    // Clear screen
    Controller1.Screen.clearScreen();

    // Print the column number on row 2, column 3.
    Controller1.Screen.setCursor(2, 3);
    Controller1.Screen.print(Controller1.Screen.row());
}
Callback#
.pressed#
.pressed registers a callback function that runs when a specific button on the controller is pressed. This method must be called on a specific button object, such as ButtonDown — (see full list of button objects below).
Usage:
One of the available button objects can be used with this method, as shown below:
Button |
Command |
|---|---|
|
|
|
|
|
|
|
|
|
|
|
|
|
|
|
|
|
|
|
|
|
|
|
|
Parameters |
Description |
|---|---|
|
A previously defined callback function that is called automatically when the axis value changes. The function must match the required callback signature. See Callback Functions for more information. |
Callback Signature:
void callback();
Arguments |
Description |
|---|---|
This callback function has no arguments. |
// Drive forward when A is pressed
void driveForward() {
    Drivetrain.driveFor(forward, 100, mm);
}

int main() {
    // Initializing Robot Configuration. DO NOT REMOVE!
    vexcodeInit();
    // Call driveForward when the A button is pressed
    Controller1.ButtonA.pressed(driveForward);
}
.released#
.released registers a callback function that runs when a specific button on the controller is released. This method must be called on a specific button object, such as ButtonDown — (see full list of button objects below).
Usage:
One of the available button objects can be used with this method, as shown below:
Button |
Command |
|---|---|
|
|
|
|
|
|
|
|
|
|
|
|
|
|
|
|
|
|
|
|
|
|
|
|
Parameters |
Description |
|---|---|
|
A previously defined callback function that is called automatically when the axis value changes. The function must match the required callback signature. See Callback Functions for more information. |
Callback Signature:
void callback();
Arguments |
Description |
|---|---|
This callback function has no arguments. |
// Drive backward when A is released
void backUp() {
    Drivetrain.driveFor(reverse, 100, mm);
}

int main() {
    // Initializing Robot Configuration. DO NOT REMOVE!
    vexcodeInit();
    // Call backUp when the A button is released
    Controller1.ButtonA.released(backUp);
}
.changed#
.changed registers a callback function that runs when the joystick’s position changes. This method must be called on a specific axis object, such as Axis1 (see full list of axis objects below).
Usage:
One of four available axes can be used with this method, as shown below:
Axis |
Command |
|---|---|
|
|
|
|
|
|
|
|
Parameters |
Description |
|---|---|
|
A previously defined callback function that is called automatically when the axis value changes. The function must match the required callback signature. See Callback Functions for more information. |
Callback Signature:
void callback();
Arguments |
Description |
|---|---|
This callback function has no arguments. |
// Play a rumble pattern when the left joystick moves
void rumblePattern() {
    Controller1.rumble("..--");
    wait(1, seconds);
}

int main() {
    // Initializing Robot Configuration. DO NOT REMOVE!
    vexcodeInit();
    // Call the rumble function when the left joystick moves
    Controller1.Axis4.changed(rumblePattern);
}
Constructors#
Constructors are used to manually create controller objects, which are necessary for configuring a controller outside of VEXcode. You can only create two controllers in a project.
controller#
controller creates a controller.
Usage:
controller Controller = controller(controller_type);
Parameters |
Description |
|---|---|
|
The type of controller to create.
|
// Create a controller
controller Controller = controller(primary);
// Create two controllers
controller Controller1 = controller(primary);
controller Controller2 = controller(partner);