控制器#
介绍#
V5 主机可以连接到 V5 控制器。V5 控制器有两个模拟摇杆和多个按钮,主机可以通过这些按钮来检测动作和按键操作。
This page uses Controller1 as the example V5 Controller name. Replace these with your own configured name as needed.
以下是所有可用方法的列表:
操作 — 开启或关闭控制器编程的操作。
rumble— Sends a rumble string to the V5 Controller.print— Prints text on the Controller’s screen.setCursor— Sets the cursor position used for printing text on the Controller’s screen.newLine— Moves the cursor to the beginning of the next row.clearScreen— Clears the whole screen.clearLine— Clears a screen row.RemoteControlCodeEnabled— Enable or disable Controller configured actions.
Getter 函数——读取按钮状态和摇杆位置。
.pressing— Returns whether the specified button is being pressed..position— Returns the position of the joystick’s specified axis.column— Returns the current column where text will be printed as an integer.row— Returns the current row where text will be printed as an integer.
回调函数——当按钮或摇杆状态改变时运行代码。
.pressed— Registers a callback function for when the specified button is pressed..released— Registers a callback function for when the specified button is released..changed— Registers a callback function for when the joystick’s axis changes.
构造函数——手动初始化和配置控制器。
Controller— Create a controller.
行动#
rumble#
rumble sends a rumble string to the V5 Controller.
用法:
Controller.rumble(pattern);
范围 |
描述 |
|---|---|
|
A pattern using |
int main() {
    // Initializing Robot Configuration. DO NOT REMOVE!
    vexcodeInit();
    // Rumble the V5 Controller to the pattern short-short-long-long.
    Controller1.rumble("..--");
}
print#
print prints text on the controller’s screen using the current cursor position.
用法:
Controller.Screen.print(value, sep, precision);
范围 |
描述 |
|---|---|
|
控制器屏幕上要打印的文本。 |
|
Optional. A string to inset between values. This must be written as a keyword argument (sep=). The default is |
|
Optional. The number of decimal places to display when printing simple numbers. This must be written as a keyword argument ( |
int main() {
    // Initializing Robot Configuration. DO NOT REMOVE!
    vexcodeInit();
    // Print the number 1 on the screen.
    Controller1.Screen.print(1);
}
int main() {
    // Initializing Robot Configuration. DO NOT REMOVE!
    vexcodeInit();
    // Print the numbers 1, 2, 3 and 4 on the screen.
    Controller1.Screen.print("1, 2, 3, 4");
}
int main() {
    // Initializing Robot Configuration. DO NOT REMOVE!
    vexcodeInit();
    // Print the number 1 on the screen.
    Motor1.spin(forward);
    wait(2,seconds);
    Controller1.Screen.print("motor1 : %7.2f", Motor1.velocity(percent));
}
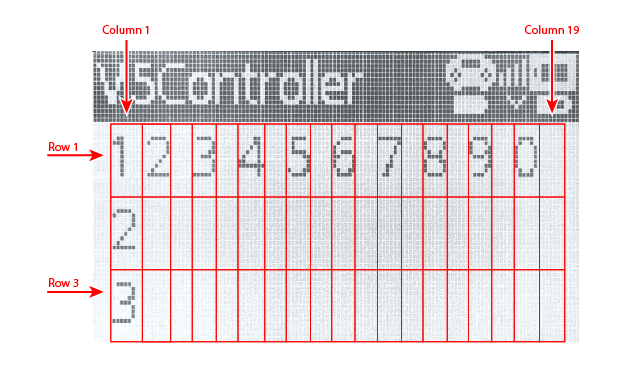
setCursor#
setCursor sets the cursor to a specific row and column on the controller’s screen. The controller screen has 3 rows and 19 columns.
用法:
Controller.Screen.setCursor(row, col);
范围 |
描述 |
|---|---|
|
光标所在行的第 1 行到第 3 行。 |
|
光标所在列,从 1 到 19。 |
newLine#
newLine method moves the cursor to the beginning of the next line.
用法:
Controller.Screen.newLine();
参数 |
描述 |
|---|---|
此方法没有参数。 |
int main() {
    // Initializing Robot Configuration. DO NOT REMOVE!
    vexcodeInit();

    // Clear screen to print to multiple lines
    Controller1.Screen.clearScreen();
    Controller1.Screen.setCursor(1,1);

    // Print text on both rows
    Controller1.Screen.print("VEX V5");
    Controller1.Screen.newLine();
    Controller1.Screen.print("Controller");
}
clearScreen#
clearScreen clears the whole screen.
用法:
Controller.Screen.clearScreen();
参数 |
描述 |
|---|---|
此方法没有参数。 |
int main() {
    // Initializing Robot Configuration. DO NOT REMOVE!
    vexcodeInit();

    // Print text and then clear the screen.
    Controller1.Screen.print("VEX V5");
    wait(2000, msec);
    Controller1.Screen.clearScreen();
}
clearLine#
clearLine clears a screen row.
默认用法:
Controller.Screen.clearLine(line);
Overload Usages:
Controller.Screen.clearLine();
参数 |
描述 |
|---|---|
|
要清除的行号为 1 到 3。如果未指定,则清除当前行。 |
int main() {
    // Initializing Robot Configuration. DO NOT REMOVE!
    vexcodeInit();

    // Clear screen to print to multiple lines
    Controller1.Screen.clearScreen();
    Controller1.Screen.setCursor(1,1);

    // Print text
    Controller1.Screen.print("VEX V5");
    Controller1.Screen.newLine();
    Controller1.Screen.print("Controller");
    wait(2000, msec);

    // Clear row 2.
    Controller1.Screen.clearLine(2);
}
RemoteControlCodeEnabled#
RemoteControlCodeEnabled is a variable that can be set to a boolean that enables or disables controller configured actions from the Devices menu. The controller is enabled by default. It can be set to either of the following:
true— Enable controller configured actions.false— Disable controller configured actions.
Usage:
RemoteControlCodeEnabled = false;
int main() {
    // Initializing Robot Configuration. DO NOT REMOVE!
    vexcodeInit();

    // Drive forward or backward using the left joystick
    RemoteControlCodeEnabled = false;

    while (true) {
        if (Controller1.Axis3.position() > 0) {
            Drivetrain.drive(forward);
        } else if (Controller1.Axis3.position() < 0) {
            Drivetrain.drive(reverse);
        // Press A to use the controller configured actions
        } else if (Controller1.ButtonA.pressing()) {
            break;
        } else {
            Drivetrain.stop();
        }
        wait(20, msec);
    }
    RemoteControlCodeEnabled = true;
}
获取器#
.pressing#
.pressing returns an integer indicating whether a specific button on the controller is currently being pressed. This method must be called on a specific button object, such as ButtonDown (see full list of button objects below).
1— The specified button is being pressed.0— The specified button is not being pressed.
用法:
此方法可以使用十二种可用按钮对象之一,如下所示:
按钮 |
命令 |
|---|---|
|
|
|
|
|
|
|
|
|
|
|
|
|
|
|
|
|
|
|
|
|
|
|
|
参数 |
描述 |
|---|---|
此方法没有参数。 |
int main() {
    // Initializing Robot Configuration. DO NOT REMOVE!
    vexcodeInit();
    // Turn right while L1 is pressed
    while (true) {
        if (Controller1.ButtonL1.pressing()) {
            Drivetrain.turn(right);
        } else {
            Drivetrain.stop();
        }
        wait(5, msec);
    }
}
.position#
.position returns the position of the joystick’s specified axis as an integer from —100 to 100, representing a percentage. This method must be called on a specific axis object, such as Axis1 (see full list of axis objects below).
用法:
该方法可以使用以下四个可用坐标轴之一:
轴 |
命令 |
|---|---|
|
|
|
|
|
|
|
|
参数 |
描述 |
|---|---|
此方法没有参数。 |
int main() {
    // Initializing Robot Configuration. DO NOT REMOVE!
    vexcodeInit();

    // Turn with the left joystick
    RemoteControlCodeEnabled = false;

    while (true) {
        if (Controller1.Axis4.position() > 10) {
            Drivetrain.turn(right);
        } else if (Controller1.Axis4.position() < -10) {
            Drivetrain.turn(left);
        } else {
            Drivetrain.stop();
        }
        wait(20, msec);
    }
}
column#
column returns the current column where text will be printed as an integer.
用法:
Controller.Screen.column()
参数 |
描述 |
|---|---|
此方法没有参数。 |
int main() {
    // Initializing Robot Configuration. DO NOT REMOVE!
    vexcodeInit();

    // Clear screen
    Controller1.Screen.clearScreen();

    // Print the column number on row 2, column 3.
    Controller1.Screen.setCursor(2, 3);
    Controller1.Screen.print(Controller1.Screen.column());
}
row#
row returns the current row where text will be printed as an integer.
用法:
Controller.Screen.row()
参数 |
描述 |
|---|---|
此方法没有参数。 |
int main() {
    // Initializing Robot Configuration. DO NOT REMOVE!
    vexcodeInit();

    // Clear screen
    Controller1.Screen.clearScreen();

    // Print the column number on row 2, column 3.
    Controller1.Screen.setCursor(2, 3);
    Controller1.Screen.print(Controller1.Screen.row());
}
打回来#
.pressed#
.pressed registers a callback function that runs when a specific button on the controller is pressed. This method must be called on a specific button object, such as ButtonDown — (see full list of button objects below).
用法:
此方法可以使用一个可用的按钮对象,如下所示:
按钮 |
命令 |
|---|---|
|
|
|
|
|
|
|
|
|
|
|
|
|
|
|
|
|
|
|
|
|
|
|
|
参数 |
描述 |
|---|---|
|
预先定义的回调函数,当轴值发生变化时会自动调用。该函数必须符合所需的回调函数签名。有关更多信息,请参阅回调函数。 |
Callback Signature:
void callback();
论点 |
描述 |
|---|---|
此回调函数没有参数。 |
// Drive forward when A is pressed
void driveForward() {
    Drivetrain.driveFor(forward, 100, mm);
}

int main() {
    // Initializing Robot Configuration. DO NOT REMOVE!
    vexcodeInit();
    // Call driveForward when the A button is pressed
    Controller1.ButtonA.pressed(driveForward);
}
.released#
.released registers a callback function that runs when a specific button on the controller is released. This method must be called on a specific button object, such as ButtonDown — (see full list of button objects below).
用法:
此方法可以使用一个可用的按钮对象,如下所示:
按钮 |
命令 |
|---|---|
|
|
|
|
|
|
|
|
|
|
|
|
|
|
|
|
|
|
|
|
|
|
|
|
参数 |
描述 |
|---|---|
|
预先定义的回调函数,当轴值发生变化时会自动调用。该函数必须符合所需的回调函数签名。有关更多信息,请参阅回调函数。 |
Callback Signature:
void callback();
论点 |
描述 |
|---|---|
此回调函数没有参数。 |
// Drive backward when A is released
void backUp() {
    Drivetrain.driveFor(reverse, 100, mm);
}

int main() {
    // Initializing Robot Configuration. DO NOT REMOVE!
    vexcodeInit();
    // Call backUp when the A button is released
    Controller1.ButtonA.released(backUp);
}
.changed#
.changed registers a callback function that runs when the joystick’s position changes. This method must be called on a specific axis object, such as Axis1 (see full list of axis objects below).
用法:
此方法可以使用以下所示的四个可用轴之一:
轴 |
命令 |
|---|---|
|
|
|
|
|
|
|
|
参数 |
描述 |
|---|---|
|
预先定义的回调函数,当轴值发生变化时会自动调用。该函数必须符合所需的回调函数签名。有关更多信息,请参阅回调函数。 |
Callback Signature:
void callback();
论点 |
描述 |
|---|---|
此回调函数没有参数。 |
// Play a rumble pattern when the left joystick moves
void rumblePattern() {
    Controller1.rumble("..--");
    wait(1, seconds);
}

int main() {
    // Initializing Robot Configuration. DO NOT REMOVE!
    vexcodeInit();
    // Call the rumble function when the left joystick moves
    Controller1.Axis4.changed(rumblePattern);
}
构造函数#
Constructors are used to manually create controller objects, which are necessary for configuring a controller outside of VEXcode. You can only create two controllers in a project.
controller#
controller creates a controller.
Usage:
controller Controller = controller(controller_type);
参数 |
描述 |
|---|---|
|
The type of controller to create.
|
// Create a controller
controller Controller = controller(primary);
// Create two controllers
controller Controller1 = controller(primary);
controller Controller2 = controller(partner);