Controller#
Introduction#
The V5 Controller has buttons, two joysticks, a rumble motor, and a screen. Controller methods can be used to check button presses, read joystick movement, rumble the Controller, enable or disable configured Controller actions, run functions when Controller events happen, or display text on the Controller screen.
Configured Controller actions are controller behaviors set in the Devices menu. Use remote_control_code_enabled to temporarily enable or disable those configured actions during a project.
This page uses controller_1 as the example Controller name. Replace it with your own configured name as needed.
Below is a list of all available methods:
Actions — Rumble the Controller or enable/disable configured Controller actions.
rumble— Plays a rumble pattern on the Controller.remote_control_code_enabled— Enables or disables Controller actions configured in the Devices menu.
Screen — Display text and numbers on the Controller screen.
print— Displays text, numbers, or variable values on the Controller screen.set_cursor— Moves the cursor to a specified row and column on the Controller screen.column— Returns the current cursor column on the Controller screen.row— Returns the current cursor row on the Controller screen.clear_screen— Clears the Controller screen.clear_row— Clears one row on the Controller screen.next_row— Moves the cursor to the next row on the Controller screen.
Getters — Read button states and joystick positions.
.pressing— Returns whether a specified button is being pressed..position— Returns the position of a specified joystick axis.
Callbacks — Run functions when Controller input changes.
.pressed— Runs a function when a specified button is pressed..released— Runs a function when a specified button is released..changed— Runs a function when the joystick’s position changes along a specified axis.
Constructor — Manually create a Controller object.
Controller— Creates a Controller object.
Actions#
rumble#
rumble plays a rumble pattern on the Controller. In the pattern string, periods are short rumbles, hyphens are long rumbles, and spaces are pauses.
Usage:
controller_1.rumble(pattern)
Parameter |
Description |
|---|---|
|
A string made of periods, hyphens, and spaces that represent the rumble pattern. |
# Rumble the Controller with a short-short-long-long pattern
controller_1.rumble("..--")
remote_control_code_enabled#
remote_control_code_enabled is a variable that enables or disables Controller actions configured in the Devices menu. Controller configured actions are enabled by default.
Usage:
remote_control_code_enabled = state
Value |
Description |
|---|---|
|
Enables Controller configured actions. |
|
Disables Controller configured actions. |
# Drive forward or backward using the left joystick
remote_control_code_enabled = False

while True:
    if controller_1.axis3.position() > 0:
        drivetrain.drive(FORWARD)
    elif controller_1.axis3.position() < 0:
        drivetrain.drive(REVERSE)
    # Press A to use Controller configured actions again
    elif controller_1.buttonA.pressing():
        break
    else:
        drivetrain.stop()

    wait(20, MSEC)

remote_control_code_enabled = True
Screen#
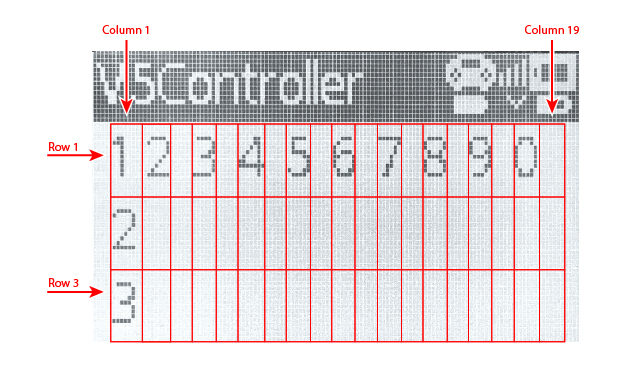
The V5 Controller screen has 3 rows and 19 columns for displaying text and numbers.
print#
controller_1.screen.print displays text, numbers, or variable values on the Controller screen using the current cursor position.
Usage:
controller_1.screen.print(value, sep, precision)
Parameter |
Description |
|---|---|
|
The text, number, or variable value to display on the Controller screen. More than one value can be printed by separating values with commas. |
|
Optional. A string to place between values. This must be written as a keyword argument, such as |
|
Optional. The number of decimal places to display when printing simple numbers. This must be written as a keyword argument, such as |
# Print a number on the Controller screen
controller_1.screen.print(1)
# Print multiple numbers separated by hyphens
controller_1.screen.print(1, 2, 3, 4, sep="-")
# Print a number using one decimal place
controller_1.screen.print(1 / 3, precision=1)
set_cursor#
set_cursor moves the cursor to a specified row and column on the Controller screen. The next printed value will appear at that position.
Usage:
controller_1.screen.set_cursor(row, col)
Parameter |
Description |
|---|---|
|
The row of the cursor, from |
|
The column of the cursor, from |
# Print text at row 2, column 1
controller_1.screen.set_cursor(2, 1)
controller_1.screen.print("Ready")
column#
column returns the current column where text will be printed on the Controller screen.
Usage:
controller_1.screen.column()
Parameters |
Description |
|---|---|
This method has no parameters. |
# Print the current column number
controller_1.screen.set_cursor(2, 3)
controller_1.screen.print(controller_1.screen.column())
row#
row returns the current row where text will be printed on the Controller screen.
Usage:
controller_1.screen.row()
Parameters |
Description |
|---|---|
This method has no parameters. |
# Print the current row number
controller_1.screen.set_cursor(2, 3)
controller_1.screen.print(controller_1.screen.row())
clear_screen#
clear_screen clears the Controller screen and moves the cursor back to the starting position.
Usage:
controller_1.screen.clear_screen()
Parameters |
Description |
|---|---|
This method has no parameters. |
# Print text, then clear the Controller screen
controller_1.screen.print("VEX V5")
wait(2, SECONDS)
controller_1.screen.clear_screen()
clear_row#
clear_row clears one row on the Controller screen.
Usage:
controller_1.screen.clear_row(row)
Parameter |
Description |
|---|---|
|
Optional. The row to clear, from |
# Clear row 2 on the Controller screen
controller_1.screen.clear_row(2)
next_row#
next_row moves the cursor to column 1 on the next row of the Controller screen. The next printed value will appear on that row.
Usage:
controller_1.screen.next_row()
Parameters |
Description |
|---|---|
This method has no parameters. |
# Print on two rows
controller_1.screen.print("VEX V5")
controller_1.screen.next_row()
controller_1.screen.print("Controller")
Getters#
.pressing#
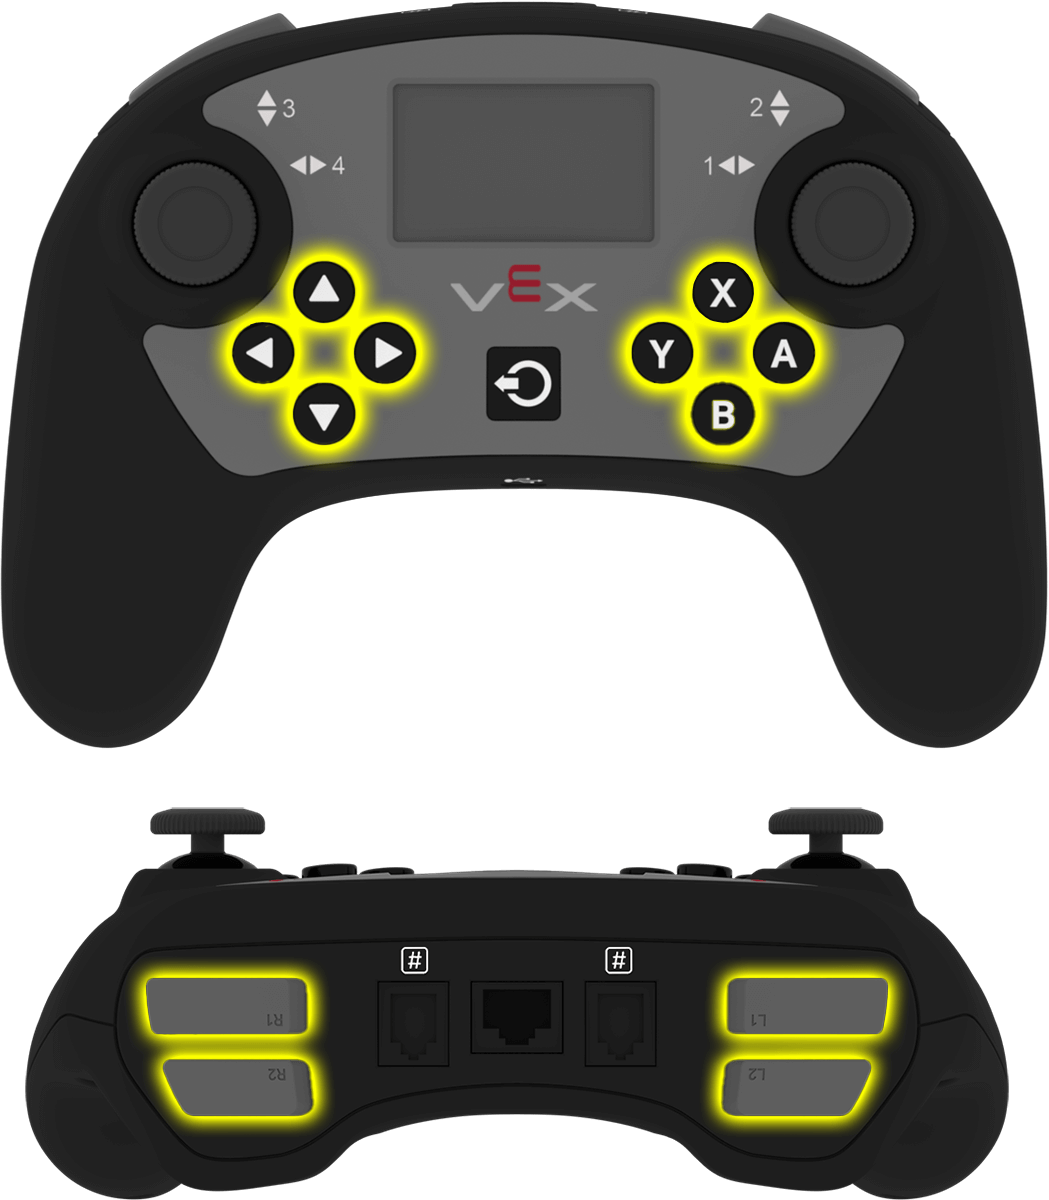
.pressing returns whether a specific button on the Controller is currently being pressed. This method must be called on a specific button object, such as controller_1.buttonA.
True— The specified button is being pressed.False— The specified button is not being pressed.
Usage:
One of the available button objects can be used with this method:
Button |
Command |
|---|---|
|
|
|
|
|
|
|
|
|
|
|
|
|
|
|
|
|
|
|
|
|
|
|
|
Parameters |
Description |
|---|---|
This method has no parameters. |
# Turn right while L1 is pressed
while True:
    if controller_1.buttonL1.pressing():
        drivetrain.turn(RIGHT)
    else:
        drivetrain.stop()

    wait(20, MSEC)
.position#
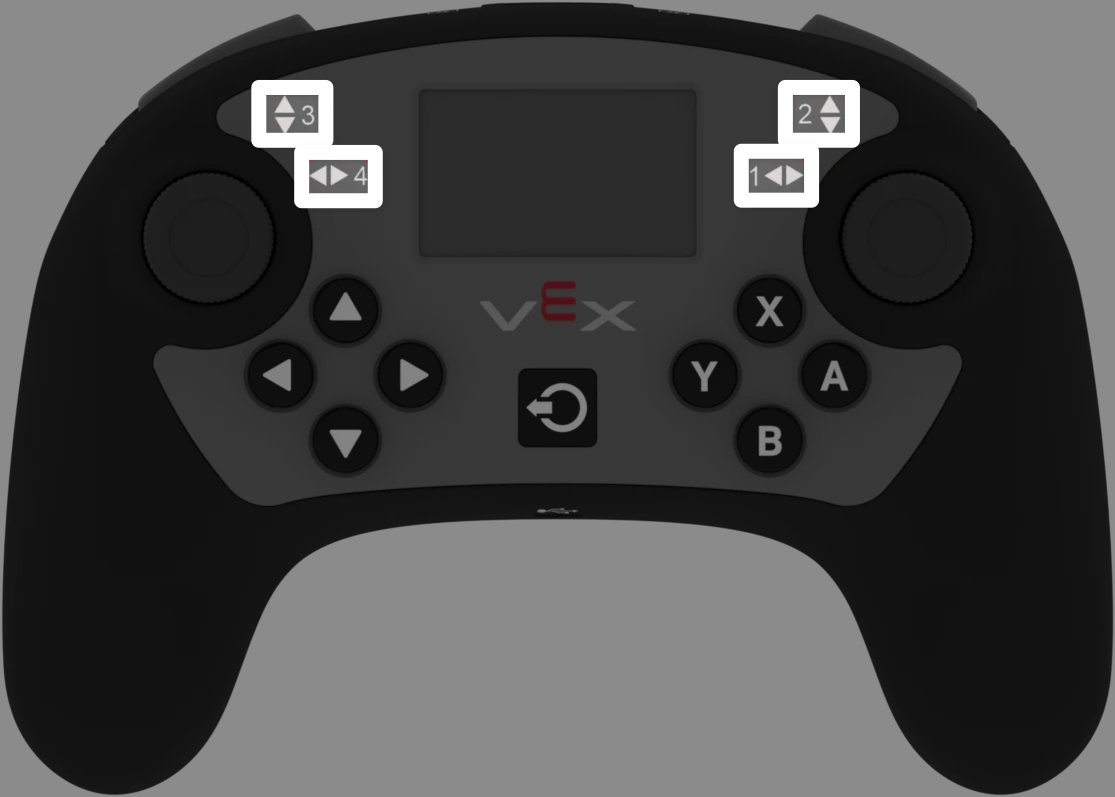
.position returns the position of a joystick axis as a number from -100 to 100.
This method must be called on a specific axis object, such as controller_1.axis1.
Usage:
One of the available axis objects can be used with this method:
Axis |
Command |
|---|---|
|
|
|
|
|
|
|
|
Parameters |
Description |
|---|---|
This method has no parameters. |
# Turn with the left joystick
remote_control_code_enabled = False

while True:
    if controller_1.axis4.position() > 10:
        drivetrain.turn(RIGHT)
    elif controller_1.axis4.position() < -10:
        drivetrain.turn(LEFT)
    else:
        drivetrain.stop()

    wait(20, MSEC)
Callbacks#
.pressed#
.pressed runs a function when the specified button is pressed. Once it is used, the function will run automatically each time that button is pressed.
Usage:
One of the available button objects can be used with this method:
Button |
Command |
|---|---|
|
|
|
|
|
|
|
|
|
|
|
|
|
|
|
|
|
|
|
|
|
|
|
|
Parameter |
Description |
|---|---|
|
A previously defined function to run each time the specified button is pressed. |
|
Optional. A tuple containing arguments to pass to the callback function. See Using Events with Parameters for more information. |
# Drive forward when A is pressed
def drive_forward():
    drivetrain.drive_for(FORWARD, 100, MM)

controller_1.buttonA.pressed(drive_forward)
.released#
.released runs a function when the specified button is released. Once it is used, the function will run automatically each time that button is released.
Usage:
One of the available button objects can be used with this method:
Button |
Command |
|---|---|
|
|
|
|
|
|
|
|
|
|
|
|
|
|
|
|
|
|
|
|
|
|
|
|
Parameter |
Description |
|---|---|
|
A previously defined function to run each time the specified button is released. |
|
Optional. A tuple containing arguments to pass to the callback function. See Using Events with Parameters for more information. |
# Drive backward when A is released
def back_up():
    drivetrain.drive_for(REVERSE, 100, MM)

controller_1.buttonA.released(back_up)
.changed#
.changed runs a function when the joystick’s position changes along the specified axis. Once it is used, the function will run automatically each time the joystick’s position changes along that axis.
Usage:
One of the available axis objects can be used with this method:
Axis |
Command |
|---|---|
|
|
|
|
|
|
|
|
Parameter |
Description |
|---|---|
|
A previously defined function to run each time the joystick’s position changes along the specified axis. |
|
Optional. A tuple containing arguments to pass to the callback function. See Using Events with Parameters for more information. |
# Play a sound when the left joystick moves
def tada_sound():
    brain.play_sound(SoundType.TADA)

controller_1.axis4.changed(tada_sound)
Constructors#
Controller#
Controller creates a Controller object. Manually creating a Controller object is only needed when configuring a controller outside of VEXcode.
Usage:
Controller(controller_type)
Parameter |
Description |
|---|---|
|
Optional. The Controller type to create: |
# Create the primary Controller
controller_1 = Controller(PRIMARY)
# Create a partner Controller
controller_2 = Controller(PARTNER)