Controlador#
Introducción#
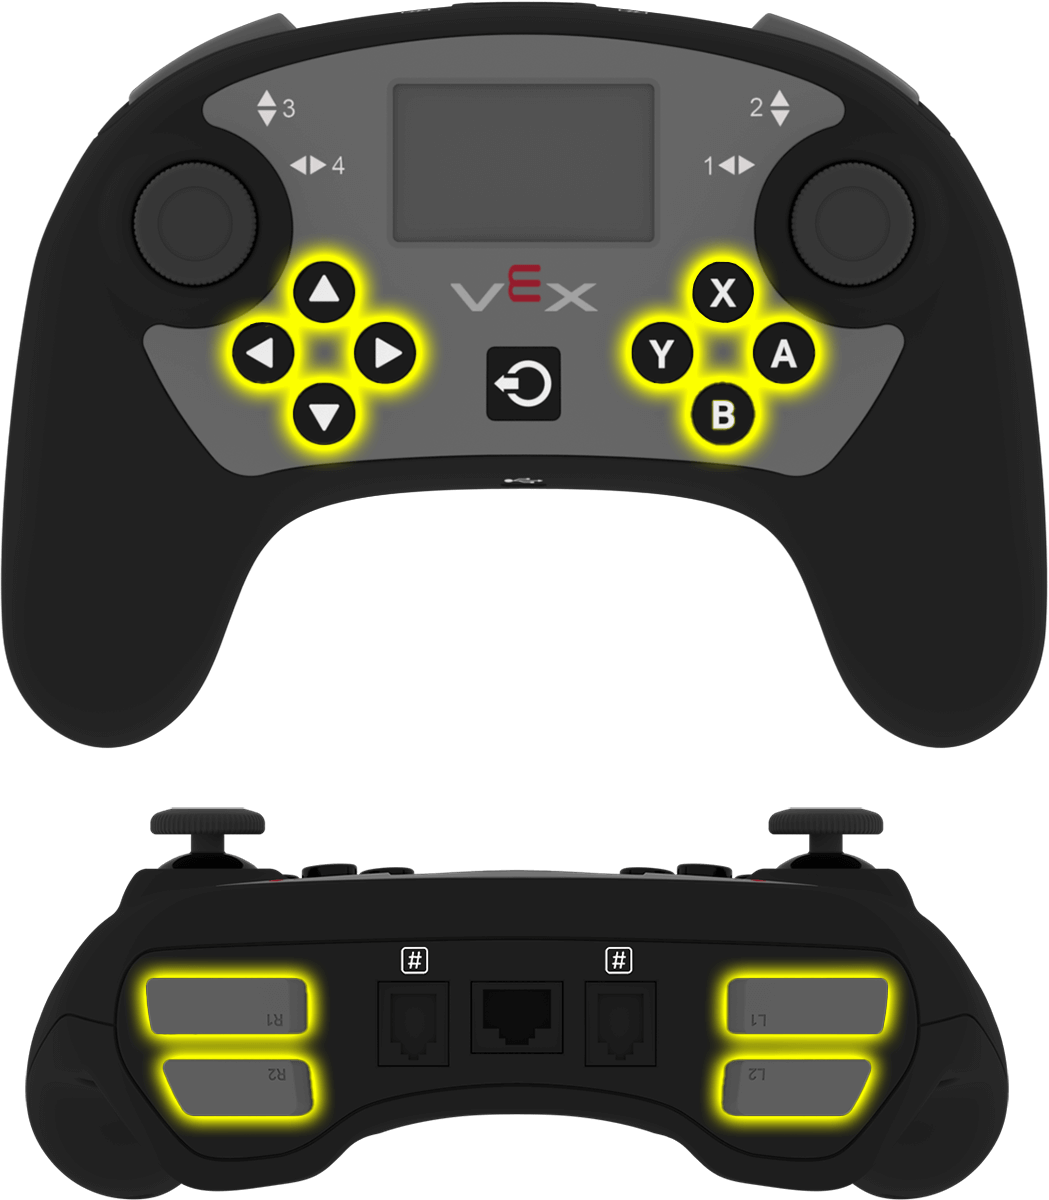
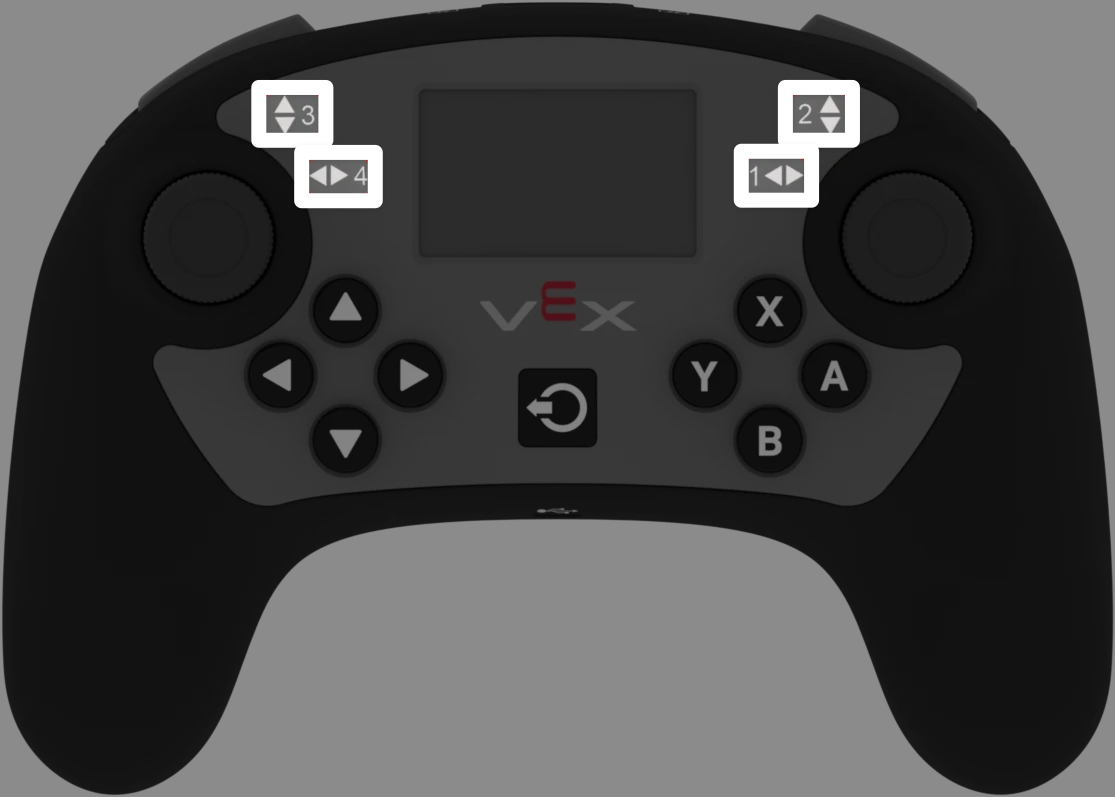
El controlador V5 cuenta con botones, dos joysticks, un motor de vibración y una pantalla. Los métodos del controlador permiten comprobar las pulsaciones de los botones, leer el movimiento de los joysticks, activar la vibración del controlador, habilitar o deshabilitar las acciones configuradas, ejecutar funciones cuando se producen eventos en el controlador o mostrar texto en la pantalla.
Configured Controller actions are controller behaviors set in the Devices menu. Use remote_control_code_enabled to temporarily enable or disable those configured actions during a project.
This page uses controller_1 as the example Controller name. Replace it with your own configured name as needed.
A continuación se muestra una lista de todos los métodos disponibles:
Acciones: Activar el controlador o habilitar/deshabilitar las acciones configuradas del controlador.
rumble— Plays a rumble pattern on the Controller.remote_control_code_enabled— Enables or disables Controller actions configured in the Devices menu.
Pantalla: muestra texto y números en la pantalla del controlador.
print— Displays text, numbers, or variable values on the Controller screen.set_cursor— Moves the cursor to a specified row and column on the Controller screen.column— Returns the current cursor column on the Controller screen.row— Returns the current cursor row on the Controller screen.clear_screen— Clears the Controller screen.clear_row— Clears one row on the Controller screen.next_row— Moves the cursor to the next row on the Controller screen.
Funciones de obtención: leen el estado de los botones y la posición del joystick.
.pressing— Returns whether a specified button is being pressed..position— Returns the position of a specified joystick axis.
Funciones de devolución de llamada: ejecutan funciones cuando cambia la entrada del controlador.
.pressed— Runs a function when a specified button is pressed..released— Runs a function when a specified button is released..changed— Runs a function when the joystick’s position changes along a specified axis.
Constructor: crea manualmente un objeto Controller.
Controller— Creates a Controller object.
Comportamiento#
rumble#
rumble plays a rumble pattern on the Controller. In the pattern string, periods are short rumbles, hyphens are long rumbles, and spaces are pauses.
Usage:
controller_1.rumble(pattern)
Parámetro |
Descripción |
|---|---|
|
Una cadena formada por puntos, guiones y espacios que representan el patrón de vibración. |
# Rumble the Controller with a short-short-long-long pattern
controller_1.rumble("..--")
remote_control_code_enabled#
remote_control_code_enabled is a variable that enables or disables Controller actions configured in the Devices menu. Controller configured actions are enabled by default.
Usage:
remote_control_code_enabled = state
Valor |
Descripción |
|---|---|
|
Habilita las acciones configuradas por el controlador. |
|
Deshabilita las acciones configuradas por el controlador. |
# Drive forward or backward using the left joystick
remote_control_code_enabled = False

while True:
    if controller_1.axis3.position() > 0:
        drivetrain.drive(FORWARD)
    elif controller_1.axis3.position() < 0:
        drivetrain.drive(REVERSE)
    # Press A to use Controller configured actions again
    elif controller_1.buttonA.pressing():
        break
    else:
        drivetrain.stop()

    wait(20, MSEC)

remote_control_code_enabled = True
Pantalla#
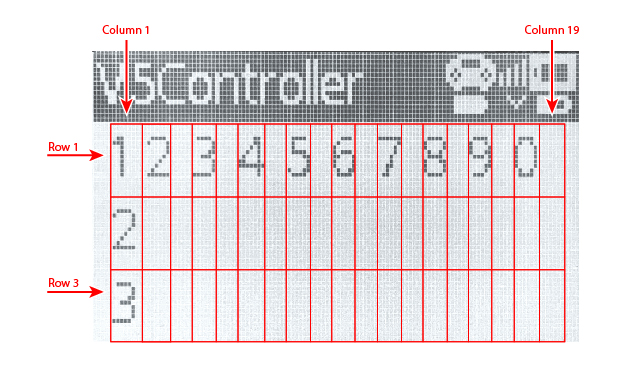
La pantalla del controlador V5 tiene 3 filas y 19 columnas para mostrar texto y números.
print#
controller_1.screen.print displays text, numbers, or variable values on the Controller screen using the current cursor position.
Usage:
controller_1.screen.print(value, sep, precision)
Parámetro |
Descripción |
|---|---|
|
Texto, número o valor de variable que se mostrará en la pantalla del controlador. Se pueden imprimir varios valores separándolos con comas. |
|
Optional. A string to place between values. This must be written as a keyword argument, such as |
|
Optional. The number of decimal places to display when printing simple numbers. This must be written as a keyword argument, such as |
# Print a number on the Controller screen
controller_1.screen.print(1)
# Print multiple numbers separated by hyphens
controller_1.screen.print(1, 2, 3, 4, sep="-")
# Print a number using one decimal place
controller_1.screen.print(1 / 3, precision=1)
set_cursor#
set_cursor moves the cursor to a specified row and column on the Controller screen. The next printed value will appear at that position.
Usage:
controller_1.screen.set_cursor(row, col)
Parámetro |
Descripción |
|---|---|
|
The row of the cursor, from |
|
The column of the cursor, from |
# Print text at row 2, column 1
controller_1.screen.set_cursor(2, 1)
controller_1.screen.print("Ready")
column#
column returns the current column where text will be printed on the Controller screen.
Usage:
controller_1.screen.column()
Parámetros |
Descripción |
|---|---|
Este método no tiene parámetros. |
# Print the current column number
controller_1.screen.set_cursor(2, 3)
controller_1.screen.print(controller_1.screen.column())
row#
row returns the current row where text will be printed on the Controller screen.
Usage:
controller_1.screen.row()
Parámetros |
Descripción |
|---|---|
Este método no tiene parámetros. |
# Print the current row number
controller_1.screen.set_cursor(2, 3)
controller_1.screen.print(controller_1.screen.row())
clear_screen#
clear_screen clears the Controller screen and moves the cursor back to the starting position.
Usage:
controller_1.screen.clear_screen()
Parámetros |
Descripción |
|---|---|
Este método no tiene parámetros. |
# Print text, then clear the Controller screen
controller_1.screen.print("VEX V5")
wait(2, SECONDS)
controller_1.screen.clear_screen()
clear_row#
clear_row clears one row on the Controller screen.
Usage:
controller_1.screen.clear_row(row)
Parámetro |
Descripción |
|---|---|
|
Optional. The row to clear, from |
# Clear row 2 on the Controller screen
controller_1.screen.clear_row(2)
next_row#
next_row moves the cursor to column 1 on the next row of the Controller screen. The next printed value will appear on that row.
Usage:
controller_1.screen.next_row()
Parámetros |
Descripción |
|---|---|
Este método no tiene parámetros. |
# Print on two rows
controller_1.screen.print("VEX V5")
controller_1.screen.next_row()
controller_1.screen.print("Controller")
Captadores#
.pressing#
.pressing returns whether a specific button on the Controller is currently being pressed. This method must be called on a specific button object, such as controller_1.buttonA.
True— The specified button is being pressed.False— The specified button is not being pressed.
Uso:
Se puede utilizar uno de los objetos de botón disponibles con este método:
Botón |
Dominio |
|---|---|
|
|
|
|
|
|
|
|
|
|
|
|
|
|
|
|
|
|
|
|
|
|
|
|
Parámetros |
Descripción |
|---|---|
Este método no tiene parámetros. |
# Turn right while L1 is pressed
while True:
    if controller_1.buttonL1.pressing():
        drivetrain.turn(RIGHT)
    else:
        drivetrain.stop()

    wait(20, MSEC)
.position#
.position returns the position of a joystick axis as a number from -100 to 100.
This method must be called on a specific axis object, such as controller_1.axis1.
Uso:
Se puede utilizar uno de los objetos de eje disponibles con este método:
Eje |
Dominio |
|---|---|
|
|
|
|
|
|
|
|
Parámetros |
Descripción |
|---|---|
Este método no tiene parámetros. |
# Turn with the left joystick
remote_control_code_enabled = False

while True:
    if controller_1.axis4.position() > 10:
        drivetrain.turn(RIGHT)
    elif controller_1.axis4.position() < -10:
        drivetrain.turn(LEFT)
    else:
        drivetrain.stop()

    wait(20, MSEC)
Devoluciones de llamada#
.pressed#
.pressed runs a function when the specified button is pressed. Once it is used, the function will run automatically each time that button is pressed.
Uso:
Se puede utilizar uno de los objetos de botón disponibles con este método:
Botón |
Dominio |
|---|---|
|
|
|
|
|
|
|
|
|
|
|
|
|
|
|
|
|
|
|
|
|
|
|
|
Parámetro |
Descripción |
|---|---|
|
Una función definida previamente para ejecutarse cada vez que se presione el botón especificado. |
|
Opcional. Una tupla que contiene los argumentos que se pasarán a la función de devolución de llamada. Consulte Uso de eventos con parámetros para obtener más información. |
# Drive forward when A is pressed
def drive_forward():
    drivetrain.drive_for(FORWARD, 100, MM)

controller_1.buttonA.pressed(drive_forward)
.released#
.released runs a function when the specified button is released. Once it is used, the function will run automatically each time that button is released.
Uso:
Se puede utilizar uno de los objetos de botón disponibles con este método:
Botón |
Dominio |
|---|---|
|
|
|
|
|
|
|
|
|
|
|
|
|
|
|
|
|
|
|
|
|
|
|
|
Parámetro |
Descripción |
|---|---|
|
Una función definida previamente para ejecutarse cada vez que se suelte el botón especificado. |
|
Opcional. Una tupla que contiene los argumentos que se pasarán a la función de devolución de llamada. Consulte Uso de eventos con parámetros para obtener más información. |
# Drive backward when A is released
def back_up():
    drivetrain.drive_for(REVERSE, 100, MM)

controller_1.buttonA.released(back_up)
.changed#
.changed runs a function when the joystick’s position changes along the specified axis. Once it is used, the function will run automatically each time the joystick’s position changes along that axis.
Uso:
Se puede utilizar uno de los objetos de eje disponibles con este método:
Eje |
Dominio |
|---|---|
|
|
|
|
|
|
|
|
Parámetro |
Descripción |
|---|---|
|
Una función definida previamente para ejecutarse cada vez que la posición del joystick cambie a lo largo del eje especificado. |
|
Opcional. Una tupla que contiene los argumentos que se pasarán a la función de devolución de llamada. Consulte Uso de eventos con parámetros para obtener más información. |
# Play a sound when the left joystick moves
def tada_sound():
    brain.play_sound(SoundType.TADA)

controller_1.axis4.changed(tada_sound)
Constructores#
Controller#
Controller creates a Controller object. Manually creating a Controller object is only needed when configuring a controller outside of VEXcode.
Usage:
Controller(controller_type)
Parámetro |
Descripción |
|---|---|
|
Optional. The Controller type to create: |
# Create the primary Controller
controller_1 = Controller(PRIMARY)
# Create a partner Controller
controller_2 = Controller(PARTNER)