Controller#
Introduction#
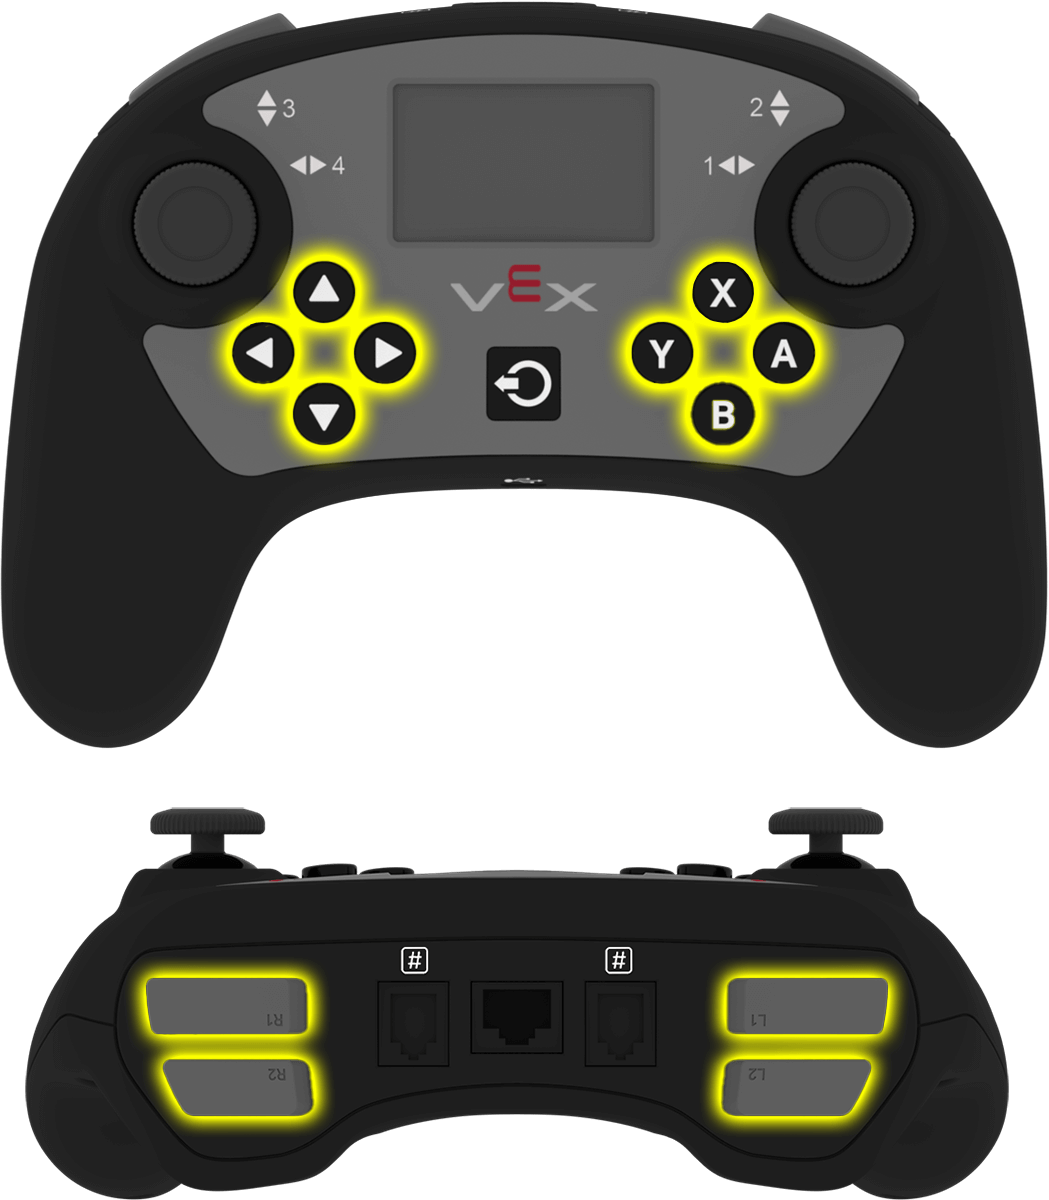
The V5 Controller has buttons, two joysticks, a rumble motor, and a screen. Controller blocks can be used to check button presses, read joystick movement, rumble the Controller, enable or disable configured Controller actions, run blocks when Controller events happen, or display text on the Controller screen.
Configured Controller actions are controller behaviors set in the Devices menu. Use the Controller enable/disable block to temporarily enable or disable those configured actions during a project.
Below is a list of available blocks:
Values — Check Controller button status or read joystick position.
Controller pressed? — Returns whether a selected Controller button is being pressed.
Controller position — Returns the joystick position along a selected axis.
Actions — Rumble the Controller, enable/disable configured Controller actions, or run blocks when Controller input changes.
play rumble on controller — Plays a rumble pattern on a Controller.
Controller enable/disable — Enables or disables Controller actions configured in the Devices menu for all connected controllers.
when Controller button pressed — Runs the attached stack when a selected button is pressed or released.
when Controller axis is changed — Runs the attached stack when a joystick’s position changes along the selected axis.
Screen — Display text and numbers on the Controller screen.
print on controller — Displays text, numbers, or variable values on the Controller screen.
set cursor to row column on controller — Moves the cursor to a specified row and column on the Controller screen.
set cursor to next row on controller — Moves the cursor to the next row on the Controller screen.
set print precision on controller — Sets how many decimal places are displayed when numbers are printed on the Controller screen.
clear controller — Clears all rows on the Controller screen.
clear row on controller — Clears one row on the Controller screen.
Values#
Controller pressed?#
The Controller pressed? Boolean block returns whether a selected Controller button is being pressed.
<[Controller1 v] [▲ v] pressed?>
Parameter |
Description |
|---|---|
device |
The Controller to use, configured in the Devices window. |
button |
The button to check:
|
Example
    when started
    [Drive forward while X is pressed.]
    forever
        if <[Controller1 v] [X v] pressed?> then
            drive [forward v]
        else
            stop driving
        end
    end
Controller position#
The Controller position reporter block returns the joystick position along a selected axis as a number from -100 to 100.
([Controller1 v] [1 v] position :: sensing)
Parameter |
Description |
|---|---|
device |
The Controller to use, configured in the Devices window. |
axis |
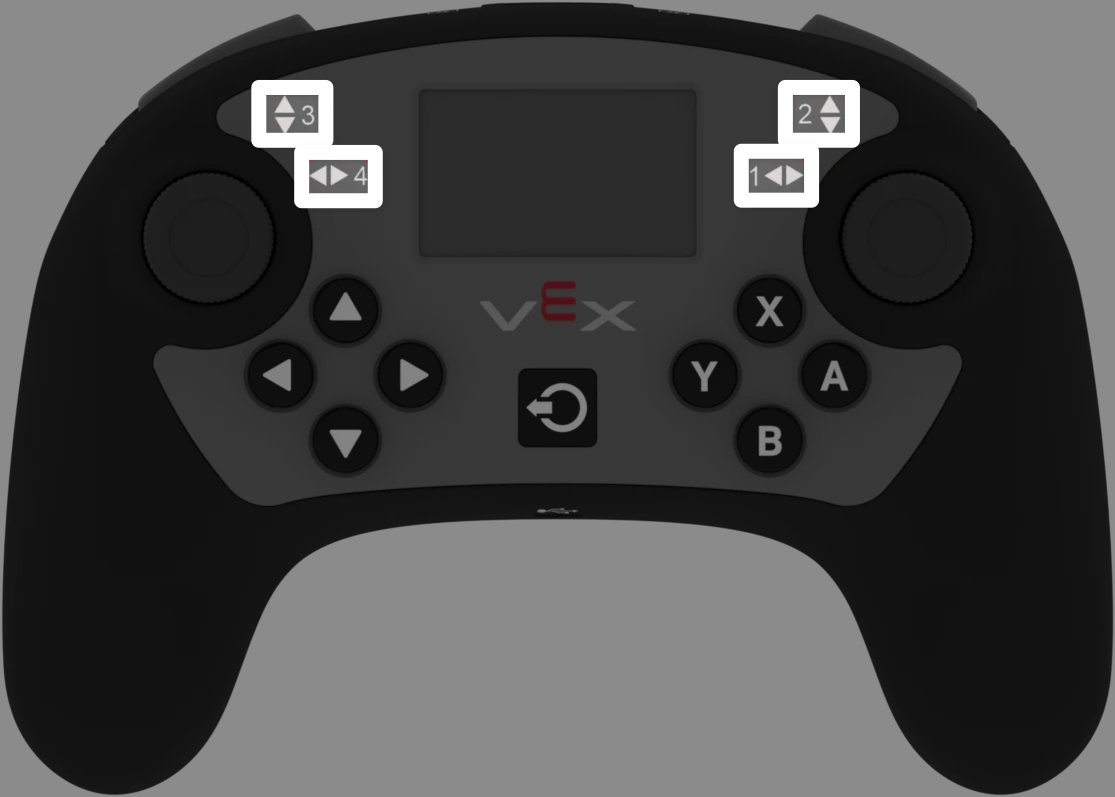
The joystick axis to report:
|
Example
    when started
    [Drive forward while the left joystick is pushed up.]
    forever
        if <([Controller1 v] [3 v] position :: sensing) [math_greater_than v] [0]> then
            drive [forward v]
        else
            stop driving
        end
    end
Actions#
play rumble on controller#
The play rumble on controller stack block plays a rumble pattern on the Controller.
play rumble [Long v] on [Controller1 v]
Parameter |
Description |
|---|---|
pattern |
The rumble pattern to play on the Controller:
|
device |
The Controller to use, configured in the Devices window. |
Example
    when [Controller1 v] button [R1 v] [pressed v] :: hat events
    play rumble [Short v] on [Controller1 v]
Controller enable/disable#
The Controller enable/disable stack block enables or disables Controller configured actions from the Devices menu for all connected controllers.
Controller [Disable v]
Parameter |
Description |
|---|---|
state |
The Controller configured action state: Disable or Enable. |
Example
    when started
    [Disable Controller configured actions until the drive movement is done.]
    Controller [Disable v]
    drive [forward v] for (6) [inches v] ▶
    Controller [Enable v]
when Controller button pressed#
The when Controller button pressed Hat block runs the attached stack when a selected Controller button is pressed or released.
when [Controller1 v] button [▲ v] [pressed v] :: hat events
Parameter |
Description |
|---|---|
device |
The Controller to use, configured in the Devices window. |
button |
The button to check:
|
button status |
The button event that triggers the attached stack: pressed or released. |
Example
    when [Controller1 v] button [R1 v] [pressed v] :: hat events
    [Drive forward when R1 is pressed.]
    drive [forward v] for (200) [mm v] ▶
when Controller axis is changed#
The when Controller axis is changed Hat block runs the attached stack when a joystick’s position changes along the selected axis.
when [Controller1 v] axis [1 v] is changed :: hat events
Parameter |
Description |
|---|---|
device |
The Controller to use, configured in the Devices window. |
axis |
The joystick axis to check:
|
Example
    when [Controller1 v] axis [3 v] is changed :: hat events
    [Drive forward when the joystick's position changes along axis 3.]
    drive [forward v] for (200) [mm v] ▶
Screen#
print on controller#
The print on controller stack block displays text, numbers, or variable values on the Controller screen at the current cursor position.
print [VEXcode] on [Controller1 v] ▶ :: custom-controller-inertial-timer
Parameter |
Description |
|---|---|
value |
The text, number, or variable value to display on the Controller screen. |
device |
The Controller to use, configured in the Devices window. |
expanding arrow |
Expands the block to include and set cursor to next row, which moves the cursor to the next row after the value is printed. If this option is not used, the next printed value appears immediately after the previous value on the same row. |
Example
    when started
    [Display a message on the Controller screen.]
    print [Hello, robot!] on [Controller1 v] ▶ :: custom-controller-inertial-timer
set cursor to row column on controller#
The set cursor to row column on controller stack block moves the cursor to a specified row and column on the Controller screen. The next printed value will appear at that position.
set cursor to row [1] column [1] on [Controller1 v] :: custom-controller-inertial-timer
Parameter |
Description |
|---|---|
row |
The row to move the cursor to on the Controller screen. |
column |
The column to move the cursor to on the Controller screen. |
device |
The Controller to use, configured in the Devices window. |
Example
    when started
    [Display a message on row 2.]
    set cursor to row [2] column [1] on [Controller1 v] :: custom-controller-inertial-timer
    print [Ready] on [Controller1 v] ▶ :: custom-controller-inertial-timer
set cursor to next row on controller#
The set cursor to next row on controller stack block moves the cursor to column 1 on the next row of the Controller screen. The next printed value will appear on that row.
set cursor to next row on [Controller1 v] :: custom-controller-inertial-timer
Parameter |
Description |
|---|---|
device |
The Controller to use, configured in the Devices window. |
Example
    when started
    [Display two rows of text.]
    print [Row 1] on [Controller1 v] ▶ :: custom-controller-inertial-timer
    set cursor to next row on [Controller1 v] :: custom-controller-inertial-timer
    print [Row 2] on [Controller1 v] ▶ :: custom-controller-inertial-timer
set print precision on controller#
The set print precision on controller stack block sets how many decimal places are displayed when numbers are printed on the Controller screen. This setting applies to numbers printed after this block is used.
set print precision to [0.1 v] on [Controller1 v] :: custom-controller-inertial-timer
Parameter |
Description |
|---|---|
precision |
The print precision to use:
|
device |
The Controller to use, configured in the Devices window. |
Example
    when started
    [Display 1/3 with two decimals.]
    set print precision to [0.01 v] on [Controller1 v] :: custom-controller-inertial-timer
    print ([1] [math_division v] [3]) on [Controller1 v] ▶ :: custom-controller-inertial-timer
clear controller#
The clear controller stack block clears all rows on the Controller screen and moves the cursor back to the first row.
clear [Controller1 v] :: custom-controller-inertial-timer
Parameter |
Description |
|---|---|
device |
The Controller to use, configured in the Devices window. |
Example
    when started
    [Clear the Controller screen after printing.]
    print [This will disappear...] on [Controller1 v] ▶ :: custom-controller-inertial-timer
    wait [2] seconds
    clear [Controller1 v] :: custom-controller-inertial-timer
clear row on controller#
The clear row on controller stack block clears a single row on the Controller screen.
clear row [1] on [Controller1 v] :: custom-controller-inertial-timer
Parameter |
Description |
|---|---|
row |
The row to clear on the Controller screen. |
device |
The Controller to use, configured in the Devices window. |
Example
    when started
    [Clear one row on the Controller screen.]
    print [Row 1] on [Controller1 v] ▶ :: custom-controller-inertial-timer
    set cursor to next row on [Controller1 v] :: custom-controller-inertial-timer
    print [Row 2] on [Controller1 v] ▶ :: custom-controller-inertial-timer
    wait [2] seconds
    clear row [1] on [Controller1 v] :: custom-controller-inertial-timer