Robot-Specific Blocks#
Introduction#
The Hero Bot, Huey, includes two motor options, the IQ AI Vision Sensor, the Optical Sensor, and the Touch LED.
All standard VEXcode VR Blocks are available for use in the VIQRC 25-26 Mix & Match Playground.
Below is a list of all available Robot-specific Blocks:
Drivetrain – Move and turn the robot.
Actions
drive — Moves the robot forward or reverse forever.
drive for — Moves the robot forward or reverse for a specific distance.
turn — Turns the robot left or right forever.
turn for — Turns the robot left or right for a specific number of degrees.
turn to heading — Turns the robot to face a specific heading.
turn to rotation — Turns the robot to a specific rotation.
stop driving — Stops the robot’s movement.
Settings
set drive velocity — Tells the robot how fast to drive.
set turn velocity — Tells the robot how fast to turn.
set drive heading — Changes the robot’s current heading to a new heading.
set drive rotation — Changes the robot’s current rotation to a new rotation.
set drive timeout — Sets how many seconds the robot will try to finish a movement.
Values
drive is done — Reports whether the robot is finished moving.
drive is moving — Reports whether the robot is moving.
drive heading — Reports the robot’s current heading from 0 to 359.99 degrees.
drive rotation — Reports the robot’s current rotation.
drive velocity — Reports how fast the robot is driving.
Motion – Move and track the robot’s motors.
Actions
spin motor – Spins a motor in one of its directions forever.
spin motor for – Spins a motor for a specific distance in degrees or turns.
spin motor to position – Spins a motor to a specific position.
stop motor – Stops a motor from spinning.
Settings
set motor velocity – Tells a motor how fast to spin.
set motor timeout – Sets how much time a motor will try to finish a movement.
set motor position – Changes the motor’s current position to a new value.
Values
motor is done – Reports whether the motor is finished moving.
motor is spinning – Reports whether the motor is spinning.
motor position – Reports the motor’s current position.
motor velocity – Reports how fast the motor is spinning, as a percentage from -100% to 100%.
AI Vision - Capture and analyze objects using the IQ AI Vision Sensor.
Actions
get object data - Captures data for a specific signature, such as a detected AI Classification.
Settings
set object item - Selects a specific object from the list.
Values
object exists - Returns whether any classification was detected.
object count - Returns how many objects were detected.
object property - Returns width, height, centerX, centerY, originX, or originY.
AI Classification is - Returns whether a specific classification is detected.
Sensing - Utilize the robot’s various sensors.
Optical
Optical found an object – Reports whether the sensor is detecting an object within range.
Optical detects color – Reports whether the Optical Sensor detects a specified color.
Optical brightness – Reports the brightness detected by the Optical Sensor.
Optical hue – Reports the hue detected by the Optical Sensor.
when Optical – Runs the attached stack of blocks when the Optical Sensor detects or loses an object.
Touch LED
set TouchLED color - Sets the Touch LED to a selected color.
The examples on this page use the default Playground start position.
Drivetrain#
The drivetrain controls how the VR Robot drives and turns. The drivetrain can move forward or reverse, turn left or right, turn to headings, and track its rotation.
Actions#
drive#
The drive stack block moves the robot forward or reverse forever. The robot will continue to move until it is given another action, like turning or stopping.
drive [forward v]
Parameters |
Description |
|---|---|
direction |
The direction the robot moves: forward or reverse. |
Example
  when started :: hat events
  [Drive forward, then stop.]
  drive [forward v]
  wait (2) seconds
  stop driving
drive for#
The drive for stack block moves the robot forward or reverse for a specific distance. The project will wait until the robot is done moving before the next block in the stack runs.
drive [forward v] for (200) [mm v] ▶
Parameters |
Description |
|---|---|
direction |
The direction the robot moves: forward or reverse. |
distance |
The distance the robot drives. This can be an integer or a decimal. |
unit |
The distance unit: mm (millimeters) or inches |
and don’t wait |
Select the arrow ( ▶ ) to expand the block to say and don’t wait, so the next block in the stack will run right away. |
Example
  when started :: hat events
  [Drive forward.]
  drive [forward v] for (500) [mm v] ▶
turn#
The turn stack block turns the robot left or right forever. The robot will continue to turn until it is given another action, like driving or stopping.
turn [right v]
Parameters |
Description |
|---|---|
direction |
The direction the robot turns: left or right. |
Example
  when started :: hat events
  [Turn right, then stop.]
  turn [right v]
  wait (2) seconds
  stop driving
turn for#
The turn for stack block turns the robot left or right for a specific number of degrees. The turn is relative to the current position of the robot. The project will wait until the robot is done turning before the next block in the stack runs.
turn [right v] for (90) degrees ▶
Parameters |
Description |
|---|---|
direction |
The direction the robot turns: left or right. |
angle |
The number of degrees the robot turns. This can be an integer or a decimal. |
and don’t wait |
Select the arrow ( ▶ ) to expand the block to say and don’t wait, so the next block in the stack will run right away. |
Example
  when started :: hat events
  [Turn left, then turn around to the right.]
  turn [left v] for (90) degrees ▶
  turn [right v] for (180) degrees ▶
turn to heading#
A heading is the direction the robot is facing, measured in degrees. The turn to heading stack block turns the robot to face a specific heading from -359 to 359 degrees. The robot will turn the shortest direction to reach the target heading.
The starting heading is 0 degrees.
The project will wait until the robot is done turning before the next block in the stack runs.
turn to heading (90) degrees ▶
Parameters |
Description |
|---|---|
heading |
The heading the robot should face, from -359 to 359 degrees. |
and don’t wait |
Select the arrow ( ▶ ) to expand the block to say and don’t wait, so the next block in the stack will run right away. |
Example
  when started :: hat events
  [Turn to face the cardinal directions.]
  turn to heading (90) degrees ▶
  wait (2) seconds
  turn to heading (180) degrees ▶
  wait (2) seconds
  turn to heading (270) degrees ▶
  wait (2) seconds
  turn to heading (0) degrees ▶
  wait (2) seconds
turn to rotation#
The turn to rotation stack block turns the robot to a specific rotation.
Rotation is how much the robot has turned, measured in degrees. At the beginning of a project, the rotation value is set to 0 degrees. Rotation can also be set using the set drive rotation block.
Rotation values are absolute. This means the direction of the turn depends on the robot’s current rotation. Turning right increases the rotation, and turning left decreases the rotation.
For example, if the robot starts at 0 degrees and you turn to a rotation of 720 degrees, it will turn right twice. If you then turn to a rotation of 360 degrees, it will turn left once, because 360 is less than 720.
The project will wait until the robot is done turning before the next block in the stack runs.
turn to rotation (90) degrees ▶
Parameters |
Description |
|---|---|
rotation |
The rotation value, in degrees, that the robot will turn to. This can be an integer or a decimal. |
and don’t wait |
Select the arrow ( ▶ ) to expand the block to say and don’t wait, so the next block in the stack will run right away. |
Example
  when started :: hat events
  [Turn left, then spin in a circle clockwise and face right.]
  turn to rotation (-90) degrees ▶
  wait (2) seconds
  turn to rotation (450) degrees ▶
stop driving#
The stop driving stack block stops the robot’s movement.
stop driving
Parameters |
Description |
|---|---|
This block has no parameters. |
Example
  when started :: hat events
  [Drive forward, then stop.]
  drive [forward v]
  wait [4] seconds
  stop driving
Settings#
set drive velocity#
The set drive velocity stack block tells the robot how fast to drive. A higher percentage makes the robot drive faster and a lower percentage makes the robot drive slower.
Every project begins with the robot driving at 50% velocity by default.
Note: A higher velocity makes the robot drive faster, but it may be less precise. A lower velocity makes the robot drive slower, but it can be more precise.
set drive velocity to (50) [% v]
Parameters |
Description |
|---|---|
velocity |
The velocity to drive with from 0% to 100%. |
unit |
The velocity unit: % |
Example
  when started :: hat events
  [Drive forward at the default velocity.]
  drive [forward v] for (100) [mm v] ▶
  wait (1) seconds
  [Move slower.]
  set drive velocity to (20) [% v]
  drive [forward v] for (100) [mm v] ▶
  wait (1) seconds
  [Move faster.]
  set drive velocity to (100) [% v]
  drive [forward v] for (100) [mm v] ▶
  wait (1) seconds
set turn velocity#
The set turn velocity stack block tells the robot how fast to turn. A higher percentage makes the robot turn faster and a lower percentage makes the robot turn slower.
Every project begins with the robot turning at 50% velocity by default.
Note: A higher velocity makes the robot turn faster, but it may be less precise. A lower velocity makes the robot turn slower, but it can be more precise.
set turn velocity to (50) [% v]
Parameters |
Description |
|---|---|
velocity |
The velocity to turn with from 0% to 100%. |
unit |
The velocity unit: % |
Example
  when started :: hat events
  [Turn at default velocity.]
  turn [right v] for (100) degrees ▶
  wait (1) seconds
  [Turn slower.]
  set turn velocity to (20)%
  turn [right v] for (100) degrees ▶
  wait (1) seconds
  [Turn faster.]
  set turn velocity to (100)%
  turn [right v] for (100) degrees ▶
  wait (1) seconds
set drive heading#
A heading is the direction the robot is facing, measured in degrees. The set drive heading stack block changes the robot’s current heading to a new heading value.
For example, if the robot has turned to face right, setting the heading to 0 degrees makes that right-facing position the new 0 degrees. Then the robot can turn to other positions based on that new heading.
set drive heading to (0) degrees
Parameters |
Description |
|---|---|
heading |
The heading value, in degrees, to set for the robot. |
Example
  when started :: hat events
  [Turn to the left.]
  set drive heading to (90) degrees
  turn to heading (0) degrees ▶
set drive rotation#
Rotation is how much the robot has turned, measured in degrees. At the beginning of a project, the rotation value is set to 0 degrees. The set drive rotation stack block changes the robot’s current rotation to a new value.
For example, if the robot has made two full turns to the right, its rotation value will be 720 degrees. Setting the rotation to 0 degrees will reset that rotation from 720 to 0 degrees. Then the robot can turn to rotations based on that new value.
set drive rotation to (0) degrees
Parameters |
Description |
|---|---|
rotation |
The rotation value, in degrees, to set for the robot. This can be an integer or a decimal. |
Example
  when started :: hat events
  [Spin counterclockwise two times.]
  set drive rotation to (720) degrees
  turn to rotation (0) degrees ▶
set drive timeout#
The set drive timeout stack block sets how many seconds the robot will try to finish a movement. If the robot cannot finish in that time it will stop trying and move on to the next block in the stack. This keeps the robot from getting stuck on a movement.
set drive timeout to (1) seconds
Parameters |
Description |
|---|---|
time |
The number of seconds the robot can try to finish a movement. This can be a whole number or a decimal. |
Example
  when started :: hat events
  [Drive forward for 1 second, then turn.]
  set drive timeout to (1) seconds
  drive [forward v] for (25) [inches v] ▶
  turn [right v] for (90) degrees ▶
Values#
drive is done#
The drive is done Boolean block reports whether the robot is finished moving. This can be used to control the timing of other behaviors based on the robot’s movement.
True — The robot is finished moving.
False — The robot is still moving.
This block works together with drivetrain blocks that have the and don’t wait parameter.
<drive is done?>
Parameters |
Description |
|---|---|
This block has no parameters. |
Example
    when started :: hat events
    [Start spinning when the drive is complete.]
    drive [forward v] for (200) [mm v] ◀ and don't wait
    wait until <drive is done?>
    turn [right v] for (360) degrees ▶
drive is moving#
The drive is moving Boolean block reports whether the robot is moving. This can be used to control the timing of other behaviors based on the robot’s movement.
True — The robot is moving.
False — The robot is not moving.
This block works together with drivetrain blocks that have the and don’t wait parameter.
<drive is moving?>
Parameters |
Description |
|---|---|
This block has no parameters. |
Example
    when started :: hat events
    [Print that the robot is moving while it is still driving.]
    drive [forward v] for (200) [mm v] ◀ and don't wait
    while <drive is moving?>
    print [Still Moving...] ▶
    wait (0.1) seconds
    clear screen
    end
    print [Done!] ▶
drive heading#
A heading is the direction the robot is facing, measured in degrees. The drive heading reporter block reports that heading from 0 to 359.99 degrees.
The robot’s starting heading is 0 degrees.
(drive heading in degrees)
Parameters |
Description |
|---|---|
This block has no parameters. |
Example
    when started :: hat events
    [Display the heading after turning.]
    turn [right v] for (450) degrees ▶
    print (drive heading in degrees) on screen ◀ and set cursor to next row
drive rotation#
Rotation is how much the robot has turned, measured in degrees. At the beginning of a project, the rotation value is set to 0 degrees. The drive rotation reporter block reports the robot’s current rotation.
Turning right increases the rotation, and turning left decreases the rotation. For example, making two full turns to the right will report a rotation of 720 degrees.
(drive rotation in degrees)
Parameters |
Description |
|---|---|
This block has no parameters. |
Example
    when started :: hat events
    [Display the rotation after turning.]
    turn [right v] for (450) degrees ▶
    print (drive rotation in degrees) on screen ◀ and set cursor to next row
drive velocity#
The drive velocity reporter block reports how fast the robot is driving.
(drive velocity in [% v])
Parameters |
Description |
|---|---|
unit |
The velocity unit: % |
Example
    when started :: hat events
    [Display the velocity after driving.]
    drive [forward v] for (200) [mm v] ▶
    print (drive velocity in [% v]) on screen ◀ and set cursor to next row
Motion#
Huey uses the claw motor to open and close the claw so Pins and Beams can be picked up or dropped. The lift motor raises and lowers Pins or Beams so they can attach to one another.
Each motor has its own direction options. The direction names describe how that motor moves on Huey.
Actions#
spin motor#
The spin motor stack block spins a motor in one of two directions forever. The motor will continue to spin until it is given another action, like spinning in a different direction or stopping.
spin [ClawMotor v] [open v]
Parameters |
Description |
|---|---|
motor |
The motor to spin: ClawMotor or LiftMotor. |
direction |
The direction the motor spins:
|
Example
    when started
    [Place a pin atop another pin.]
    spin [LiftMotor v] [up v] for [600] [degrees v] ▶
    drive [forward v] for (140) [mm v] ▶
    spin [ClawMotor v] [open v]
spin motor for#
The spin motor for stack block spins a motor for a specific distance. The spin is relative to the current position of the motor. The project will wait until the motor is done spinning before the next block in the stack runs.
spin [ClawMotor v] [open v] for (90) [degrees v] ▶
Parameters |
Description |
|---|---|
motor |
The motor to spin: ClawMotor or LiftMotor. |
direction |
The direction the motor spins:
|
distance |
The distance the motor spins. Degrees use integers. Turns can use integers or decimals. |
unit |
The distance unit: degrees or turns. |
and don’t wait |
Select the arrow ( ▶ ) to expand the block to say and don’t wait, so the next block in the stack will run right away. |
Example
    when started
    [Place a pin atop another pin.]
    spin [LiftMotor v] [up v] for [600] [degrees v] ▶
    drive [forward v] for (140) [mm v] ▶
    spin [ClawMotor v] [open v]
spin motor to position#
The spin motor to position stack block spins a motor to a specific position.
A motor’s position is how far it has spun, measured in degrees or turns. One turn is equal to 360 degrees. At the beginning of a project, the motor position is set to 0 degrees. The motor position can also be set using the set motor position block.
Position values are absolute. This means the direction of the spin depends on the motor’s current position.
For example, if the motor starts at 0 degrees and spins to a position of 720 degrees, it will spin forward two turns. If it then spins to a position of 360 degrees, it will spin reverse one turn, because 360 is less than 720.
spin [ClawMotor v] to position (90) [degrees v] ▶
Parameters |
Description |
|---|---|
motor |
The motor to spin: ClawMotor or LiftMotor. |
position |
The position value the motor will spin to. Degrees use integers. Turns can use integers or decimals. |
unit |
The position unit: degrees or turns. |
and don’t wait |
Select the arrow ( ▶ ) to expand the block to say and don’t wait, so the next block in the stack will run right away. |
Example
    when started
    [Place a pin atop another pin.]
    spin [LiftMotor v] to position [-2] [turns v] ▶
    drive [forward v] for (140) [mm v] ▶
    spin [ClawMotor v] [open v]
stop motor#
The stop motor stack block stops the selected motor.
stop [ClawMotor v]
Parameters |
Description |
|---|---|
motor |
The motor to stop: ClawMotor or LiftMotor. |
Example
    when started
    [Raise the lift for 2 seconds, then stop.]
    spin [LiftMotor v] [up v]
    wait (2) seconds
    stop [LiftMotor v]
Settings#
set motor velocity#
The set motor velocity stack block tells a motor how fast to spin. A higher percentage makes the motor spin faster and a lower percentage makes the motor spin slower.
Every project begins with each motor spinning at 50% velocity by default.
Note: A higher velocity makes the motor spin faster, but it may be less precise. A lower velocity makes the motor spin slower, but it can be more precise.
set [ClawMotor v] velocity to (50) [% v]
Parameters |
Description |
|---|---|
motor |
The motor to set the velocity of: ClawMotor or LiftMotor. |
velocity |
The speed the motor will spin at. Percent uses whole numbers from 0% to 100%. |
unit |
The velocity unit: %. |
Example
    when started
    [Raise the lift at full speed.]
    set [LiftMotor v] velocity to [100] [% v]
    spin [LiftMotor v] [up v] for [600] [degrees v] ▶
set motor timeout#
The set motor timeout stack block sets how much time a motor will try to finish a movement. If the motor cannot finish in that time, it will stop trying and move on to the next block in the stack. This keeps the motor from getting stuck on a movement.
set [ClawMotor v] timeout to (1) seconds
Parameters |
Description |
|---|---|
motor |
The motor to set the timeout of: ClawMotor or LiftMotor. |
time |
The number of seconds the motor can try to finish a movement. This can be a whole number or decimal. |
Example
    when started
    set [LiftMotor v] timeout to [2] seconds
    spin [LiftMotor v] [up v] for [5] [turns v] ▶
Position#
motor position#
A motor’s position is how far it has spun, measured in degrees or turns. One turn is equal to 360 degrees. The motor position reporter block reports the motor’s current position.
At the beginning of a project, the motor position is set to 0 degrees. If the motor spins one full turn forward, the position will be 360 degrees or 1 turn. If the motor spins the other direction, the position will be negative.
([ClawMotor v] position in [degrees v])
Parameters |
Description |
|---|---|
motor |
The motor to report the position of: ClawMotor or LiftMotor. |
unit |
The unit to report the motor position in: degrees or turns. |
Example
    when started
    [Raise the lift until it reaches 600 degrees.]
    spin [LiftMotor v] [up v]
    wait until <([LiftMotor v] position in [degrees v]) [math_less_than v] [-600]>
    stop [LiftMotor v]
set motor position#
A motor’s position is how far it has spun, measured in degrees or turns. One turn is equal to 360 degrees. The set motor position stack block changes the motor’s current position to a new value.
For example, if a motor has spun to 180 degrees, setting the position to 0 degrees will reset that position from 180 to 0 degrees. Then the motor can spin to positions based on that new value.
set [ClawMotor v] position to (0) [degrees v]
Parameters |
Description |
|---|---|
motor |
The motor to set the position of: ClawMotor or LiftMotor. |
position |
The position value to set for the motor. Degrees use integers. Turns can use integers or decimals. |
unit |
The position unit: degrees or turns. |
Example
    when started
    set [LiftMotor v] position to [100] [degrees v]
    spin [LiftMotor v] to position [-500] [degrees v] ▶
Values#
motor is done#
The motor is done Boolean block reports whether the motor is finished moving. This can be used to control the timing of other behaviors based on the motor’s movement.
True — The motor is finished moving.
False — The motor is still moving.
This block works together with the following Motion blocks that have the and don’t wait parameter: spin motor for and spin motor to position.
<[ClawMotor v] is done?>
Parameters |
Description |
|---|---|
motor |
The motor to report whether it is finished moving: ClawMotor or LiftMotor. |
Example
    when started
    [Flash the Touch LED while the lift is moving.]
    spin [LiftMotor v] [up v] for [600] [degrees v] ◀ and don't wait
    wait [0.1] seconds
    repeat until <[LiftMotor v] is done?>
        set [TouchLED v] color to [red v]
        wait [0.5] seconds
        set [TouchLED v] color to [none v]
        wait [0.5] seconds
    end
motor is spinning#
The motor is spinning Boolean block reports whether the motor is spinning. This can be used to control the timing of other behaviors based on the motor’s movement.
True — The motor is spinning.
False — The motor is not spinning.
This block works together with the following Motion blocks that have the and don’t wait parameter: spin motor for and spin motor to position.
<[ClawMotor v] is spinning?>
Parameters |
Description |
|---|---|
motor |
The motor to report whether it is spinning: ClawMotor or LiftMotor. |
Example
    when started
    [Flash the Touch LED while the lift is spinning.]
    spin [LiftMotor v] [up v] for [600] [degrees v] ◀ and don't wait
    wait [0.1] seconds
    repeat until <not <[LiftMotor v] is spinning?>>
        set [TouchLED v] color to [red v]
        wait [0.5] seconds
        set [TouchLED v] color to [none v]
        wait [0.5] seconds
    end
motor velocity#
The motor velocity reporter block reports how fast the motor is spinning, as a percentage from -100% to 100%.
([ClawMotor v] velocity in [% v] :: custom-motion)
Parameters |
Description |
|---|---|
motor |
The motor to report the velocity of: ClawMotor or LiftMotor. |
unit |
The unit to report the motor velocity in: %. |
Example
    when started
    set [LiftMotor v] velocity to [100] [% v]
    spin [LiftMotor v] [up v] for [600] [degrees v] ◀ and don't wait
    wait [0.5] seconds
    print ([LiftMotor v] velocity in [% v] :: custom-motion) ▶
AI Vision#
Actions#
get object data#
The get object data block filters data from the IQ AI Vision Sensor frame to a single signature — a saved description of something the sensor can recognize, such as a game element on the field.
The dataset stores objects ordered from largest to smallest by width, starting at index 0. Each object’s properties can be accessed using the object property block. An empty dataset is returned if no matching objects are detected.
get [AI Classifications v] data from [AIVision v]
Parameter |
Description |
|---|---|
signature |
Filters the dataset to only include data of the given signature. Available signatures are:
|
Example
    when started
    [Place the Red Pin on the top left Blue Pin.]
    spin [LiftMotor v] [up v] for [600] [degrees v] ▶
    turn [left v] for [38] degrees ▶
    repeat until <([AIVision v] object [width v]) [math_greater_than v] [48]>
        get [AI Classifications v] data from [AIVision v]
        drive [forward v]
    end
    drive [forward v] for [160] [mm v] ▶
    spin [ClawMotor v] [open v]
Settings#
set object item#
The set object item block sets which item in the dataset to use.
set [AIVision v] object item to [1]
Parameters |
Description |
|---|---|
item |
The number of the item in the dataset to use. |
Example
    when started
    [Find the object index of the nearest Orange Pin.]
    set [object_counter v] to [1]
    get [AI Classifications v] data from [AIVision v]
    repeat ([AIVision v] object count)
        set [AIVision v] object item to (object_counter)
        if <[AIVision v] object is [Orange Pin v]> then
            print (join [Nearest Orange Pin is ] (object_counter)) ▶
        else
            change [object_counter v] by [1]
        end
    end
Values#
object exists#
The object exists block returns a Boolean indicating whether any object is detected in the dataset.
True - The dataset includes a detected object.
False - The dataset does not include any detected objects.
<[AIVision v] object exists?>
Parameters |
Description |
|---|---|
This block has no parameters. |
Example
    when started
    [Raise the Lift until a Pin or Beam is detected.]
    repeat until <[AIVision v] object exists?>
        get [AI Classifications v] data from [AIVision v]
        spin [LiftMotor v] [up v]
    end
    stop [LiftMotor v]
object count#
The object count block returns the number of detected objects in the dataset as an integer.
([AIVision v] object count)
Parameters |
Description |
|---|---|
This block has no parameters. |
Example
    when started
    get [AI Classifications v] data from [AIVision v]
    print ([AIVision v] object count) ▶
object property#
There are six properties that are included with each object stored after the get object data block is used.
([AIVision v] object [width v])
All property values describe the detected object’s position and size in the IQ AI Vision Sensor’s view at the moment the get object data block was used. These values are measured in pixels, based on the sensor’s 320 by 240 pixel resolution.
Parameter |
Description |
|---|---|
property |
Which property of the detected object to use: |
width#
The width property reports the width of the detected object in pixels as a whole number from 1 to 320.
([AIVision v] object [width v])
height#
The height property reports the height of the detected object in pixels as a whole number from 1 to 240.
([AIVision v] object [height v])
centerX#
The centerX property reports the x-coordinate of the center of the detected object in pixels as a whole number from 0 to 320.
([AIVision v] object [centerX v])
centerY#
The centerY property reports the y-coordinate of the center of the detected object in pixels as a whole number from 0 to 240.
([AIVision v] object [centerY v])
originX#
The originX property reports the x-coordinate of the top-left corner of the detected object’s bounding box in pixels as a whole number from 0 to 320.
([AIVision v] object [originX v])
originY#
The originY property reports the y-coordinate of the top-left corner of the detected object’s bounding box in pixels as a whole number from 0 to 240.
([AIVision v] object [originY v])
AI Classification is#
The AI Vision object is block returns a Boolean indicating whether a detected object matches a specific classification.
True - The item in the dataset is the specific object.
False - The item in the dataset is not the specific object.
<[AIVision v] object is [Beam v]?>
Parameter |
Description |
|---|---|
object |
Which object to compare the item to:
|
Example
    when started
    [Find the object index of the nearest Orange Pin.]
    set [object_counter v] to [1]
    get [AI Classifications v] data from [AIVision v]
    repeat ([AIVision v] object count)
        set [AIVision v] object item to (object_counter)
        if <[AIVision v] object is [Orange Pin v]> then
            print (join [Nearest Orange Pin is ] (object_counter)) ▶
        else
            change [object_counter v] by [1]
        end
    end
Sensing#
Optical#
Optical found an object#
The Optical found an object Boolean block reports whether or not the Optical Sensor detects an object within range.
True — The Optical Sensor detects an object.
False — The Optical Sensor does not detect an object.
<[Optical v] found an object?>
Parameters |
Description |
|---|---|
This block has no parameters. |
Example
    when started
    [Place a pin atop another pin.]
    spin [LiftMotor v] [up v] for [600] [degrees v] ▶
    drive [forward v] for (140) [mm v] ▶
    spin [ClawMotor v] [open v]
    wait until <not <[Optical v] found an object?>>
    spin [LiftMotor v] to position [0] [degrees v] ▶
Optical detects color#
The Optical detects color Boolean block reports whether the Optical Sensor detects a specified color, based on the detected hue value.
True – The sensor detects the specified color.
False – The sensor does not detect the specified color.
Note: The Optical Sensor is looking for hue ranges that match the specified color. For detecting specific hue ranges, see the Optical hue block.
<[Optical v] detects [red v]?>
Parameters |
Description |
|---|---|
color |
Which color to look for:
|
Example
    when started
    [Place a pin atop another pin.]
    spin [LiftMotor v] [up v] for [600] [degrees v] ▶
    drive [forward v] for (140) [mm v] ▶
    spin [ClawMotor v] [open v]
    wait until <[Optical v] detects [red v]?>
    spin [LiftMotor v] to position [0] [degrees v] ▶
Optical brightness#
The Optical brightness reporter block reports how much light is reflected back to the Optical Sensor, as a percentage from 0% to 100%.
A higher percentage means more light is reflected back to the Optical Sensor. A lower percentage means less light is reflected back.
([Optical v] brightness in %)
Parameters |
Description |
|---|---|
This block has no parameters. |
Optical hue#
The Optical hue block returns the hue value of the color detected by the Optical Sensor.
Hue is a way to describe color using numbers around a color wheel.
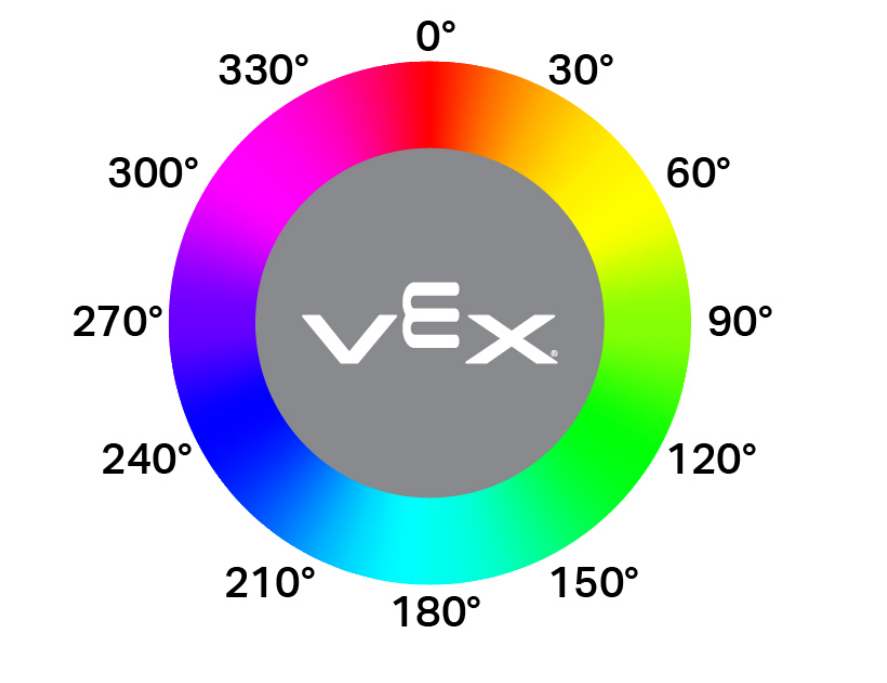
([Optical v] hue in degrees)
Parameters |
Description |
|---|---|
This block has no parameters. |
when Optical#
The when Optical hat block runs the attached stack of blocks whenever the Optical Sensor detects or loses an object.
when [Optical v] [detects v] an object
Parameters |
Description |
|---|---|
state |
When the attached stack of blocks will run: detects runs when an undetected object is detected, while loses runs when a detected object is now no longer detected. |
Example
    when [Optical v] [loses v] an object
    [Lower the lift when the object is no longer in the claw.]
    spin [LiftMotor v] to position [0] [degrees v] ▶
Touch LED#
set TouchLED color#
The set TouchLED color block sets the color of the Touch LED.
set [TouchLED v] color to [none v]
Parameters |
Description |
|---|---|
color |
Sets the LED’s color to:
|
Example
    when started
    [Light the Touch LED while placing a pin.]
    set [TouchLED v] color to [red v]
    spin [LiftMotor v] [up v] for [600] [degrees v] ▶
    drive [forward v] for (140) [mm v] ▶
    spin [ClawMotor v] [open v]
    set [TouchLED v] color to [none v]