屏幕#
介绍#
屏幕类别控制 V5 大脑的触摸屏,使机器人能够显示文本、数字和图形,并响应触摸输入。
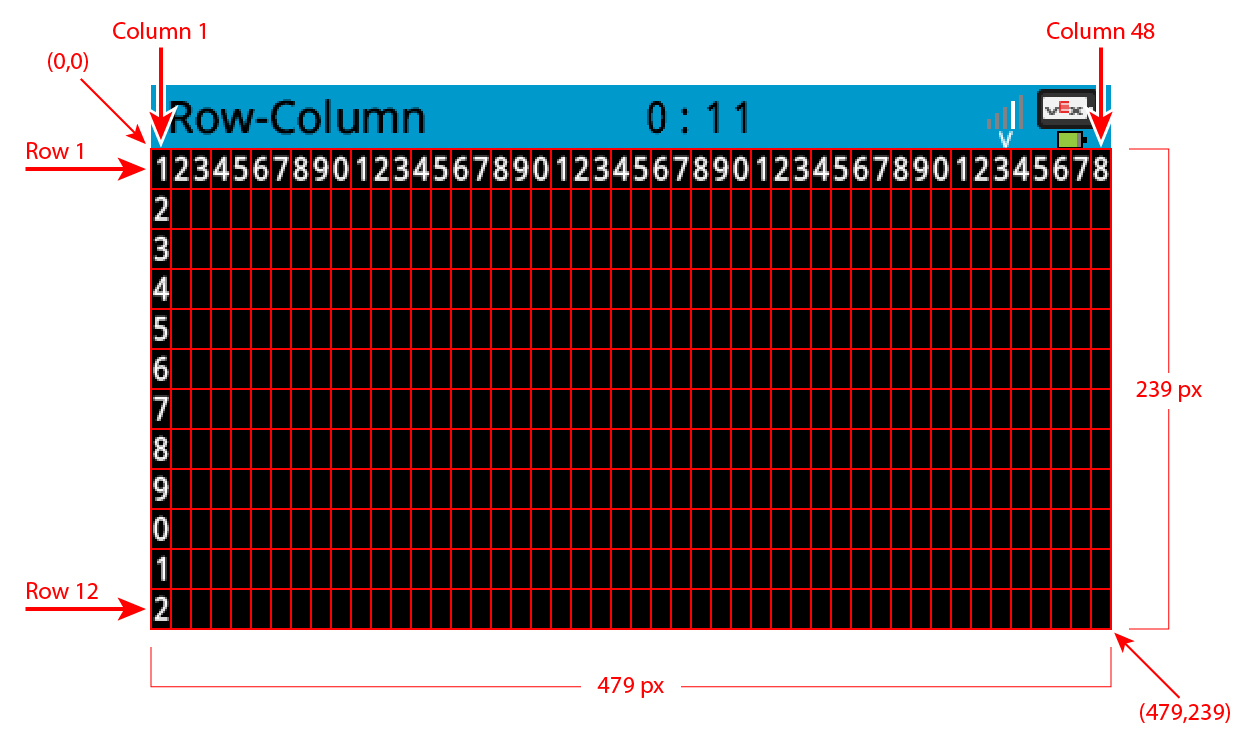
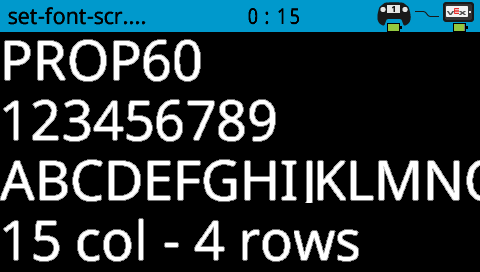
默认情况下,打印到大脑的字体是等宽小号,它有 12 行 48 列。
对于绘画而言,大脑的分辨率为 479 x 239 像素。
以下是所有方法的列表:
光标打印 — 放置并打印文本。
print— Prints text at the current cursor position.setCursor— Sets the cursor to a specific row and column.newLine— Moves the cursor to column 1 of the next row.clearLine— Clears a row of text.row— Returns the current cursor row.column— Returns the current cursor column.printAt— Prints text at specific x- and y-coordinates.getStringWidth— Returns the width of a string in pixels.getStringHeight— Returns the height of a string in pixels.
修改器——更改屏幕设置、颜色和绘制行为。
clearScreen— Clears the screen of all drawings and text.setFont— Sets the font for printed text.setPenWidth— Sets the thickness for drawn shapes and lines.setPenColor— Sets the color for outlines and text.setFillColor— Sets the fill color for shapes and backgrounds.setOrigin— Sets a new origin for printing and drawing.
绘制 — 在屏幕上添加图形。
drawPixel— Draws a pixel at a specific x and y-position.drawLine— Draws a line between two points.drawRectangle— Draws a rectangle.drawCircle— Draws a circle.render— Updates the Brain’s screen with text and drawings only when called.setClipRegion— Restricts where drawings and text can appear.
触摸 — 获取屏幕触摸输入。
pressing— Returns whether the screen is being pressed.xPosition— Returns the x-coordinate of the last screen event.yPosition— Returns the y-coordinate of the last screen event.
回调函数——响应屏幕上的触摸事件。
pressed— Registers a function to be called when the screen is pressed.released— Registers a function to be called when the screen is released.
For information on constructing a Brain to gain access to the screen methods, see Brain.
光标打印#
print#
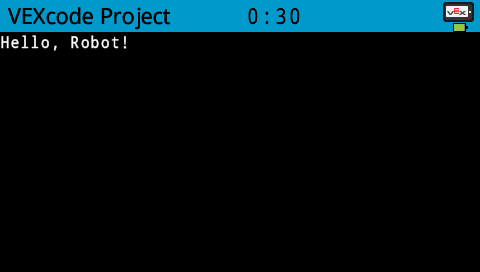
print displays text on the Brain’s screen at the current cursor position and font.
Usage:
Brain.Screen.print(value);
参数 |
描述 |
|---|---|
|
屏幕上要显示的文本。使用 C++ 字符串格式化 打印变量。 |
int main() {
  // Initializing Robot Configuration. DO NOT REMOVE!
  vexcodeInit();

  // Display a message at the starting cursor
  Brain.Screen.print("Hello, Robot!");
}
setCursor#
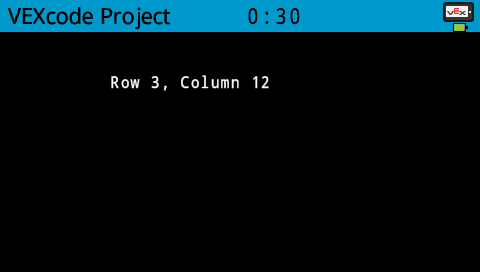
setCursor sets the cursor at a specific row and column on the Brain’s screen. How many rows and columns can comfortably fit depends on the selected font.
Monospaced fonts have characters that are all the same width, making text placement consistent. In contrast, proportional fonts vary in character width, so some letters take up more space than others. However, regardless of which type is used, setCursor positions the cursor based on row and column size, not font style. The font size can be adjusted using setFont.
Usage:
Brain.Screen.setCursor(row, col);
参数 |
描述 |
|---|---|
|
光标所在的行。 |
|
光标所在的列。 |
int main() {
  // Initializing Robot Configuration. DO NOT REMOVE!
  vexcodeInit();

  // Display text starting at Row 3 Column 12
  Brain.Screen.setCursor(3, 12);
  Brain.Screen.print("Row 3, Column 12");
}
newLine#
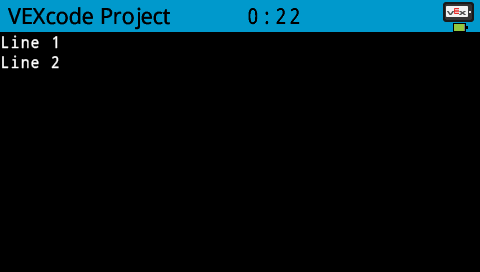
newLine moves the cursor to column 1 on the next row on the Brain’s screen.
Usage:
Brain.Screen.newLine();
参数 |
描述 |
|---|---|
此方法没有参数。 |
int main() {
  // Initializing Robot Configuration. DO NOT REMOVE!
  vexcodeInit();

  // Display two lines of text
  Brain.Screen.print("Line 1");
  Brain.Screen.newLine();
  Brain.Screen.print("Line 2");
}
clearLine#
clearLine clears a row of drawings and text on the Brain’s screen. By default, this will clear the row that the cursor is currently on.
Default Usage:
Brain.Screen.clearLine();
Overload Usages:
Brain.Screen.clearLine(row);
Brain.Screen.clearLine(row, color);
参数 |
描述 |
|---|---|
|
要清除的行。 |
|
Sets the background color of the cleared row. Options include:
|
int main() {
  // Initializing Robot Configuration. DO NOT REMOVE!
  vexcodeInit();

  // Display text on two rows
  Brain.Screen.print("This text stays");
  Brain.Screen.newLine();
  Brain.Screen.print("This disappears");

  // Wait 3 seconds before clearing row 2
  wait(3, seconds);
  Brain.Screen.clearLine(2);
}
row#
row returns the current row where text will be printed as an integer.
Usage:
Brain.Screen.row()
参数 |
描述 |
|---|---|
此方法没有参数。 |
int main() {
// Initializing Robot Configuration. DO NOT REMOVE!
vexcodeInit();
// Display the cursor's current row
Brain.Screen.setCursor(3, 12);
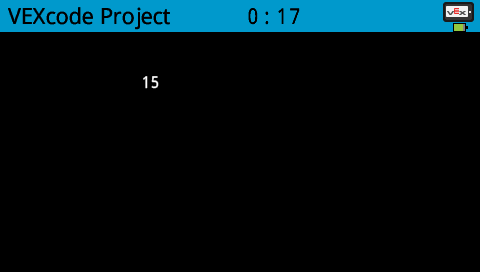
Brain.Screen.print(Brain.Screen.row());
}

column#
column returns the current column where text will be printed as an integer.
Usage:
Brain.Screen.column()
参数 |
描述 |
|---|---|
此方法没有参数。 |
int main() {
  // Initializing Robot Configuration. DO NOT REMOVE!
  vexcodeInit();

  // Display the cursor's current column
  Brain.Screen.setCursor(5, 15);
  Brain.Screen.print(Brain.Screen.column());
}
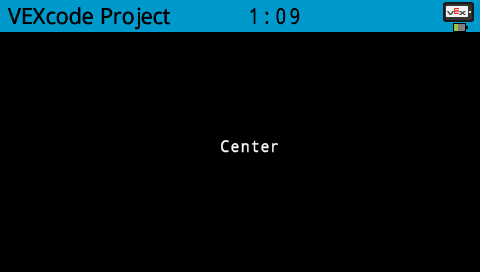
printAt#
printAt displays text on the Brain’s screen at specified x- and y-coordinates (in pixels) with the current font and origin.
Usage:
Brain.Screen.printAt(x, y, value);
参数 |
描述 |
|---|---|
|
The x-position to print at as a keyword argument, ie: |
|
The y-position to print at as a keyword argument, ie: |
|
要打印到屏幕上的文本。使用 C++ 字符串格式化 打印变量。 |
int main() {
  // Initializing Robot Configuration. DO NOT REMOVE!
  vexcodeInit();

  // Print the number 1 at pixel (100, 40)
  Brain.Screen.printAt(220, 120, "Center");
}
getStringWidth#
getStringWidth returns the width of a string as an integer in pixels as if it was on the Brain’s screen. The width of a string changes based on the length of the string and the size of the font.
Usage:
Brain.Screen.getStringWidth(string);
参数 |
描述 |
|---|---|
|
待测量的绳子。 |
getStringHeight#
get_string_height returns the height of a string as an integer in pixels as if it was on the Brain’s screen. The height of a string changes based on the length of the string and the size of the font.
Usage:
Brain.Screen.getStringHeight(string);
参数 |
描述 |
|---|---|
|
待测量的绳子。 |
变异体#
clearScreen#
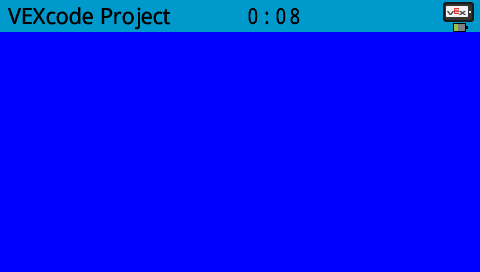
clearScreen clears all drawings and text from the Brain’s screen.
Default Usage:
Brain.Screen.clearScreen();
Overload Usages:
Brain.Screen.clearScreen(color);
参数 |
描述 |
|---|---|
|
Sets the background color. Options include:
|
int main() {
  // Initializing Robot Configuration. DO NOT REMOVE!
  vexcodeInit();

  // Clear screen after 2 seconds
  Brain.Screen.print("VEXcode");
  wait(2, seconds);
  Brain.Screen.clearScreen();
}
int main() {
  // Initializing Robot Configuration. DO NOT REMOVE!
  vexcodeInit();

  // Clear screen to blue after 2 seconds
  Brain.Screen.print("VEXcode");
  wait(2, seconds);
  Brain.Screen.clearScreen(blue);
}
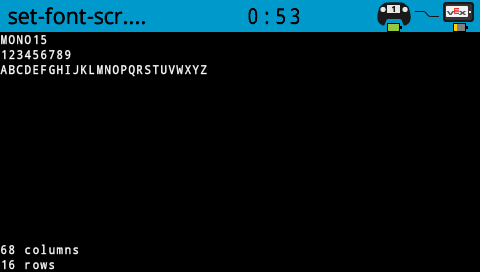
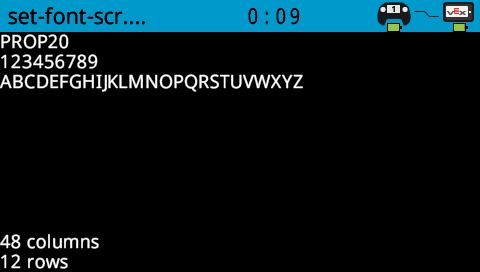
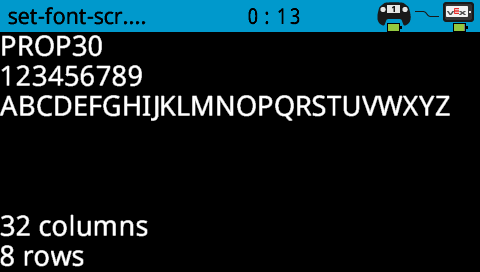
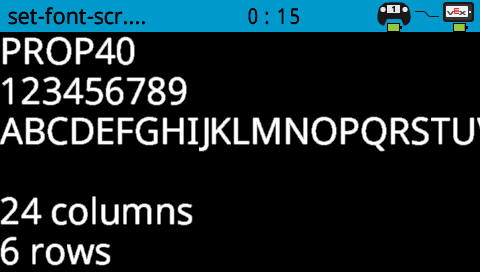
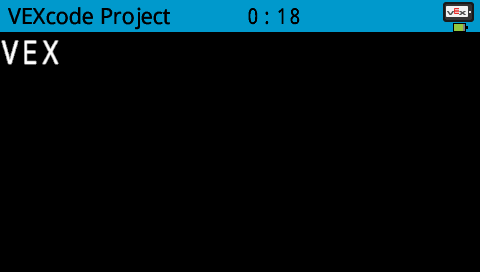
setFont#
setFont sets the font used for displaying text on the Brain’s screen. This font will apply to all text printed with print or printAt. The default font at the start of a project is mono20.
Usage:
Brain.Screen.setFont(font);
范围 |
描述 |
|---|---|
|
Sets the font to one of the following:
|
|
|
|
|---|---|---|
|
|
|
|
|
|
|


int main() {
  // Initializing Robot Configuration. DO NOT REMOVE!
  vexcodeInit();

  // Set the font type to mono40
  Brain.Screen.setFont(mono40);
  Brain.Screen.print("VEX");
}
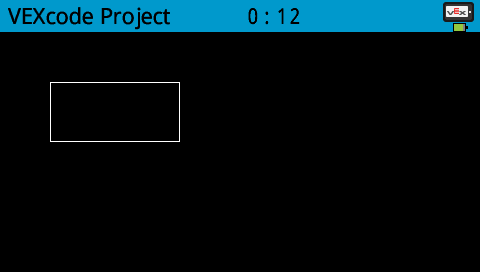
setPenWidth#
setPenWidth sets the pen width used for drawing lines and shapes.
Usage:
Brain.Screen.setPenWidth(width);
范围 |
描述 |
|---|---|
|
笔的宽度,以像素为单位的整数,范围从 0 到 32。 |
int main() {
  // Initializing Robot Configuration. DO NOT REMOVE!
  vexcodeInit();

  // Draw a rectangle with a pen width of 10
  Brain.Screen.setPenWidth(10);
  Brain.Screen.drawRectangle(50, 50, 130, 60);
}
setPenColor#
setPenColor sets the pen color used for drawing lines, shapes, and text.
Usage:
Brain.Screen.setPenColor(color);
范围 |
描述 |
|---|---|
|
Optional. Sets the pen color. Options include:
|
int main() {
  // Initializing Robot Configuration. DO NOT REMOVE!
  vexcodeInit();

  // Draw a rectangle with orange borders
  Brain.Screen.setPenColor(orange);
  Brain.Screen.drawRectangle(50, 50, 130, 60);
}

setFillColor#
setFillColor method sets the fill color used when shapes are drawn.
Usage:
Brain.Screen.setFillColor(color);
范围 |
描述 |
|---|---|
|
Optional. Sets the fill color. Options include:
|
int main() {
  // Initializing Robot Configuration. DO NOT REMOVE!
  vexcodeInit();

  // Draw a purple rectangle
  Brain.Screen.setFillColor(purple);
  Brain.Screen.drawRectangle(50, 50, 130, 60);
}

setOrigin#
setOrigin sets the origin used for drawing graphics on the Brain’s screen. Drawing functions consider the top left corner of the Brain’s screen as the origin. This function can move the origin to an alternate position such as the center of the Brain’s screen.
Usage:
Brain.Screen.setOrigin(x, y);
范围 |
描述 |
|---|---|
|
原点相对于左上角的 x 坐标,取值范围为 0 到 480 的整数。 |
|
原点相对于左上角的 y 坐标,取值范围为 0 到 240 的整数。 |
画#
drawPixel#
drawPixel draws a pixel at the specified x- and y-coordinates with the current pen color.
Usage:
Brain.Screen.drawPixel(x, y);
范围 |
描述 |
|---|---|
|
像素绘制位置的 x 坐标,取值范围为 0 到 480 之间的整数。 |
|
像素绘制位置的 y 坐标,取值范围为 0 到 240 之间的整数。 |
int main() {
  // Initializing Robot Configuration. DO NOT REMOVE!
  vexcodeInit();

  // Draw the pixels marking the corners of a square
  Brain.Screen.drawPixel(250, 100);
  Brain.Screen.drawPixel(275, 100);
  Brain.Screen.drawPixel(250, 125);
  Brain.Screen.drawPixel(275, 125);
}
![]()
drawLine#
drawLine draws a line from the first specified screen coordinates (x1, y1) to the second specified screen coordinates (x2, y2). It uses the current pen width and pen color.
The x- and y-coordinates use the default origin of (0, 0) unless a different origin has been set using setOrigin.
Usage:
Brain.Screen.drawLine(x1, y1, x2, y2);
范围 |
描述 |
|---|---|
|
直线的起始 x 坐标,取值范围为 0 到 480 的整数。 |
|
直线的起始 y 坐标,取值范围为 0 到 240 之间的整数。 |
|
直线的终点 x 坐标,取值范围为 0 到 480 之间的整数。 |
|
直线的终点 y 坐标,取值范围为 0 到 240 之间的整数。 |
int main() {
  // Initializing Robot Configuration. DO NOT REMOVE!
  vexcodeInit();

  // Draw a line from the top left to bottom right of the screen
  Brain.Screen.drawLine(0, 0, 479, 239);
}
屏幕中央出现一条细斜线,从左上角延伸到/_static/img/screen/draw-line.png。
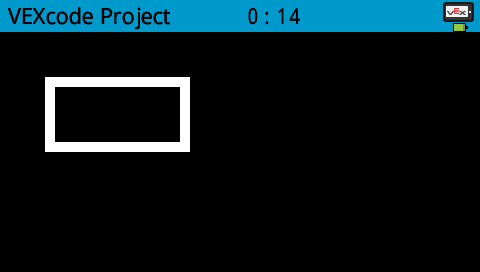
drawRectangle#
drawRectangle draws a rectangle with its top-left corner at the specified x- and y-coordinates and a size determined by the given width and height, all measured in pixels. The rectangle’s outline is drawn using the current pen width and pen color. The interior is filled with the current fill color.
The x- and y-coordinates use the default origin of (0,0) unless a different origin has been set using setOrigin.
Default Usage:
Brain.Screen.drawRectangle(x, y, width, height);
Overload Usages:
Brain.Screen.drawRectangle(x, y, width, height, color);
范围 |
描述 |
|---|---|
|
矩形左上角的 x 坐标,取值范围为 0 到 480 之间的整数。 |
|
矩形左上角的 y 坐标,取值范围为 0 到 240 的整数。 |
|
矩形的宽度,取值范围为 0 到 480 之间的整数。 |
|
矩形的高度,取值范围为 0 到 240 之间的整数。 |
|
Sets the fill color. Options include:
|
int main() {
  // Initializing Robot Configuration. DO NOT REMOVE!
  vexcodeInit();

  // Draw a rectangle on the screen
  Brain.Screen.drawRectangle(50, 50, 130, 60);
}
drawCircle#
drawCircle draws a circle with its center at the specified x- and y-coordinates and a size determined by the given radius, all measured in pixels. The circle’s outline is drawn using the current pen width and pen color. The interior is filled with the current fill color.
The x- and y-coordinates use the default origin of (0, 0) unless a different origin has been set using setOrigin.
Usage:
Brain.Screen.drawCircle(x, y, radius);
Overload Usages:
Brain.Screen.drawCircle(x, y, radius, color);
范围 |
描述 |
|---|---|
|
圆心的 x 坐标,取值范围为 0 到 480 之间的整数。 |
|
圆心的 y 坐标,取值范围为 0 到 240 之间的整数。 |
|
圆的半径,取值范围为 0 到 240 像素的整数。 |
|
Sets the fill color. Options include:
|
int main() {
  // Initializing Robot Configuration. DO NOT REMOVE!
  vexcodeInit();

  // Draw a circle on the screen
  Brain.Screen.drawCircle(240, 120, 40);
}

render#
render enables double buffering for the Brain’s screen. Once called, any drawing commands (like text, shapes, or images) will no longer appear immediately for the rest of the project. Instead, updates will only be shown when render is used again. This allows for smoother and more controlled screen updates, but means nothing will be visible until render is used.
Usage:
Brain.Screen.render();
参数 |
描述 |
|---|---|
此方法没有参数。 |
int main() {
  // Initializing Robot Configuration. DO NOT REMOVE!
  vexcodeInit();

  // Render text after moving
  Brain.Screen.render();
  Brain.Screen.print("Render later...");
  Drivetrain.driveFor(forward, 100, mm);
  Drivetrain.turnFor(right, 90, degrees);
  Brain.Screen.render();
}
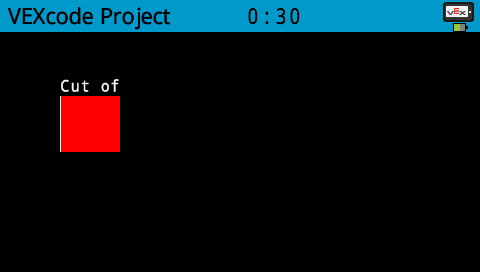
setClipRegion#
setClipRegion defines a rectangular area on the screen where all drawings and text will be confined. Any content outside this region will not be displayed.
Usage:
Brain.Screen.setClipRegion(x, y, width, height);
范围 |
描述 |
|---|---|
|
剪辑区域左上角的 x 坐标,以 0 到 480 之间的整数或浮点数表示。 |
|
裁剪区域左上角的 y 坐标,以 0 到 240 之间的整数或浮点数表示。 |
|
裁剪区域的宽度(以像素为单位),取值范围为 0 到 480 的整数或浮点数。 |
|
裁剪区域的高度(以像素为单位),取值范围为 0 到 240 的整数或浮点数。 |
int main() {
  // Initializing Robot Configuration. DO NOT REMOVE!
  vexcodeInit();

  // Restrict text and drawings to a specific region
  Brain.Screen.setClipRegion(0, 0, 120, 120);
  Brain.Screen.drawRectangle(60, 60, 100, 100, red);
  Brain.Screen.printAt(60, 60, "Cut off!");
}
触碰#
pressing#
pressing returns whether the screen is currently being pressed (touched).
true— The screen is being pressed.false— The screen is not being pressed.
Usage:
Brain.Screen.pressing()
参数 |
描述 |
|---|---|
此方法没有参数。 |
int main() {
  // Change the screen's color after it's pressed
  while (Brain.Screen.pressing() == false) {
    wait(5, msec);
  }

  Brain.Screen.setFillColor(green);
  Brain.Screen.drawRectangle(0, 0, 479, 239);
}
int main() {
  // Display different messages after the screen is pressed
  while (!Brain.Screen.pressing()) {
    wait(5, msec);
  }
  Brain.Screen.print("First message!");
  Brain.Screen.newLine();

  // Lift finger to press the screen again
  while (Brain.Screen.pressing()) {
    wait(5, msec);
  }
  while (Brain.Screen.pressing() == false) {
    wait(5, msec);
  }
  Brain.Screen.print("Second message!");
  Brain.Screen.newLine();
}
xPosition#
xPosition returns the x-coordinate of the last screen event (press or release) as an integer between 0 and 480.
Usage:
Brain.Screen.xPosition()
参数 |
描述 |
|---|---|
此方法没有参数。 |
int main() {
  // Display a circle where the screen is pressed
  while (Brain.Screen.pressing() == false) {
    wait(5, msec);
  }

  Brain.Screen.drawCircle(Brain.Screen.xPosition(), Brain.Screen.yPosition(), 20, white);
}
yPosition#
yPosition returns the y-coordinate of the last screen event (press or release) as an integer between 0 and 240.
Usage:
Brain.Screen.yPosition()
参数 |
描述 |
|---|---|
此方法没有参数。 |
int main() {
  // Display a circle where the screen is pressed
  while (Brain.Screen.pressing() == false) {
    wait(5, msec);
  }

  Brain.Screen.drawCircle(Brain.Screen.xPosition(), Brain.Screen.yPosition(), 20, white);
}
回调函数#
pressed#
pressed registers a function to be called when the Brain’s Screen is pressed.
Default Usage:
Brain.Screen.pressed(callback)
Overload Usages:
Brain.Screen.pressed(callback, arg)
参数 |
描述 |
|---|---|
|
预先定义的回调函数,当轴值发生变化时会自动调用。该函数必须符合所需的回调函数签名。有关更多信息,请参阅回调函数。 |
|
可选。用户定义的一个值,在调用回调函数时传递给它。这允许回调函数访问在函数外部定义的数据。 |
void screenPressed() {
  Brain.Screen.print("screen pressed");
}

int main() {
  // Initializing Robot Configuration. DO NOT REMOVE!
  vexcodeInit();

  // Call screenPressed whenever the Brain screen is pressed
  Brain.Screen.pressed(screenPressed);
}
// arg keeps track of how many times the screen is pressed
void onScreenPressed(void* arg) {
  // Convert arg back to an int pointer
  int* count = (int*)arg;
  (*count)++;

  Brain.Screen.clearScreen();
  Brain.Screen.setCursor(1, 1);
  Brain.Screen.print("Pressed %d times", *count);
}

int main() {
  // Initializing Robot Configuration. DO NOT REMOVE!
  vexcodeInit();

  // Variable to track screen presses
  int pressCount = 0;

  // Register the callback and pass the address of pressCount
  // so the callback can update it each time the screen is pressed
  Brain.Screen.pressed(onScreenPressed, &pressCount);

  // Keep the project running so the callback can be triggered
  while (true) {
    wait(20, msec);
  }
}
released#
released registers a function to be called when the screen is released (touch removed).
Default Usage:
Brain.Screen.released(callback)
Overload Usages:
Brain.Screen.released(callback, arg)
参数 |
描述 |
|---|---|
|
预先定义的回调函数,当轴值发生变化时会自动调用。该函数必须符合所需的回调函数签名。有关更多信息,请参阅回调函数。 |
|
可选。用户定义的一个值,在调用回调函数时传递给它。这允许回调函数访问在函数外部定义的数据。 |
void screenReleased() {
  Brain.Screen.print("screen released");
}

int main() {
  // Initializing Robot Configuration. DO NOT REMOVE!
  vexcodeInit();

  // Call screenReleased whenever the Brain screen is released
  Brain.Screen.released(screenReleased);
}
// arg keeps track of how many times the screen is released
void onScreenReleased(void* arg) {
  // Convert arg back to an int pointer
  int* count = (int*)arg;
  (*count)++;  // Increase the release count

  Brain.Screen.clearScreen();
  Brain.Screen.setCursor(1, 1);
  Brain.Screen.print("Released %d times", *count);
}

int main() {
  // Initializing Robot Configuration. DO NOT REMOVE!
  vexcodeInit();

  // Variable to track screen releases
  int releaseCount = 0;

  // Register the callback and pass the address of releaseCount
  // so the callback can update it each time the screen is released
  Brain.Screen.released(onScreenReleased, &releaseCount);
}