Robot-Specific Blocks#
Introduction#
The 123 Robot includes a Drivetrain, LED, speaker, Eye Sensor, and Gyro Sensor.
All standard VEXcode VR Blocks are available for use in the 123 Playspace Playground.
Below is a list of all available Robot-specific Blocks:
Drivetrain - Move and turn the robot.
Actions
drive - Moves the robot forward or reverse forever.
drive until - Moves the robot forward or reverse until it detects an object, crash, or line.
drive for - Moves the robot forward or reverse for a specific distance.
turn - Turns the robot left or right forever.
turn for - Turns the robot left or right for a specific number of degrees.
turn to heading - Turns the robot to face a specific heading from -359 to 359 degrees. The robot will turn the shortest direction to reach the target heading.
stop driving - Stops the robot’s movement.
Settings
set drive timeout - Sets how many seconds the robot will try to finish a movement.
set drive heading - Changes the robot’s current heading to a new heading.
Values
drive is done - Reports whether the robot is finished moving.
drive heading - Reports the robot’s current heading from 0 to 359 degrees.
Sound - Play built-in sounds through the 123 Robot’s speaker.
play sound - Plays one of the robot’s built-in sound effects.
LED - Control the 123 Robot’s center LED.
glow - Sets the color of the LED light.
Actions - Make the 123 Robot perform preset behaviors.
act - Acts out different emotions.
Sensing - Read values from the 123 Robot’s sensors.
Gyro
detected crash — Reports whether the robot has detected a sudden impact.
Eye
eye found an object – Reports whether or not the Eye Sensor detects an object within range.
eye detects color – Reports whether the Eye Sensor detects a specified color.
eye hue – Reports the hue detected by the Eye Sensor.
eye bright object – Reports whether the detected object reflects a lot of light.
eye brightness – Reports the brightness detected by the Eye Sensor.
Drivetrain#
The 123 Robot has a two-wheel drivetrain that lets it drive and turn. The Drivetrain blocks control how the robot moves.
The drivetrain can measure distance in two ways: steps and mm (millimeters). One step is one square on a 123 Field.
Actions#
drive#
The drive stack block moves the robot forward or reverse forever. The robot will continue to move until it is given another action, like turning or stopping.
drive [forward v]
Parameters |
Description |
|---|---|
direction |
The direction the robot moves: forward or reverse. |
Example
  when started
  [Drive for 2 seconds.]
  drive [forward v]
  wait (2) seconds
  stop driving
drive until#
The drive until stack block moves the robot forward or reverse until the Eye Sensor detects an object, crash, or line.
drive [forward v] until [object v]
Parameters |
Description |
|---|---|
direction |
The direction the robot moves: forward or reverse. |
condition |
The condition that stops the robot:
|
Example
  when started
  [Reverse after a crash.]
  drive [forward v] until [crash v]
  drive [reverse v] for (1) [steps v]
drive for#
The drive for stack block moves the robot forward or reverse for a specific distance. The project will wait until the robot is done moving before the next block in the stack runs.
drive [forward v] for (1) [steps v]
Parameters |
Description |
|---|---|
direction |
The direction the robot moves: forward or reverse. |
distance |
The distance the robot drives. This can be an integer or a decimal. |
unit |
The distance unit: steps or mm. |
Example
  when started
  [Drive back and forth.]
  drive [forward v] for (3) [steps v]
  drive [reverse v] for (3) [steps v]
turn#
The turn stack block turns the robot left or right forever. The robot will continue to turn until it is given another action, like driving or stopping.
turn [right v]
Parameters |
Description |
|---|---|
direction |
The direction the robot turns: left or right. |
Example
  when started
  [Turn for 2 seconds.]
  turn [right v]
  wait (2) seconds
  stop driving
turn for#
The turn for stack block turns the robot left or right for a specific number of degrees. The turn is relative to the current position of the robot. The project will wait until the robot is done turning before the next block in the stack runs.
turn [right v] for (90) degrees
Parameters |
Description |
|---|---|
direction |
The direction the robot turns: left or right. |
angle |
The number of degrees the robot turns. This can be an integer or a decimal. |
Example
  when started
  [Turn left, then turn around to the right.]
  turn [left v] for (90) degrees
  turn [right v] for (180) degrees
turn to heading#
A heading is the direction the robot is facing, measured in degrees. The turn to heading stack block turns the robot to face a specific heading from -359 to 359 degrees. The robot will turn the shortest direction to reach the target heading.
The robot’s starting heading is 0 degrees.
turn to heading (90) degrees
Parameters |
Description |
|---|---|
heading |
The direction the robot should face, in degrees. This can be an integer or a decimal from -359 to 359. |
Example
  when started
  [Turn to face the cardinal directions.]
  turn to heading (90) degrees
  wait (2) seconds
  turn to heading (180) degrees
  wait (2) seconds
  turn to heading (270) degrees
  wait (2) seconds
  turn to heading (0) degrees
  wait (2) seconds
stop driving#
The stop driving stack block stops the robot’s movement.
stop driving
Parameters |
Description |
|---|---|
This block has no parameters. |
Example
  when started
  [Stop driving after 4 seconds.]
  drive [forward v]
  wait [4] seconds
  stop driving
Settings#
set drive timeout#
The set drive timeout stack block sets how many seconds the robot will try to finish a movement. If the robot cannot finish in that time, it will stop trying and move on to the next block in the stack. This keeps the robot from getting stuck on a movement.
set drive timeout to (1) seconds
Parameters |
Description |
|---|---|
time |
The number of seconds the robot can try to finish a movement. This can be a whole number or a decimal. |
Example
  when started
  [Turn right after driving for 1 second.]
  set drive timeout to (1) seconds
  drive [forward v] for (1000) [mm v]
  turn [right v] for (90) degrees
set drive heading#
A heading is the direction the robot is facing, measured in degrees. The set drive heading stack block changes the robot’s current heading to a new heading value.
For example, if the robot has turned to face right, setting the heading to 0 degrees makes that right-facing position the new 0 degrees. Then the robot can turn to other positions based on that new heading.
set drive heading to (0) degrees
Parameters |
Description |
|---|---|
heading |
The heading value, in degrees, to set for the robot. This can be an integer or a decimal from -359 to 359. |
Example
  when started
  [Face the new 0 degree heading.]
  set drive heading to (90) degrees
  turn to heading (0) degrees
Values#
drive is done#
The drive is done Boolean block reports whether the robot is finished moving. This can be used to control the timing of other behaviors based on the robot’s movement.
True — The robot is finished moving.
False — The robot is still moving.
This block works together with the following Drivetrain blocks: drive for, drive until, turn for, and turn to heading.
<drive is done?>
Parameters |
Description |
|---|---|
This block has no parameters. |
Example
    when started
    [Glow blue after a crash.]
    drive [forward v] until [crash v]
    forever
      if <drive is done?> then
        glow [blue v]
      else
        glow [green v]
drive heading#
A heading is the direction the robot is facing, measured in degrees. The drive heading reporter block reports the robot’s current heading from 0 to 359 degrees.
The robot’s starting heading is 0 degrees.
(drive heading in degrees)
Parameters |
Description |
|---|---|
This block has no parameters. |
Example
    when started
    [Display the heading after turning.]
    turn [right v] for (450) degrees
    print (drive heading in degrees) ▶
Sound#
play sound#
The play sound block plays one of the robot’s built-in sounds.
play sound [honk v]
Parameters |
Description |
|---|---|
sound |
One of the built-in sounds shown below. |
Sound Name |
Play Sound |
|---|---|
honk |
|
doorbell |
|
crash |
|
random |
Plays a random sound from the 3 sounds above. |
Example
  when started :: hat events
  [Play the doorbell sound.]
  play sound [doorbell v]
LED#
glow#
The glow block sets the color of the LED light.
glow [green v]
Parameters |
Description |
|---|---|
color |
The color to set the LED to:
|
Example
  when started :: hat events
  [Blink the LED light forever.]
  forever
  glow [green v]
  wait [0.5] seconds
  glow [off v]
  wait [0.5] seconds
Actions#
act#
The act block is used to act sad, happy, or crazy by having the 123 Robot perform a sequence of drive, turn, and sound behaviors.
act [sad v]
Parameters |
Description |
|---|---|
emotion |
The emotion to act out.
|
  when started :: hat events
  [Act out a happy behavior.]
  act [happy v]
Sensing#
The virtual 123 Robot also has access to the standard Brain and Drivetrain Sensing blocks.
Gyro#
The 123 Robot uses gyro sensing to detect sudden impacts, such as hitting a wall or object.
detected crash#
The detected crash Boolean block reports whether the robot has detected a sudden impact, such as hitting a wall or object hard enough to quickly change its motion.
True — A crash has been detected.
False — A crash has not been detected.
<detected crash?>
Parameters |
Description |
|---|---|
This block has no parameters. |
Example
  when started
  [Back up after a crash.]
  drive [forward v]
  wait until <detected crash?>
  drive [reverse v] for (200) [mm v]
Eye#
eye found an object#
The eye found an object Boolean block reports whether or not the Eye Sensor detects an object within range.
True — The Eye Sensor detects an object.
False — The Eye Sensor does not detect an object.
<eye found an object?>
Parameters |
Description |
|---|---|
This block has no parameters. |
Example
  when started
  [Stop driving after detecting an object.]
  set eye light [on v]
  drive [forward v]
  wait (0.1) seconds
  wait until <eye found an object?>
  stop driving
eye detects color#
The eye detects color Boolean block reports whether the Eye Sensor detects a specified color, based on the detected hue value.
True – The Eye sensor detects the specified color.
False – The Eye sensor does not detect the specified color.
To check the exact hue value detected by the Eye Sensor, use the eye hue reporter block.
<eye detects [red v]?>
Parameters |
Description |
|---|---|
color |
The color to detect:
|
Example
  when started
  [Stop driving after detecting a green object.]
  set eye light [on v]
  drive [forward v]
  wait (0.1) seconds
  wait until <eye detects [green v]?>
  stop driving
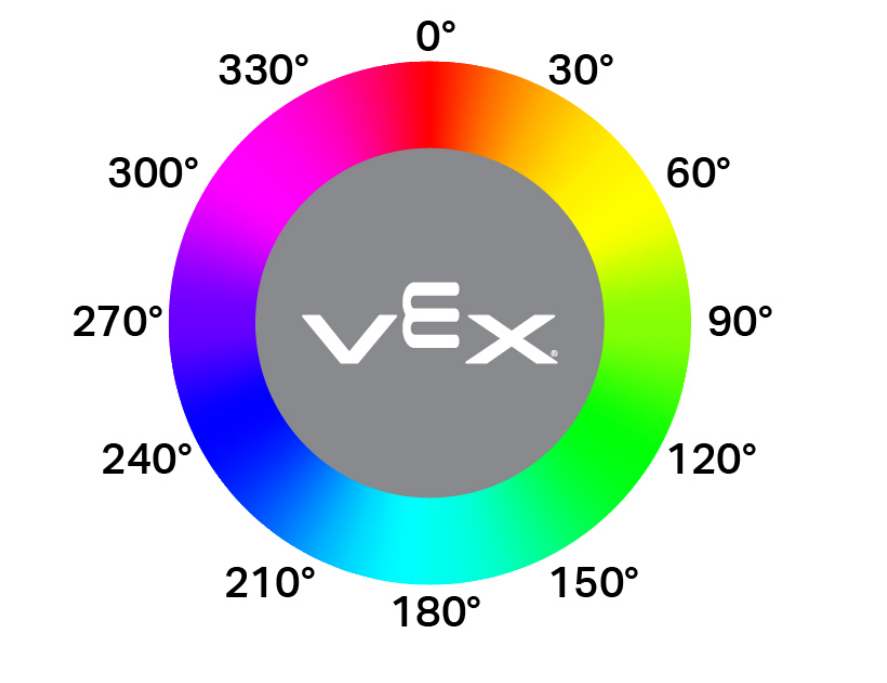
eye hue#
The eye hue reporter block reports the hue detected by the Eye Sensor as a number from 0 to 359 degrees.
Hue is a way to describe color using numbers around a color wheel.
(eye hue in degrees)
Parameters |
Description |
|---|---|
This block has no parameters. |
Example
  when started
  [Display if an object is pink.]
  forever
  clear all rows
  if <[290] [math_less_than v] (eye hue in degrees) [math_less_than v] [350]> then
    print [Pink!] ▶
    wait (0.1) seconds
  else
    print [Not pink!] ▶
    wait (0.1) seconds
eye bright object#
The eye bright object Boolean block reports whether the object detected by the Eye Sensor is bright.
An object is considered bright when it reflects more than 70% brightness back to the Eye Sensor.
True — The detected object reflects more than 70% brightness.
False — The detected object reflects 70% brightness or less.
This can be used before checking for a color to make sure the object is reflecting enough light for the Eye Sensor to detect the color reliably.
<eye bright object?>
Parameters |
Description |
|---|---|
This block has no parameters. |
Example
  when started
  [Display whether a detected object is bright.]
  set eye light power to (100)%
  drive [forward v]
  wait until <eye found an object?>
  wait (0.1) seconds
  if <eye bright object?> then
    print [Bright object!] ▶
  else
    print [Object not bright.] ▶
eye brightness#
The eye brightness reporter block reports how much light is reflected back to the Eye Sensor, as a percentage from 0% to 100%.
A higher percentage means more light is reflected back to the Eye Sensor. A lower percentage means less light is reflected back.
(eye brightness in %)
Parameters |
Description |
|---|---|
This block has no parameters. |
Example
  when started
  [Display whether a detected object is bright.]
  set eye light power to (100)%
  drive [forward v]
  wait until <eye found an object?>
  wait (0.1) seconds
  if <(eye brightness in %) [math_less_than v] [70]> then
    print [Object not bright.] ▶
  else
    print [Bright object!] ▶