人工智能视觉#
介绍#
AI视觉传感器能够检测和追踪物体、颜色以及AprilTag ID。这使得机器人能够分析周围环境、追踪物体,并根据检测到的视觉数据做出反应。
This page uses ai_vision_1, RED_BOX, and BOX_CODE as the example AI Vision Sensor, Color Signature, and Color Code names respectively. Replace them with your own configured names as needed.
以下是所有方法的列表:
数据获取器 – 从 AI 视觉传感器获取数据。
take_snapshot– Captures data for a specific signature.installed– Whether the AI Vision Sensor is connected to the V5 Brain.
Properties – Object data returned from take_snapshot.
.exists– Whether the object exists in the current detection..width– Width of the detected object..height– Height of the detected object..centerX– X position of the object’s center..centerY– Y position of the object’s center..angle– Orientation of the Color Code..originX– X position of the object’s top-left corner..originY– Y position of the object’s top-left corner..id– Classification or tag ID of the object..score– Confidence score for AI Classifications.
构造函数 – 手动初始化和配置 AI 视觉传感器及其签名。
获取器#
take_snapshot#
take_snapshot filters data from the AI Vision Sensor’s frame to a single signature — a saved description of something the sensor can recognize, such as a pre-trained object, an AprilTag ID, or a configured Color Signature or Color Code — and returns a tuple.
要使用此方法,必须先在视觉实用程序中配置颜色签名和颜色代码。
该元组按宽度从大到小排序存储对象,索引从 0 开始。每个对象的属性 (#properties) 可以通过其索引访问。如果没有检测到匹配的对象,则返回空元组。
Usage:
ai_vision_1.take_snapshot(SIGNATURE)
参数 |
描述 |
|---|---|
|
Filters the dataset to only include data of the given signature. Available signatures are:
|
|
可选。设置可返回对象的最大数量,取值范围为 1 到 24。默认值为 8。 |
# Drive forward if an object is detected
while True:
    objects = ai_vision_1.take_snapshot(AiVision.ALL_AIOBJS)
    if objects[0].exists:
        drivetrain.drive_for(FORWARD, 50, MM)
    wait(50, MSEC)
人工智能分类#
AI视觉传感器可以根据特定的AI分类检测不同的物体。根据在“设备”窗口中配置AI视觉传感器时选择的AI分类模型,可以检测到不同的物体。目前可用的模型有:
课堂要素
身份证号码 |
人工智能分类 |
|---|---|
0 |
|
1 |
|
2 |
|
3 |
|
4 |
|
5 |
|
6 |
|
7 |
|
8 |
|
V5RC High Stakes
身份证号码 |
人工智能分类 |
|---|---|
0 |
|
1 |
|
2 |
|
V5RC Push Back
身份证号码 |
人工智能分类 |
|---|---|
0 |
|
1 |
|
颜色特征#
A Color Signature is a unique color that the AI Vision Sensor can recognize. These signatures allow the AI Vision Sensor to detect and track objects based on their color. Once a Color Signature is configured, the sensor can identify objects with that specific color in its field of view. Color signatures are used with take_snapshot to process and detect colored objects in real-time.
In order to use a configured Color Signature in a project, its name must be the name of the sensor, two underscores, and then the Color Signature’s name. For example: ai_vision_1__RED_BOX.
# Display if any objects match the RED_BOX signature
while True:
    brain.screen.set_cursor(1, 1)
    brain.screen.clear_row(1)
    # Change to any configured Color Signature
    red_box = ai_vision_1.take_snapshot(ai_vision_1__RED_BOX)
    if red_box[0].exists:
        brain.screen.print("Color detected!")
        wait(100, MSEC)
颜色代码#
颜色编码是一种结构化的模式,由按特定顺序排列的颜色符号组成。这些编码使人工智能视觉传感器能够识别预定义的颜色模式。颜色编码可用于识别复杂物体或为自主导航创建独特的标记。
In order to use a configured Color Code in a project, its name must be the name of the sensor, two underscores, and then the Color Code’s name. For example: ai_vision_1__BOX_CODE.
# Display if any objects match the BOX_CODE code
while True:
    brain.screen.set_cursor(1, 1)
    brain.screen.clear_row(1)
    # Change to any configured Color Code
    box_code = ai_vision_1.take_snapshot(ai_vision_1__BOX_CODE)
    if box_code[0].exists:
        brain.screen.print("Code detected!")
        wait(100, MSEC)
installed#
installed returns a Boolean indicating whether the AI Vision Sensor is currently connected to the V5 Brain.
True– The AI Vision Sensor is connected to the V5 Brain.False– The AI Vision Sensor is not connected to the V5 Brain.
Usage:
ai_vision_1.installed()
参数 |
描述 |
|---|---|
此方法没有参数。 |
# Display a message if the AI Vision Sensor is connected
if ai_vision_1.installed():
    brain.screen.print("Installed!")
特性#
There are ten properties that are included with each object stored in a tuple after take_snapshot is used.
All property values except .id and .score describe the detected object’s position and size in the AI Vision Sensor’s view at the moment take_snapshot was used. These values are measured in pixels, based on the sensor’s 320 by 240 pixel resolution.
.exists#
.exists returns a Boolean indicating if the index exists in the tuple or not.
True– The index exists.False– The index does not exist.
# Check if at least two objects are detected
while True:
    brain.screen.clear_screen()
    brain.screen.set_cursor(1, 1)
    objects = ai_vision_1.take_snapshot(AiVision.ALL_AIOBJS)

    if objects[0].exists:
        if objects[1].exists:
            brain.screen.print("At least 2")

        else:
            brain.screen.print("Less than 2")
    wait(50, MSEC)
.width#
.width returns the width of the detected object in pixels, which is an integer between 1 and 320.
# Approach an object until it's at least 100 pixels wide
while True:
    objects = ai_vision_1.take_snapshot(AiVision.ALL_AIOBJS)

    if objects[0].exists:
        if objects[0].width < 100:
            drivetrain.drive(FORWARD)
    else:
        drivetrain.stop()
    wait(50, MSEC)
.height#
.height returns the height of the detected object in pixels, which is an integer between 1 and 240.
# Approach an object until it's at least 90 pixels tall
while True:
    objects = ai_vision_1.take_snapshot(AiVision.ALL_AIOBJS)

    if objects[0].exists:
        if objects[0].height < 90:
            drivetrain.drive(FORWARD)
    else:
        drivetrain.stop()
    wait(50, MSEC)
.centerX#
.centerX returns the x-coordinate of the detected object’s center in pixels, which is an integer between 0 and 320.
# Turn until an object is directly in front of the sensor
drivetrain.set_turn_velocity(10, PERCENT)
drivetrain.turn(RIGHT)

while True:
    objects = ai_vision_1.take_snapshot(AiVision.ALL_AIOBJS)

    if objects[0].exists:
        if 140 < objects[0].centerX < 180:
            drivetrain.stop()
    wait(10,MSEC)
.centerY#
.centerY returns the y-coordinate of the detected object’s center in pixels, which is an integer between 0 and 240.
# Approach an object until the object's center is
# high enough in the field of view
while True:
    objects = ai_vision_1.take_snapshot(AiVision.ALL_AIOBJS)

    if objects[0].exists:
        if objects[0].centerY < 150:
            drivetrain.drive(FORWARD)
    else:
        drivetrain.stop()
    wait(50, MSEC)
.angle#
.angle returns the orientation of the detected Color Code or AprilTag ID in degrees, which is an integer between 0 and 359.
# Turn left or right depending on how a
# configured Color Code is rotated
while True:
    box_code = ai_vision_1.take_snapshot(ai_vision_1__BOX_CODE)

    if box_code[0].exists:
        if 50 < box_code[0].angle < 100:
            drivetrain.turn(RIGHT)

        elif 270 < box_code[0].angle < 330:
            drivetrain.turn(LEFT)

        else:
            drivetrain.stop()
    else:
        drivetrain.stop()
    wait(50, MSEC)
.originX#
.originX returns the x-coordinate of the top-left corner of the detected object’s bounding box in pixels, which is an integer between 0 and 320.
# Display if an object is to the left or the right
while True:
    brain.screen.clear_screen()
    brain.screen.set_cursor(1,1)

    objects = ai_vision_1.take_snapshot(AiVision.ALL_AIOBJS)

    if objects[0].exists:
        if objects[0].originX < 120:
            brain.screen.print("To the left!")
        else:
            brain.screen.print("To the right!")
    else:
        brain.screen.print("No objects")
    wait(100, MSEC)
.originY#
.originY returns the y-coordinate of the top-left corner of the detected object’s bounding box in pixels, which is an integer between 0 and 240.
# Display if an object is close or far
while True:
    brain.screen.clear_screen()
    brain.screen.set_cursor(1,1)

    objects = ai_vision_1.take_snapshot(AiVision.ALL_AIOBJS)

    if objects[0].exists:
        if objects[0].originY < 110:
            brain.screen.print("Close")
        else:
            brain.screen.print("Far")
.id#
.id returns the ID of the detected AI Classification or AprilTag ID as an integer.
For an AprilTag ID, the .id property represents the detected AprilTag ID number in the range of 0 to 36. For an AI Classification, the .id property corresponds to the predefined ID in the AI Classifications section.
# Move forward when AprilTag ID 1 is detected
while True:
    apriltags = ai_vision_1.take_snapshot(AiVision.ALL_TAGS)

    if apriltags[0].exists:
        if apriltags[0].id == 1:
            robot.drive(FORWARD)
    else:
        drivetrain.stop()

    wait(50, MSEC)
.score#
.score returns the confidence score of the detected AI Classification as an integer between 1 and 100.
得分越低,表示传感器对检测到的物体信心越低;得分越高,表示传感器对检测到的物体信心越高。
构造函数#
Constructors are used to manually create AiVision, Colordesc, and Codedesc objects, which are necessary for configuring the AI Vision Sensor outside of VEXcode.
AiVision#
AiVision creates an AI Vision Sensor.
用法
Vision(smartport, sigs)
参数 |
描述 |
|---|---|
|
The Smart Port that the AI Vision Sensor is connected to, written as |
|
Optional. The name of one or more signatures, separated by commas (
|
# Create the Color Signatures
RED_BOX = Colordesc(1, 255, 0, 0, 20, 0.9)
BLUE_BOX = Colordesc(0, 26, 255, 0, 20, 0.9)

# Create the Color Code
RED_BLUE = Codedesc(RED_BOX, BLUE_BOX)

"""
Create an AI Vision Sensor with the following signatures:
- RED_BLUE
- AiVision.ALL_TAGS - for AprilTag IDs
"""
ai_vision_1 = AiVision(Ports.PORT1, RED_BLUE, AiVision.ALL_TAGS)
Colordesc#
Colordesc creates a Color Signature. Up to seven different Color Signatures can be stored on an AI Vision Sensor at once.
Usage:
Colordesc(index, red, green, blue, hangle, hdsat)
范围 |
描述 |
|---|---|
|
The |
|
颜色的红色值,范围从 0 到 255。 |
|
颜色的绿色值,范围从0到255。 |
|
颜色的蓝色值,范围从 0 到 255。 |
|
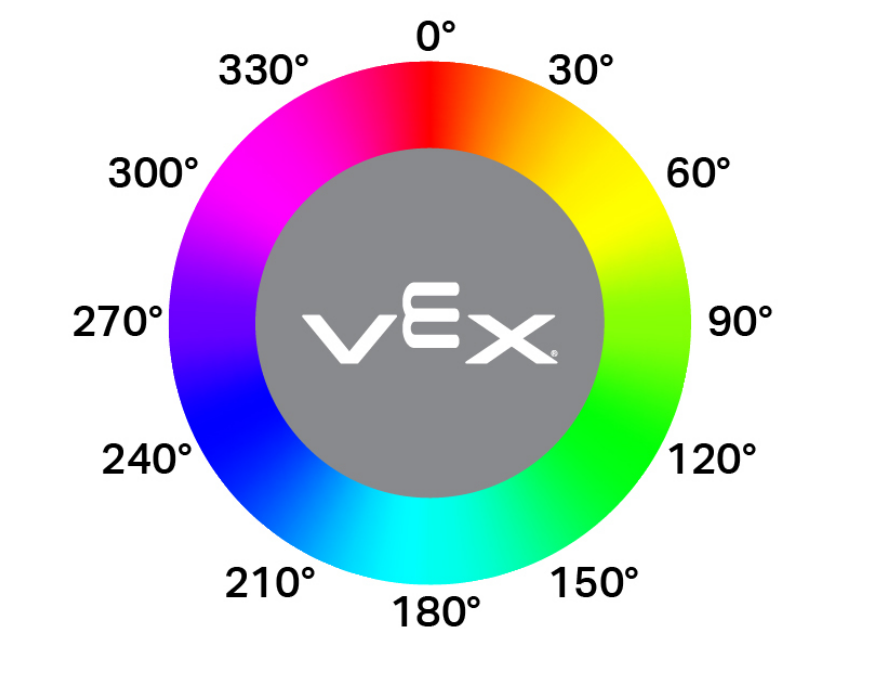
色相允许的变化范围以色轮上的角度范围(1-40)表示。数值越高,允许的旋转偏差越大,偏离基准色相的幅度也越大。 |
|
允许的饱和度偏差范围为 0.10 至 1.00。该值表示颜色可以在完整饱和度范围内偏移的比例(例如,0.10 = ±10% 饱和度)。 |
"""
Create a Color Signature with the following values:
- index: 1
- red: 255
- green: 0
- blue: 0
- hangle: 20
- hdsat: 0.9
"""
# Create a red Color Signature
RED_BOX = Colordesc(1, 255, 0, 0, 20, 0.9)
Codedesc#
Codedesc creates a Color Code. It requires at least two already defined Color Signatures in order to be used. Up to eight different Color Codes can be stored on a Vision Sensor at once.
Usage:
Codedesc(sig1, sig2, sig3, sig4, sig5)
范围 |
描述 |
|---|---|
|
先前创建的颜色签名。 |
|
先前创建的颜色签名。 |
|
可选。先前创建的颜色签名。 |
|
可选。先前创建的颜色签名。 |
|
可选。先前创建的颜色签名。 |
# Create the Color Signatures
RED_BOX = Colordesc(1, 255, 0, 0, 20, 0.9)
BLUE_BOX = Colordesc(0, 26, 255, 0, 20, 0.9)

# Create a Color Code with the Color Signatures
BOX_CODE = Codedesc(RED_BOX, BLUE_BOX)
Tagdesc#
Tagdesc creates an AprilTag ID. You can use it to define identifiable AprilTag IDs, which makes your code clearer and easier to read.
Usage:
Tagdesc(id)
范围 |
描述 |
|---|---|
|
要使用的 AprilTag ID。 |
# Set AprilTag ID 7 to be the "goal"
goal = Tagdesc(7)