Pantalla#
Introducción#
Los métodos de pantalla controlan cómo el V5 Brain muestra texto, números y gráficos en su pantalla táctil, y cómo responde a la entrada táctil.
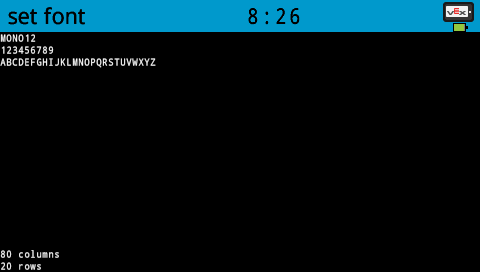
De forma predeterminada, la fuente para imprimir en Brain es monoespaciada pequeña, que tiene 12 filas y 48 columnas.
Para dibujar, la resolución del Brain es de 480 x 240 píxeles.

A continuación se muestra una lista de todos los métodos:
Impresión con cursor: Coloca e imprime texto.
print— Prints text, numbers, or variable values at the current cursor position.set_cursor— Moves the cursor to a specific row and column.next_row— Moves the cursor to column 1 of the next row.clear_row— Clears a row of text.row— Returns the row where text will be printed.column— Returns the column where text will be printed.print_at— Prints text, numbers, or variable values at a specific x and y coordinate.get_string_width— Returns the width of a string in pixels using the current font.get_string_height— Returns the height of a string in pixels using the current font.clear_line— Clears a line of text.new_line— Moves the cursor to a new line.
Motadores: Cambian la configuración de la pantalla, los colores y el comportamiento de dibujo.
clear_screen— Clears the screen of all drawings and text.set_font— Sets the font for printed text.set_pen_width— Sets the thickness of drawn lines and shape outlines.set_pen_color— Sets the color of text, pixels, lines, and shape outlines.set_fill_color— Sets the fill color for drawn shapes and printed text backgrounds.set_origin— Sets the origin used for coordinate-based printing and drawing.
Dibujar: Añadir gráficos a la pantalla.
draw_pixel— Draws one pixel at a coordinate.draw_line— Draws a line between two points.draw_rectangle— Draws a rectangle.draw_circle— Draws a circle.render— Updates the Brain’s screen with text and drawings only when called.set_clip_region— Restricts where drawings and text can appear.
Funciones de obtención: comprueban el estado y la posición del toque.
pressing— Returns whether the screen is being pressed.x_position— Returns the x-coordinate of the last screen press.y_position— Returns the y-coordinate of the last screen press.
Funciones de devolución de llamada: Responden a los eventos táctiles en la pantalla.
pressed— Registers a function to be called when the screen is pressed.released— Registers a function to be called when the screen is released.
For information on constructing a Brain to gain access to the screen methods, see Brain.
Cursor Imprimir#
print#
print prints text, numbers, or variable values on the Brain screen at the current cursor position and font.
Uso:
brain.screen.print(text, sep, precision)
Parámetros |
Descripción |
|---|---|
|
El texto, número o valor de variable que se imprimirá. |
|
Optional. A string to insert between values. This must be written as a keyword argument (sep=). The default is |
|
Optional. The number of decimal places to display when printing simple numbers. This must be written as a keyword argument( |
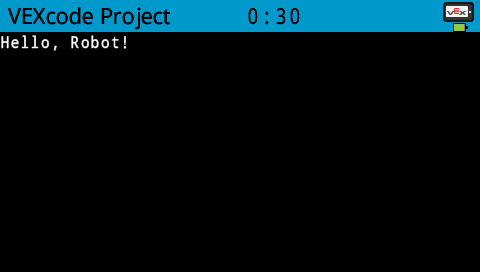
# Print on the Brain's screen
brain.screen.print("Hello, Robot!")
set_cursor#
set_cursor moves the cursor to a specific row and column on the Brain screen. The next print call will start printing at that location. How many rows and columns can comfortably fit depends on the selected font. With the default monospaced medium font, up to 8 rows and 13 columns can be displayed clearly. Text placed beyond this range may be cut off or become difficult to read.
Monospaced fonts have characters that are all the same width, making text placement consistent. In contrast, proportional fonts vary in character width, so some letters take up more space than others. However, regardless of which type is used, set_cursor positions the cursor based on row and column size, not font style. The font size can be adjusted using the set_font.
Uso:
brain.screen.set_cursor(row, column)
Parámetros |
Descripción |
|---|---|
|
La fila a la que mover el cursor. |
|
La columna a la que se debe mover el cursor. |
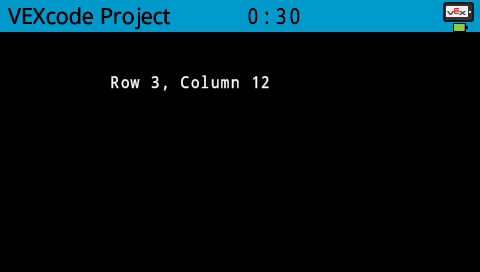
# Display text starting at Row 3 Column 12
brain.screen.set_cursor(3, 12)
brain.screen.print("Row 3, Column 12")
next_row#
next_row moves the cursor to the next row.
Uso:
brain.screen.next_row()
Parámetros |
Descripción |
|---|---|
Este método no tiene parámetros. |
# Print two lines of text on the Brain's screen
brain.screen.print("Line 1")
brain.screen.next_row()
brain.screen.print("Line 2")

clear_row#
clear_row clears a single row of text on the Brain screen.
Uso:
brain.screen.clear_row(row, color)
Parámetros |
Descripción |
|---|---|
|
Opcional. La fila que se va a borrar. El valor predeterminado es la fila actual del cursor. |
|
Opcional. Un color válido, un valor hexadecimal o una cadena web. |
# Only keep the text on row 1
brain.screen.print("This text stays")
brain.screen.next_row
brain.screen.print("This text disappears")
wait(3, SECONDS)

brain.screen.clear_row()
row#
row returns the row where text will be printed as an integer.
Uso:
brain.screen.row()
Parámetros |
Descripción |
|---|---|
Este método no tiene parámetros. |
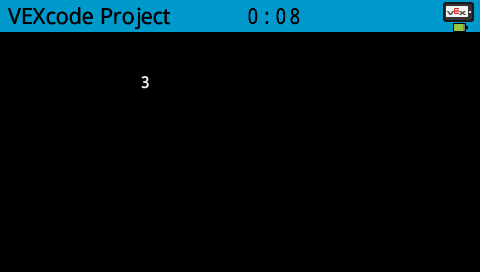
# Display the cursor's current row
brain.screen.set_cursor(3, 2)
brain.screen.print(brain.screen.row())
column#
column returns the column where text will be printed as an integer.
Uso:
brain.screen.column()
Parámetros |
Descripción |
|---|---|
Este método no tiene parámetros. |
# Display the cursor's current column
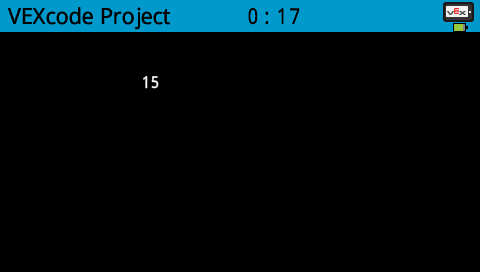
brain.screen.set_cursor(3, 15)
brain.screen.print(brain.screen.column())
print_at#
print_at prints text, numbers, or variable values on the Brain screen at specific x and y coordinates with the current font and origin.
Uso:
brain.screen.print_at(text, x, y, sep, precision, opaque)
Parámetros |
Descripción |
|---|---|
|
El texto, número o valor de variable que se imprimirá. |
|
The x-coordinate to print at as a keyword argument ( |
|
The y-coordinate to print at as a keyword argument ( |
|
Optional. A string to insert between values. This must be written as a keyword argument (sep=). The default is |
|
Optional. The number of decimal places to display when printing simple numbers. This must be written as a keyword argument( |
|
Optional. A Boolean value indicating whether or not the text should clear background pixels. The default is |
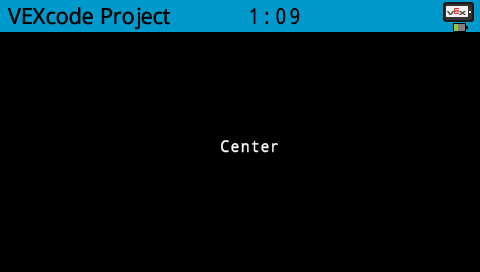
# Display text at the center of the screen
brain.screen.print_at("Center", x=220, y=120)
get_string_width#
get_string_width returns the width of a string in pixels as an integer, using the current font.
Usage:
brain.screen.get_string_width(string)
Parámetros |
Descripción |
|---|---|
|
La cuerda a medir. |
get_string_height#
get_string_height returns the height of a string in pixels as an integer, using the current font.
Usage:
brain.screen.get_string_height(string)
Parámetros |
Descripción |
|---|---|
|
La cuerda a medir. |
clear_line#
clear_line clears the current row of text.
Usage:
brain.screen.clear_line()
Parámetros |
Descripción |
|---|---|
Este método no tiene parámetros. |
new_line#
new_line moves the cursor to column 1 on the next row on the Brain screen.
Uso:
brain.screen.new_line()
Parámetros |
Descripción |
|---|---|
Este método no tiene parámetros. |
Mutadores#
clear_screen#
clear_screen clears all drawings and text from the Brain screen.
Uso:
brain.screen.clear_screen(color)
Parámetros |
Descripción |
|---|---|
|
Optional. A valid color option:
|
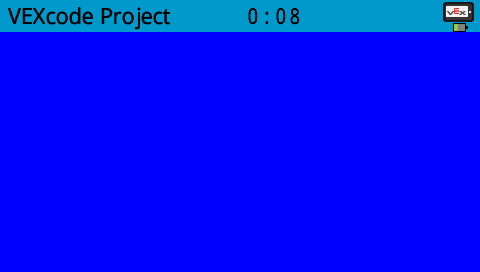
# Print VEXcode on the screen
brain.screen.print("VEXcode")
wait(2, SECONDS)
# Clear screen to black
brain.screen.clear_screen()
# Print VEXcode on the screen
brain.screen.print("VEXcode")

# Clear screen to blue using predefined color
brain.screen.clear_screen(Color.BLUE)
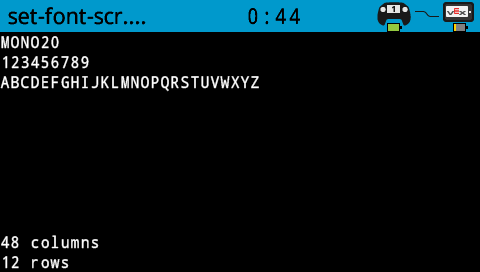
set_font#
set_font sets the font used for displaying text on the Brain screen. This font will apply to all text printed after this method runs.
Uso:
brain.screen.set_font(font)
Parámetros |
Descripción |
|---|---|
|
Una opción de fuente válida a continuación. |
|
|
|
|---|---|---|
|
|
|
|
|
|
|

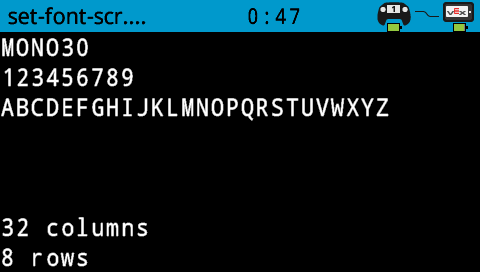
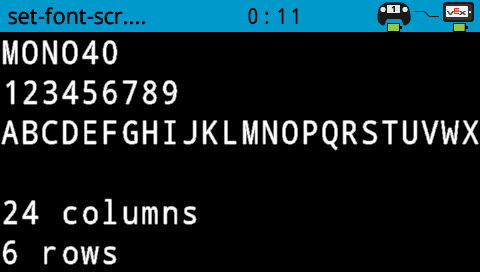
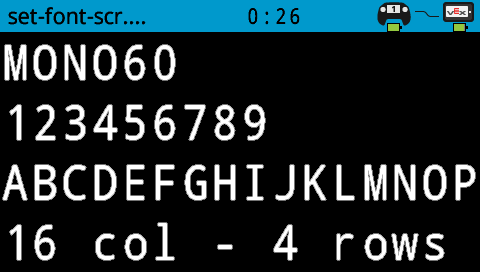
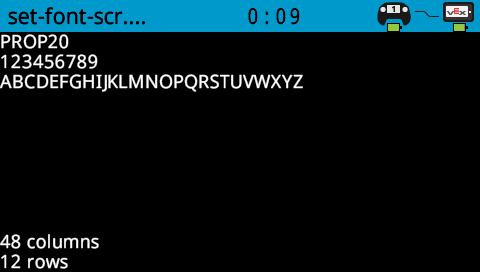
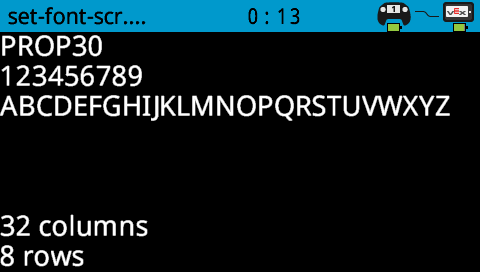
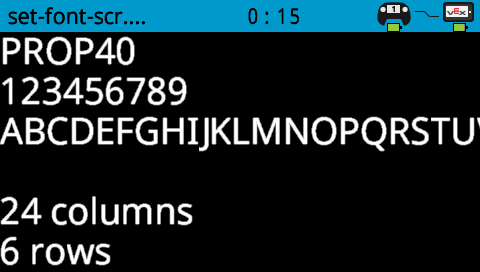
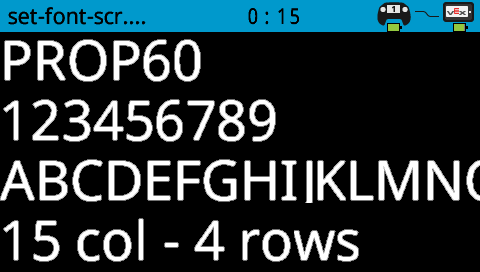
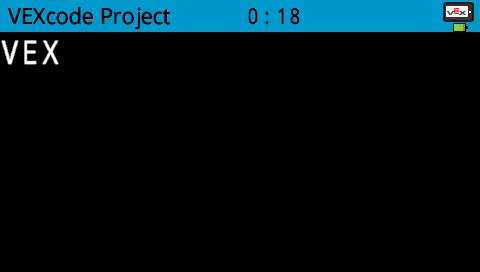
# Set the font type to MONO40
brain.screen.set_font(FontType.MONO40)
brain.screen.print("VEX")
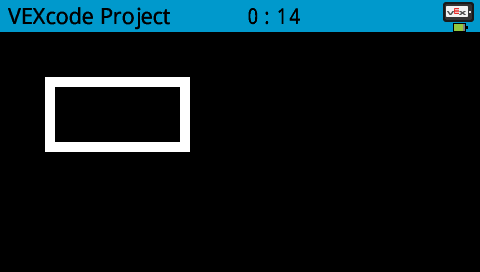
set_pen_width#
set_pen_width sets the thickness of drawn lines and shape outlines.
Uso:
brain.screen.set_pen_width(value)
Parámetros |
Descripción |
|---|---|
|
El ancho del lápiz, en píxeles, va de 0 a 32. |
# Draw a rectangle with a pen width of 10
brain.screen.set_pen_width(10)
brain.screen.draw_rectangle(50, 50, 130, 60)
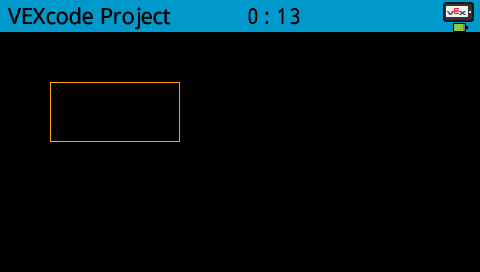
set_pen_color#
set_pen_color sets the color of text, pixels, lines, and shape outlines.
Uso:
brain.screen.set_pen_color(color)
Parámetros |
Descripción |
|---|---|
|
The pen and font color to use. Options include:
|
# Draw a rectangle with orange borders
brain.screen.set_pen_color(Color.ORANGE)
brain.screen.draw_rectangle(50, 50, 130, 60)
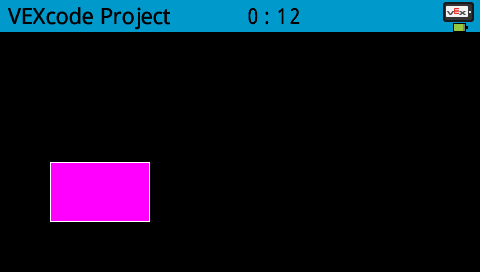
set_fill_color#
set_fill_color sets the fill color used when shapes are drawn.
Uso:
brain.screen.set_fill_color(color)
Parámetros |
Descripción |
|---|---|
|
The fill color to use. Options include:
|
# Draw a purple rectangle
brain.screen.set_fill_color(Color.PURPLE)
brain.screen.draw_rectangle(50, 130, 100, 60)
set_origin#
set_origin sets the origin used for drawing and coordinate-based printing on the Brain screen. By default, the origin is the top-left corner of the screen.
Uso:
brain.screen.set_origin(x, y)
Parámetros |
Descripción |
|---|---|
|
La coordenada x que se establecerá como origen, de 0 a 479. |
|
La coordenada y que se establecerá como origen, de 0 a 239. |
Dibujar#
draw_pixel#
draw_pixel draws one pixel at the selected x and y coordinate using the current pen color.
Uso:
brain.screen.draw_pixel(x, y)
Parámetros |
Descripción |
|---|---|
|
La coordenada x para dibujar el píxel, de 0 a 479, con referencia al origen de la pantalla. |
|
La coordenada Y para dibujar el píxel, de 0 a 239, con referencia al origen de la pantalla. |
# Draw the pixels marking the corners of a square
brain.screen.draw_pixel(250, 100)
brain.screen.draw_pixel(275, 100)
brain.screen.draw_pixel(250, 125)
brain.screen.draw_pixel(275, 125)
![]()
draw_line#
draw_line draws a line from the first screen coordinate to the second screen coordinate using the current pen width and pen color.
Uso:
brain.screen.draw_line(start_x, start_y, end_x, end_y)
Parámetros |
Descripción |
|---|---|
|
La coordenada x en píxeles del inicio de la línea, de 0 a 479, con respecto al origen de la pantalla. |
|
La coordenada y en píxeles del inicio de la línea, de 0 a 239, con respecto al origen de la pantalla. |
|
La coordenada x en píxeles del final de la línea, de 0 a 479, con respecto al origen de la pantalla. |
|
La coordenada y en píxeles del final de la línea, de 0 a 239, con respecto al origen de la pantalla. |
# Draw a line from the top left to bottom right of the screen
brain.screen.draw_line(0, 0, 479, 239)

draw_rectangle#
draw_rectangle draws a rectangle using the current pen width, pen color, and fill color, unless the optional color parameter is used.
Uso:
brain.screen.draw_rectangle(x, y, width, height, color)
Parámetros |
Descripción |
|---|---|
|
La coordenada x en píxeles de la esquina superior izquierda del rectángulo de 0 a 479. |
|
La coordenada y en píxeles de la esquina superior izquierda del rectángulo de 0 a 239. |
|
El ancho del rectángulo. |
|
La altura del rectángulo. |
|
Optional. A valid color option:
|
# Draw a rectangle on the screen
brain.screen.draw_rectangle(50, 50, 130, 60)

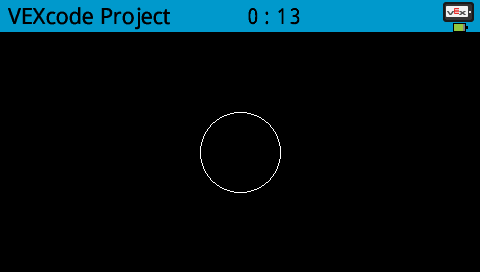
draw_circle#
draw_circle draws a circle using the current pen width, pen color, and fill color, unless the optional color parameter is used.
Uso:
brain.screen.draw_circle(x, y, radius, color)
Parámetros |
Descripción |
|---|---|
|
La coordenada x en píxeles del centro del círculo, de 0 a 479, con respecto al origen de la pantalla. |
|
La coordenada y en píxeles del centro del círculo, de 0 a 239, con respecto al origen de la pantalla. |
|
El radio del círculo, en píxeles. |
|
Optional. The fill color to use. Options include:
|
# Draw a circle on the screen
brain.screen.draw_circle(120, 120, 40)
render#
render enables double buffering for the Brain’s screen. Once called, any drawing commands (like text, shapes, or images) will no longer appear immediately for the rest of the project. Instead, updates will only be shown when render is used again. This allows for smoother and more controlled screen updates, but means nothing will be visible until render is used.
Uso:
brain.screen.render()
Parámetros |
Descripción |
|---|---|
Este método no tiene parámetros. |
# Render text after moving
brain.screen.render()
brain.screen.print("Render later...")
drivetrain.drive_for(FORWARD, 100, MM)
drivetrain.turn_for(RIGHT, 90, DEGREES)
brain.screen.render()
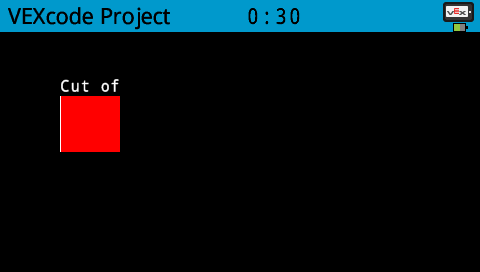
set_clip_region#
set_clip_region defines a rectangular area on the screen where all drawings and text will be confined. Any content outside this region will not be displayed.
Uso:
brain.screen.set_clip_region(x, y, width, height)
Parámetros |
Descripción |
|---|---|
|
La posición x de la esquina superior izquierda del rectángulo, referenciada al origen de la pantalla. |
|
La posición y de la esquina superior izquierda del rectángulo, referenciada al origen de la pantalla. |
|
El ancho del rectángulo. |
|
La altura del rectángulo. |
# Restrict text and drawings to a specific region
brain.screen.set_clip_region(0, 0, 120, 120)
brain.screen.draw_rectangle(60, 60, 100, 100, Color.RED)
brain.screen.print_at("Cut off!", x=60, y=60)
Tocar#
pressing#
pressing returns a Boolean indicating whether the Brain screen is currently being pressed.
True- The screen is being pressed.False- The screen is not being pressed.
Uso:
brain.screen.pressing()
Parámetros |
Descripción |
|---|---|
Este método no tiene parámetros. |
# Change the screen's color after it's pressed
while not brain.screen.pressing():
    wait(5, MSEC)
brain.screen.set_fill_color(Color.GREEN)
brain.screen.draw_rectangle(0, 0, 479, 239)
# Display different messages after the screen is pressed
while not brain.screen.pressing():
    wait(5, MSEC)
brain.screen.print("First message!")
brain.screen.next_row()
# Lift finger to press the screen again
while brain.screen.pressing():
    wait(5, MSEC)
while not brain.screen.pressing():
    wait(5, MSEC)
brain.screen.print("Second message!")
brain.screen.next_row()
x_position#
x_position returns the x-coordinate of the last screen press as an integer from 0 (left) to 479 (right).
Uso:
brain.screen.x_position()
Parámetros |
Descripción |
|---|---|
Este método no tiene parámetros. |
# Display a circle where the screen is pressed
while not brain.screen.pressing():
    wait(5, MSEC)
brain.screen.set_fill_color(Color.WHITE)
brain.screen.draw_circle(brain.screen.x_position(), brain.screen.y_position(), 20)
y_position#
y_position returns the y-coordinate of the last screen press as an integer from 0 (top) to 239 (bottom).
Uso:
brain.screen.y_position()
Parámetros |
Descripción |
|---|---|
Este método no tiene parámetros. |
# Display a circle where the screen is pressed
while not brain.screen.pressing():
    wait(5, MSEC)
brain.screen.set_fill_color(Color.WHITE)
brain.screen.draw_circle(brain.screen.x_position(), brain.screen.y_position(), 20)
Devoluciones de llamadas#
pressed#
pressed registers a function to be called when the Brain’s Screen is pressed.
Uso:
brain.screen.pressed(callback, arg)
Parámetros |
Descripción |
|---|---|
|
Una función definida previamente que se ejecuta cuando se presiona la pantalla del Cerebro. |
|
Opcional. Una tupla que contiene los argumentos que se pasarán a la función de devolución de llamada. Consulte Uso de funciones con parámetros para obtener más información. |
def my_function():
  brain.screen.print("Screen pressed")

# Call my_function whenever the Brain screen is pressed
brain.screen.pressed(my_function)
released#
released registers a function to be called when the screen is released (touch removed).
Uso:
brain.screen.released(callback, arg)
Parámetros |
Descripción |
|---|---|
|
Una función definida previamente que se ejecuta cuando se suelta la pantalla del cerebro. |
|
Opcional. Una tupla que contiene los argumentos que se pasarán a la función de devolución de llamada. Consulte Uso de funciones con parámetros para obtener más información. |
def my_function():
  brain.screen.print("Screen released")

# Call my_function whenever the Brain screen is released
brain.screen.released(my_function)