屏幕#
介绍#
屏幕方法控制 VEX AIM 编码机器人如何在屏幕上显示文本、数字和图形,以及如何响应屏幕按键。
以下是所有方法的列表:
触摸——检测并响应屏幕按压。
pressing– Returns whether the screen is currently being pressed.x_position– Returns the x-coordinate of the last screen press.y_position– Returns the y-coordinate of the last screen press.
光标打印——使用行/列系统显示文本。
print– Prints text, numbers, or variable values at the current cursor position.set_cursor– Moves the cursor to a specific row and column.next_row– Moves the cursor to column 1 of the next row.clear_row– Clears a row of text.get_row– Returns the current cursor row.get_column– Returns the current cursor column.
XY 打印 – 在特定的屏幕坐标处显示文本。
print_at– Prints text, numbers, or variable values at a specific x and y coordinate.set_origin– Sets the origin used for coordinate-based printing and drawing.
改变器——清除屏幕或更新视觉设置。
clear_screen– Clears the screen of all drawings and text.set_font– Sets the font for printed text.set_pen_width– Sets the thickness of drawn lines and shape outlines.set_pen_color– Sets the color of text, pixels, lines, and shape outlines.set_fill_color– Sets the fill color for drawn shapes and printed text backgrounds.
绘图——在屏幕上添加图形和图像。
draw_pixel– Draws a pixel at a specific x and y position.draw_line– Draws a line between two points.draw_rectangle– Draws a rectangle.draw_circle– Draws a circle.show_file– Displays an uploaded image.set_clip_region– Restricts where drawings and text can appear.
回调函数——在屏幕被按下或释放时运行的函数。
触碰#
pressing#
pressing returns a Boolean indicating whether the robot’s screen is currently being pressed.
True– The screen is being pressed.False– The screen is not being pressed.
Usage:
robot.screen.pressing()
参数 |
描述 |
|---|---|
该方法没有参数。 |
# Turn LEDs white only while the screen is pressed.
while True:
    if robot.screen.pressing():
        robot.led.on(ALL_LEDS, WHITE)
    else:
        robot.led.off(ALL_LEDS)

    wait(50, MSEC)
# Display different messages after the screen is pressed
while not robot.screen.pressing():
    wait(5, MSEC)
robot.screen.print("First message!")
robot.screen.next_row()
# Lift finger to press the screen again
while robot.screen.pressing():
    wait(5, MSEC)
while not robot.screen.pressing():
    wait(5, MSEC)
robot.screen.print("Second message!")
robot.screen.next_row()
x_position#
x_position returns the x-coordinate of the last screen press as an integer from 0 (left) to 240 (right).
Usage:robot.screen.x_position()
参数 |
描述 |
|---|---|
该方法没有参数。 |
# Display the x-coordinate of where
# the screen is pressed
while True:
    if robot.screen.pressing():
        robot.screen.clear_screen()
        robot.screen.print(robot.screen.x_position())
    wait (50, MSEC)
y_position#
y_position returns the y-coordinate of the last screen press as an integer from 0 (top) to 240 (bottom).
Usage:robot.screen.y_position()
参数 |
描述 |
|---|---|
该方法没有参数。 |
# Display the y-coordinate of where
# the screen is pressed
while True:
    if robot.screen.pressing():
        robot.screen.clear_screen()
        robot.screen.print(robot.screen.y_position())
    wait (50, MSEC)
光标打印#
print#
print prints text, numbers, or variable values on the robot’s screen at the current cursor position and font.
Usage:robot.screen.print(text)
参数 |
描述 |
|---|---|
|
要在屏幕上显示的文本、数字或变量值。 |
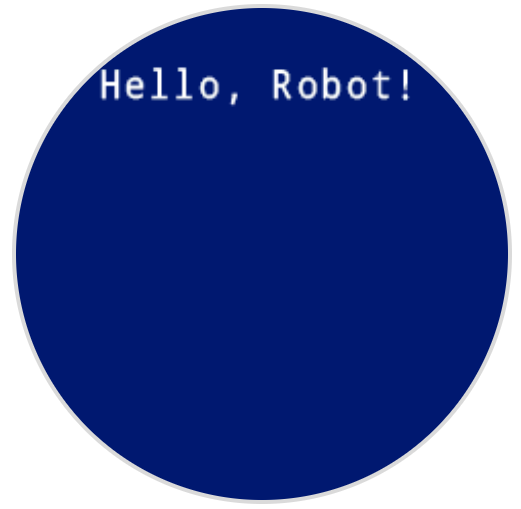
# Display a message at the starting cursor position
robot.screen.print("Hello, Robot!")
set_cursor#
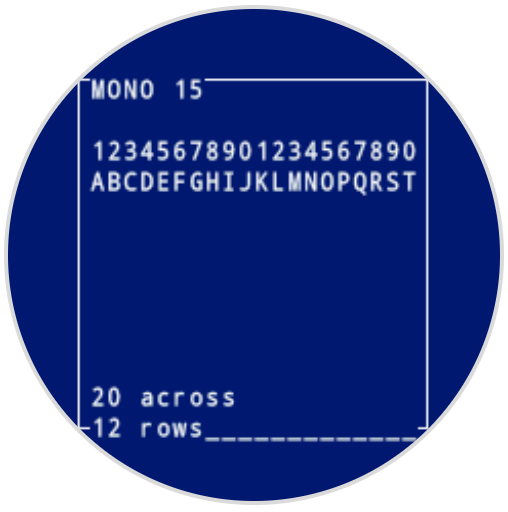
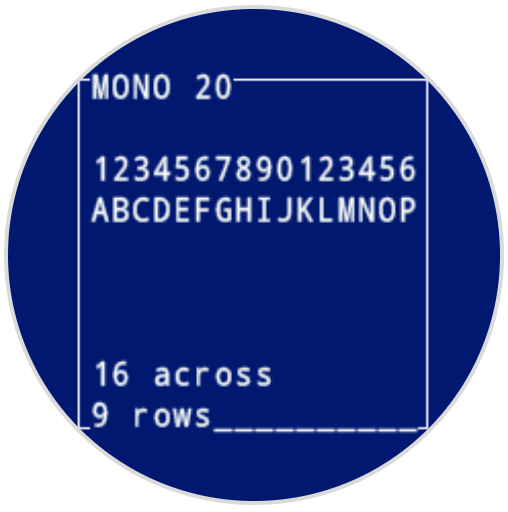
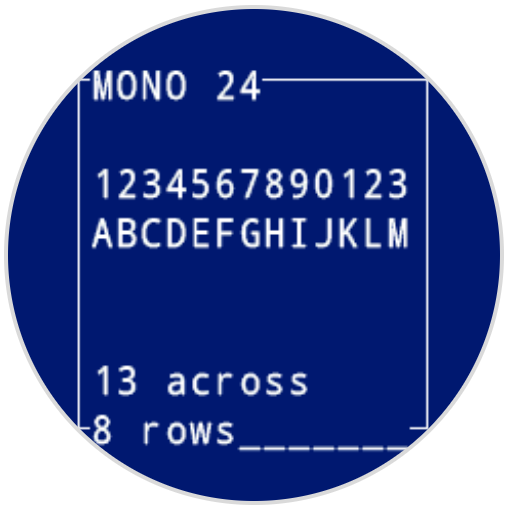
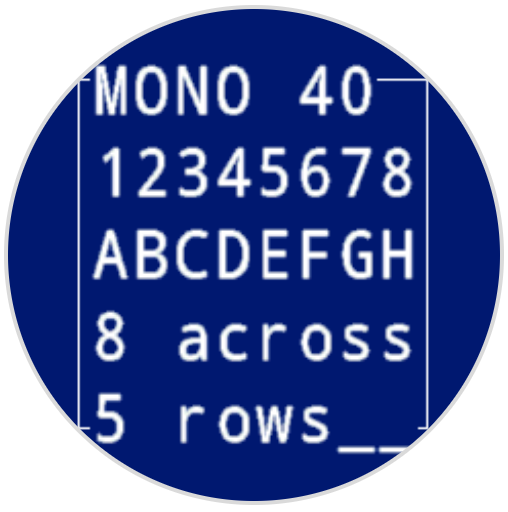
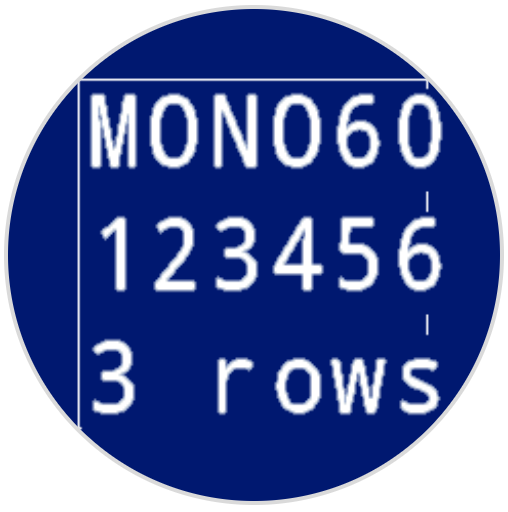
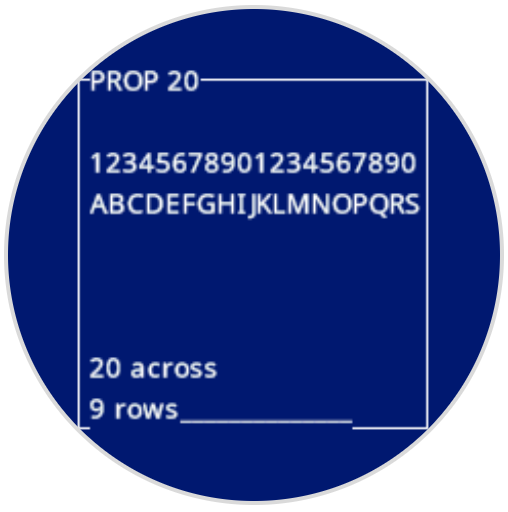
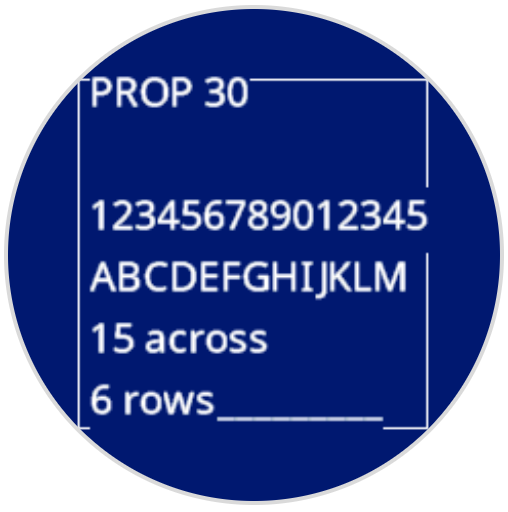
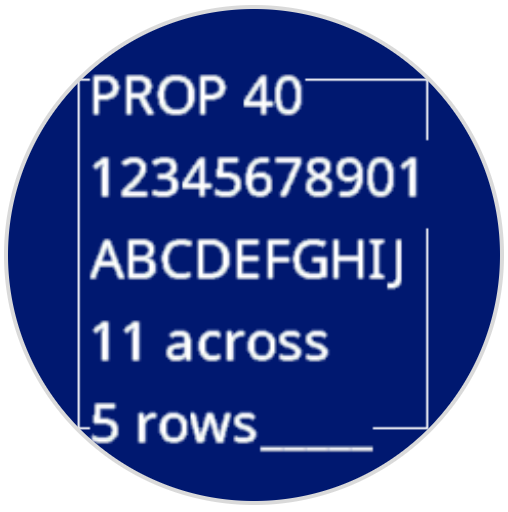
set_cursor moves the text cursor to a specific row and column on the robot’s screen. The next print call will start printing at that location. The number of rows and columns that fit depends on the selected font. With the default monospaced medium font, the screen can clearly display up to 8 rows and 13 columns. Text placed beyond this range may be cut off or harder to read.
Monospaced fonts have characters that are all the same width, making text placement consistent. In contrast, proportional fonts vary in character width, so some letters take up more space than others. However, regardless of which type is used, set_cursor positions the cursor based on row and column size, not font style. The font size can be adjusted using set_font.
Usage:robot.screen.set_cursor(row, column)
参数 |
描述 |
|---|---|
|
要将光标移动到的行。 |
|
要将光标移动到的列。 |
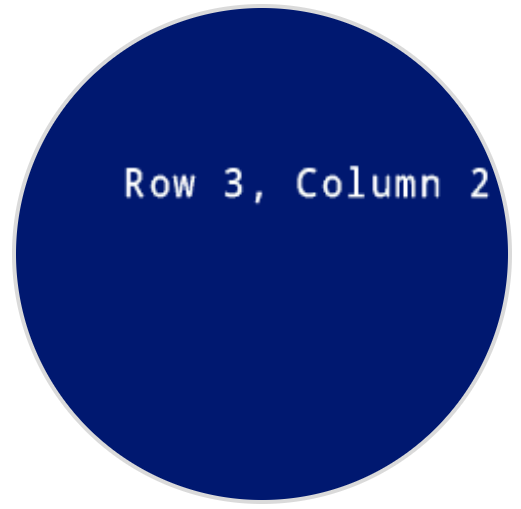
# Display text starting at Row 3 Column 2
robot.screen.set_cursor(3, 2)
robot.screen.print("Row 3, Column 2")
next_row#
next_row moves the cursor to column 1 on the next row on the robot’s screen.
Usage:robot.screen.next_row()
参数 |
描述 |
|---|---|
该方法没有参数。 |
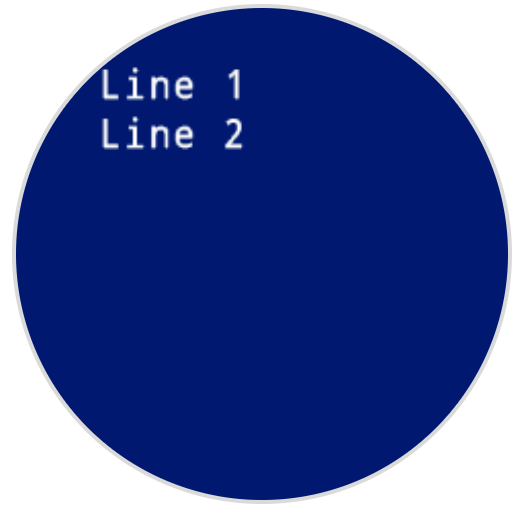
# Display two lines of text
robot.screen.print("Line 1")
robot.screen.next_row()
robot.screen.print("Line 2")
clear_row#
clear_row clears a single row of text on the robot’s screen.
Usage:robot.screen.clear_row(row, color)
范围 |
描述 |
|---|---|
|
可选。要清除的行号,以整数形式表示。默认值为当前光标所在行。 |
|
Optional. The color to apply to the cleared row. Options include:
|
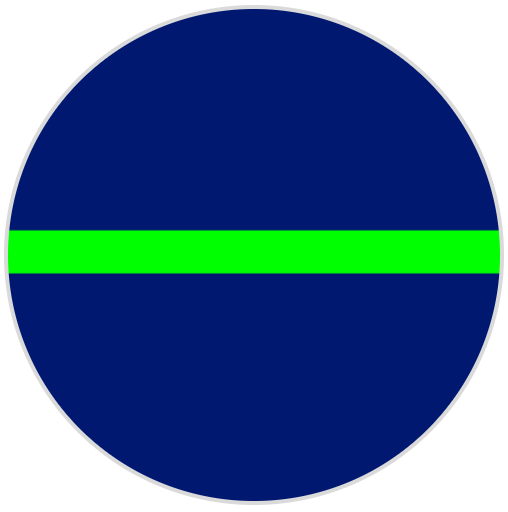
# Display text on two rows
robot.screen.print("This text stays")
robot.screen.next_row()
robot.screen.print("This text disappears")

# Wait 3 seconds before clearing only the second row
wait(3, SECONDS)
robot.screen.clear_row()
# Turn the 5th row green
robot.screen.clear_row(5, GREEN)
get_row#
get_row returns the current row where text will be printed as an integer.
Usage:robot.screen.get_row()
参数 |
描述 |
|---|---|
该方法没有参数。 |
# Set cursor to (3,2) and print row number
robot.screen.set_cursor(3, 2)
robot.screen.print(robot.screen.get_row())

get_column#
get_column returns the current column where text will be printed as an integer.
Usage:robot.screen.get_column()
参数 |
描述 |
|---|---|
该方法没有参数。 |
# Set cursor to (3,2) and print column number
robot.screen.set_cursor(3, 2)
robot.screen.print(robot.screen.get_column())
XY打印#
print_at#
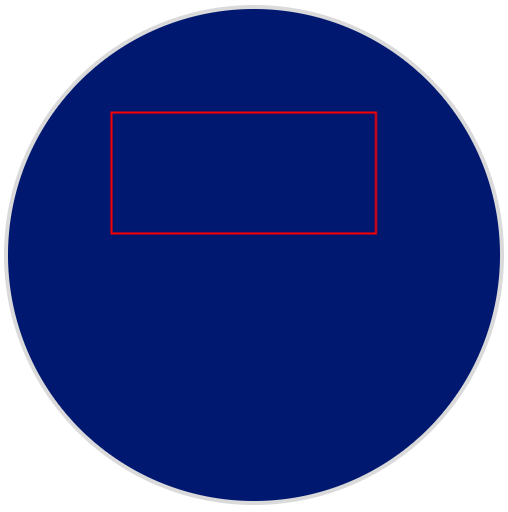
print_at prints text, numbers, or variable values on the robot’s screen at a specific x and y coordinate in pixels, using the currently set font and origin. x sets how far from the left side the text begins, and y sets where the bottom of the letters sit. This method disregards the current cursor position.
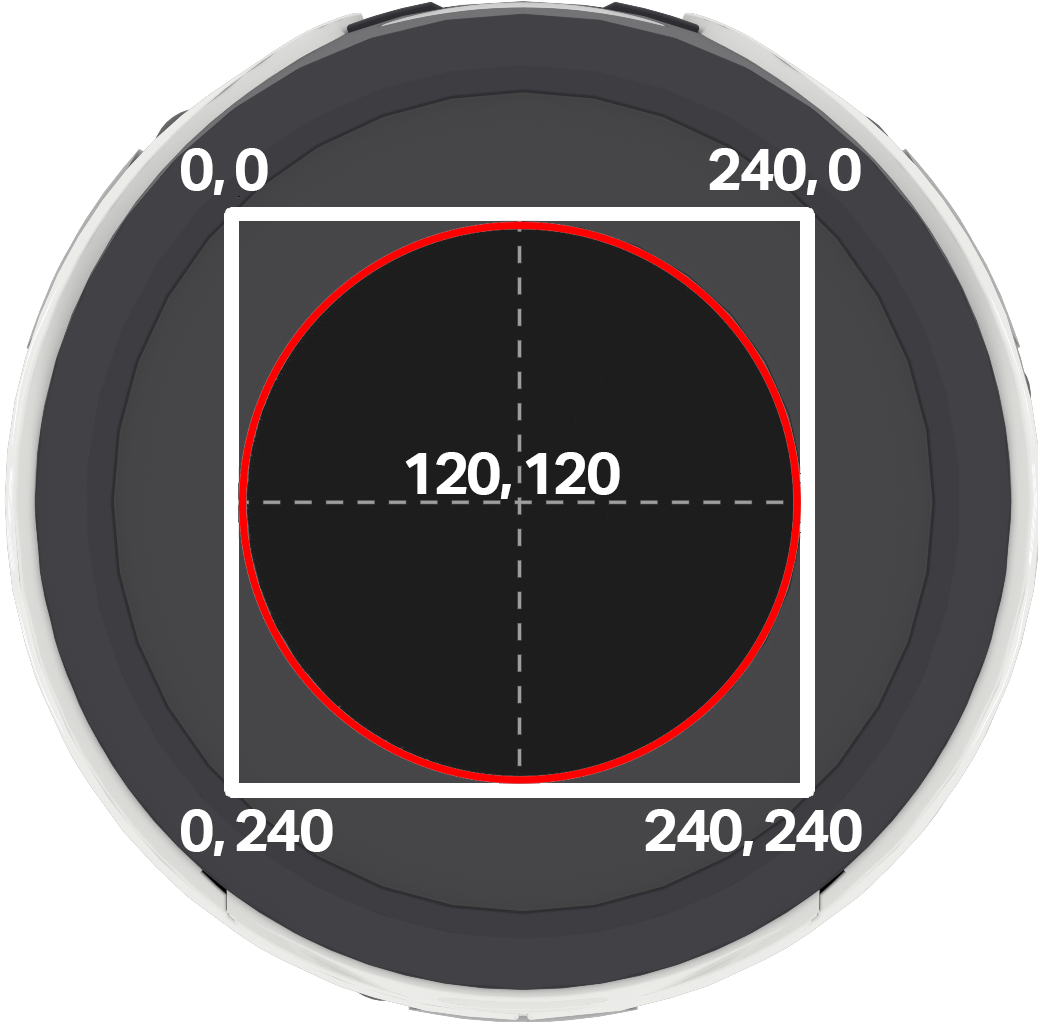
**注意:**红色圆圈标示了AIM机器人圆形屏幕上可见的坐标。红色圆圈之外的坐标虽然在0-240范围内,但不会显示在屏幕上。
Usage:
robot.screen.print_at(text, x, y)
范围 |
描述 |
|---|---|
|
要在屏幕上打印的文本、数字或变量值。 |
|
文本的水平位置,以 0 到 240 像素之间的整数表示。0 为左;240 为右。 |
|
文本的垂直位置,以 0 到 240 像素之间的整数表示。0 表示顶部;240 表示底部。 |
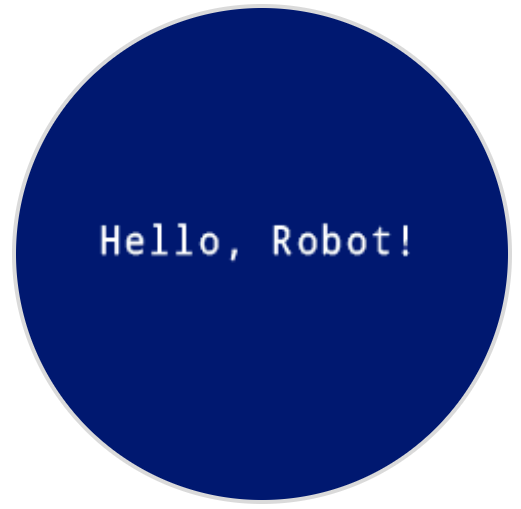
# Display a message in the middle of the screen
robot.screen.print_at("Hello, Robot!", x=40, y=120)
set_origin#
set_origin sets the origin used for drawing and coordinate-based printing on the robot’s screen. By default, the origin is the top-left corner of the screen.
Usage:
robot.screen.set_origin(x, y)
范围 |
描述 |
|---|---|
|
设置为原点的新 x 坐标,以 0 至 240 之间的整数形式给出。 |
|
设置作为原点的新 y 坐标,以 0 至 240 之间的整数形式给出。 |
# Set the origin to the center of the screen
robot.screen.set_origin(120, 120)

# Draw a rectangle at the new origin
robot.screen.draw_rectangle(0, 0, 80, 40)
修改器#
clear_screen#
clear_screen clears all drawings and text from the robot’s screen. By default, it also resets the cursor position to row 1, column 1.
Usage:
robot.screen.clear_screen(color)
范围 |
描述 |
|---|---|
|
Optional. Sets the screen color. Options include:
|
# Draw a circle, and clear it after 2 seconds
robot.screen.draw_circle(120, 120, 60)
wait(2, SECONDS)
robot.screen.clear_screen()
# Set the background color of the screen to red
robot.screen.clear_screen(RED)
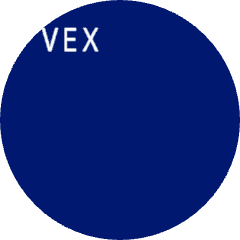
set_font#
set_font sets the font used for displaying text on the robot’s screen. This font will apply to all text printed with print or print_at. The default font at the start of a project is MONO24.
Usage:
robot.screen.set_font(fontname)
范围 |
描述 |
|---|---|
|
Sets the font to one of the following:
|
|
|
|
|---|---|---|
|
|
|
|
|
|
|
|


# Display text using a larger font
robot.screen.set_font(MONO40)
robot.screen.print("VEX")
set_pen_width#
set_pen_width sets the thickness of drawn lines and shape outlines.
Usage:
robot.screen.set_pen_width(width)
范围 |
描述 |
|---|---|
|
笔的宽度,以像素为单位,范围从 0 到 32。 |
# Draw a rectangle with a pen width of 10
robot.screen.set_pen_width(10)
robot.screen.draw_rectangle(50, 50, 130, 60)
set_pen_color#
set_pen_color sets the color of text, pixels, lines, and shape outlines.
Usage:
robot.screen.set_pen_color(color)
范围 |
描述 |
|---|---|
|
Optional. The pen and font color to use. Options include:
|
# Draw a rectangle with a red pen
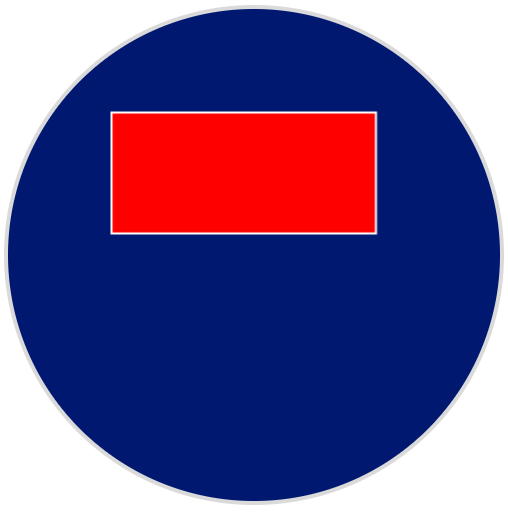
robot.screen.set_pen_color(RED)
robot.screen.draw_rectangle(50, 50, 130, 60)
set_fill_color#
set_fill_color sets the fill color used when shapes are drawn and when printed text uses a background.
Usage:robot.screen.set_fill_color(color)
范围 |
描述 |
|---|---|
|
Optional. The fill color to use. Options include:
|
# Draw two orange rectangles
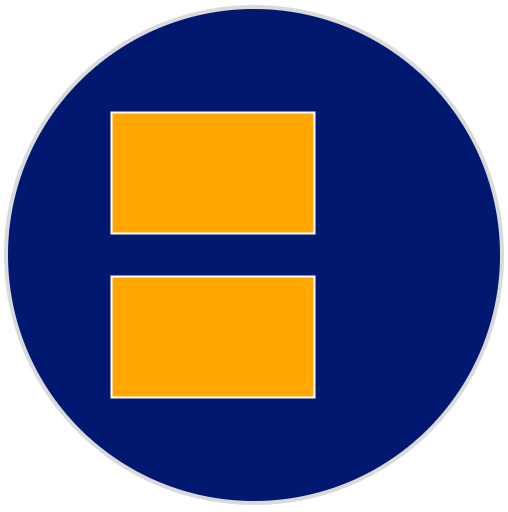
robot.screen.set_fill_color(ORANGE)
robot.screen.draw_rectangle(50, 50, 100, 60)
robot.screen.draw_rectangle(50, 130, 100, 60)
# Display text with a purple background
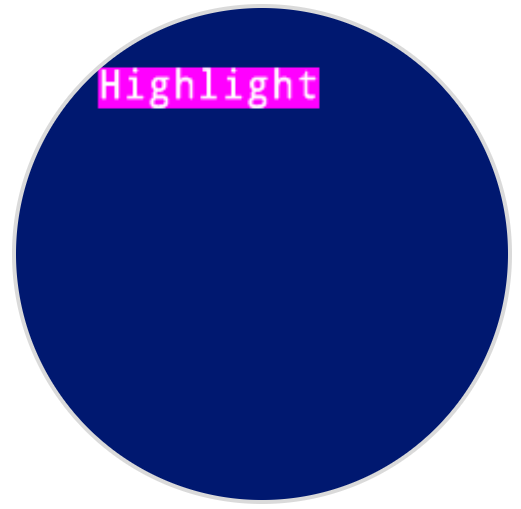
robot.screen.set_fill_color(PURPLE)
robot.screen.print("Highlight")
画#
draw_pixel#
draw_pixel draws one pixel at the selected x and y coordinate using the current pen color.
Usage:
robot.screen.draw_pixel(x, y)
范围 |
描述 |
|---|---|
|
将绘制像素的 x 坐标,以 0 至 240 之间的整数表示。 |
|
将绘制像素的 y 坐标,以 0 至 240 之间的整数表示。 |
# Draw a pixel at the center of the screen
robot.screen.draw_pixel(120, 120)
![]()
draw_line#
draw_line draws a line from the first screen coordinate (x1, y1) to the second screen coordinate (x2, y2) using the current pen width and pen color.
The x and y-coordinates use the default origin of (0, 0) unless a different origin has been set using set_origin.
Usage:
robot.screen.draw_line(x1, y1, x2, y2)
范围 |
描述 |
|---|---|
|
线的起始 x 坐标,以 0 至 240 之间的整数表示。 |
|
线的起始 y 坐标,以 0 至 240 之间的整数表示。 |
|
线的结束 x 坐标,以 0 至 240 之间的整数表示。 |
|
线的结束 y 坐标,以 0 至 240 之间的整数表示。 |
# Draw a line from the top left to bottom right of the screen
robot.screen.draw_line(0, 0, 240, 240)

draw_rectangle#
draw_rectangle draws a rectangle with its top-left corner at the selected (x, y) coordinate and a size determined by the given width and height, all measured in pixels. The rectangle’s outline is drawn using the current pen width and pen color. The interior is filled with the current fill color, unless the optional color parameter is used.
The x and y-coordinates use the default origin of (0, 0) unless a different origin has been set using set_origin.
Usage:robot.screen.draw_rectangle(x, y, width, height, color)
范围 |
描述 |
|---|---|
|
矩形左上角的 x 坐标,以 0 至 240 之间的整数表示。 |
|
矩形左上角的 y 坐标,以 0 至 240 之间的整数表示。 |
|
矩形的宽度,以 0 到 240 之间的整数表示。 |
|
矩形的高度,以 0 到 240 之间的整数表示。 |
|
Optional. The fill color of the rectangle. Options include:
|
# Draw a red rectangle on the screen
robot.screen.draw_rectangle(50, 50, 130, 60, RED)
draw_circle#
draw_circle draws a circle with its center at the selected (x, y) coordinate and a size determined by the given radius, all measured in pixels. The circle’s outline is drawn using the current pen width and pen color. The interior is filled with the current fill color, unless the optional color parameter is used.
The x and y-coordinates use the default origin of (0, 0) unless a different origin has been set using set_origin.
Usage:robot.screen.draw_circle(x, y, radius, color)
范围 |
描述 |
|---|---|
|
圆心的 x 坐标,以 0 至 240 之间的整数表示。 |
|
圆心的 y 坐标,以 0 至 240 之间的整数表示。 |
|
圆的半径,以 0 到 240 像素之间的整数表示。 |
|
Optional. The fill color of the circle. Options include:
|
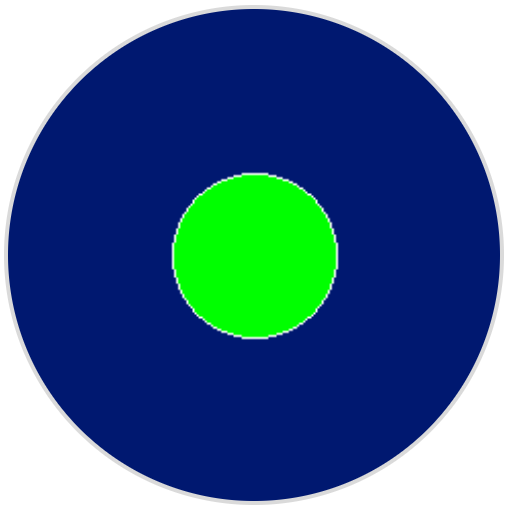
# Draw a green circle on the screen
robot.screen.draw_circle(120, 120, 40, GREEN)
show_file#
show_file displays a custom uploaded image on the robot’s screen, with its position set using the x, y, and center parameters based on the image’s reference point.
Usage:
robot.screen.show_file(file, x, y, center)
范围 |
描述 |
|---|---|
|
The custom image to use, from |
|
图像的水平偏移量,以像素为单位的整数形式指定。正值表示向右移动;负值表示向左移动。 |
|
图像的垂直偏移量,以像素为单位的整数形式指定。正值表示向下移动;负值表示向上移动。 |
|
Optional. If |
# Display uploaded Image 1 in the top left corner
robot.screen.show_file(IMAGE1, 0, 0)
# Show the same image on both sides of the screen
# Image size is 120 x 120
robot.screen.show_file(IMAGE1, 65, 0, center=True)
robot.screen.show_file(IMAGE1, -65, 0, center=True)
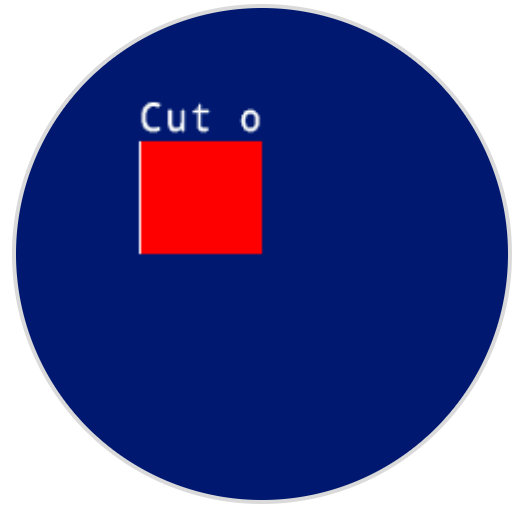
set_clip_region#
set_clip_region defines a rectangular area on the screen where all drawings and text will be confined. Any content outside this region will not be displayed.
Usage:
robot.screen.set_clip_region(x, y, width, height)
范围 |
描述 |
|---|---|
|
The x-coordinate of the top-left corner of the clip region, given as an decimal ( |
|
The y-coordinate of the top-left corner of the clip region, given as an decimal ( |
|
The width of the clip region in pixels, given as an decimal ( |
|
The height of the clip region in pixels, given as an decimal ( |
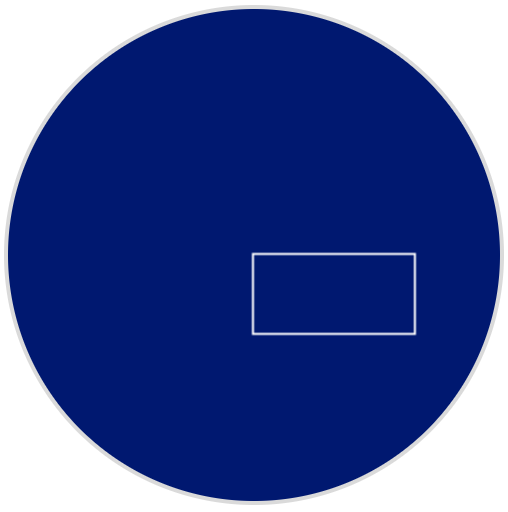
# Restrict text and drawings to a specific region
robot.screen.set_clip_region(0, 0, 120, 120)
robot.screen.draw_rectangle(60, 60, 100, 100, RED)
robot.screen.print_at("Cut off!", x=60, y=60)
回调函数#
pressed#
pressed registers a method to be called when the robot’s screen is pressed.
Usage:robot.screen.pressed(callback, arg)
参数 |
描述 |
|---|---|
|
一个预先定义好的函数,当按下控制器屏幕时执行。 |
|
# Set the LEDs to green when the screen is pressed.
def screen_touched():
    robot.led.on(ALL_LEDS, GREEN)

robot.screen.pressed(screen_touched)
released#
released registers a method to be called when the robot’s screen is released.
Usage:robot.screen.released(callback, arg)
参数 |
描述 |
|---|---|
|
一个预先定义好的函数,当按下控制器屏幕时执行。 |
|
# Set the LEDs to blue when the screen is released.
def screen_released():
    robot.led.on(ALL_LEDS, BLUE)

robot.screen.released(screen_released)