Pantalla#
Introducción#
Los métodos de pantalla controlan cómo el robot de codificación VEX AIM muestra texto, números y gráficos en su pantalla, y cómo responde a las pulsaciones en la misma.
A continuación se muestra una lista de todos los métodos:
Táctil: detecta y responde a las pulsaciones de la pantalla.
pressing– Returns whether the screen is currently being pressed.x_position– Returns the x-coordinate of the last screen press.y_position– Returns the y-coordinate of the last screen press.
Impresión del cursor: muestra el texto utilizando un sistema de filas y columnas.
print– Prints text, numbers, or variable values at the current cursor position.set_cursor– Moves the cursor to a specific row and column.next_row– Moves the cursor to column 1 of the next row.clear_row– Clears a row of text.get_row– Returns the current cursor row.get_column– Returns the current cursor column.
Impresión XY: muestra el texto en una coordenada de pantalla específica.
print_at– Prints text, numbers, or variable values at a specific x and y coordinate.set_origin– Sets the origin used for coordinate-based printing and drawing.
Mutadores: limpia la pantalla o actualiza la configuración visual.
clear_screen– Clears the screen of all drawings and text.set_font– Sets the font for printed text.set_pen_width– Sets the thickness of drawn lines and shape outlines.set_pen_color– Sets the color of text, pixels, lines, and shape outlines.set_fill_color– Sets the fill color for drawn shapes and printed text backgrounds.
Dibujar – Agregar gráficos e imágenes a la pantalla.
draw_pixel– Draws a pixel at a specific x and y position.draw_line– Draws a line between two points.draw_rectangle– Draws a rectangle.draw_circle– Draws a circle.show_file– Displays an uploaded image.set_clip_region– Restricts where drawings and text can appear.
Funciones de devolución de llamada: ejecutan funciones cuando se presiona o se suelta la pantalla.
Tocar#
pressing#
pressing returns a Boolean indicating whether the robot’s screen is currently being pressed.
True– The screen is being pressed.False– The screen is not being pressed.
Usage:
robot.screen.pressing()
Parámetros |
Descripción |
|---|---|
Este método no tiene parámetros. |
# Turn LEDs white only while the screen is pressed.
while True:
    if robot.screen.pressing():
        robot.led.on(ALL_LEDS, WHITE)
    else:
        robot.led.off(ALL_LEDS)

    wait(50, MSEC)
# Display different messages after the screen is pressed
while not robot.screen.pressing():
    wait(5, MSEC)
robot.screen.print("First message!")
robot.screen.next_row()
# Lift finger to press the screen again
while robot.screen.pressing():
    wait(5, MSEC)
while not robot.screen.pressing():
    wait(5, MSEC)
robot.screen.print("Second message!")
robot.screen.next_row()
x_position#
x_position returns the x-coordinate of the last screen press as an integer from 0 (left) to 240 (right).
Usage:robot.screen.x_position()
Parámetros |
Descripción |
|---|---|
Este método no tiene parámetros. |
# Display the x-coordinate of where
# the screen is pressed
while True:
    if robot.screen.pressing():
        robot.screen.clear_screen()
        robot.screen.print(robot.screen.x_position())
    wait (50, MSEC)
y_position#
y_position returns the y-coordinate of the last screen press as an integer from 0 (top) to 240 (bottom).
Usage:robot.screen.y_position()
Parámetros |
Descripción |
|---|---|
Este método no tiene parámetros. |
# Display the y-coordinate of where
# the screen is pressed
while True:
    if robot.screen.pressing():
        robot.screen.clear_screen()
        robot.screen.print(robot.screen.y_position())
    wait (50, MSEC)
Cursor Imprimir#
print#
print prints text, numbers, or variable values on the robot’s screen at the current cursor position and font.
Usage:robot.screen.print(text)
Parámetros |
Descripción |
|---|---|
|
El texto, número o valor de variable que se mostrará en la pantalla. |
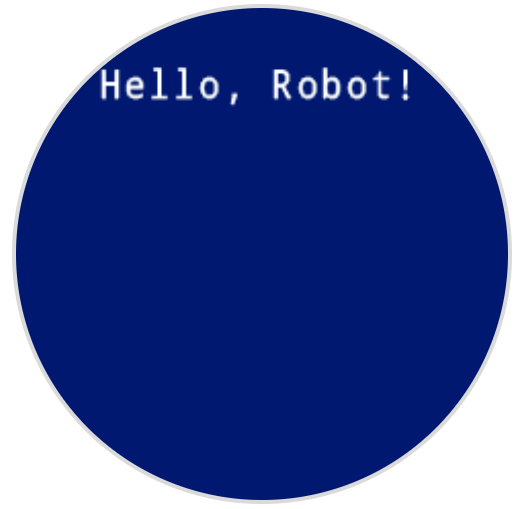
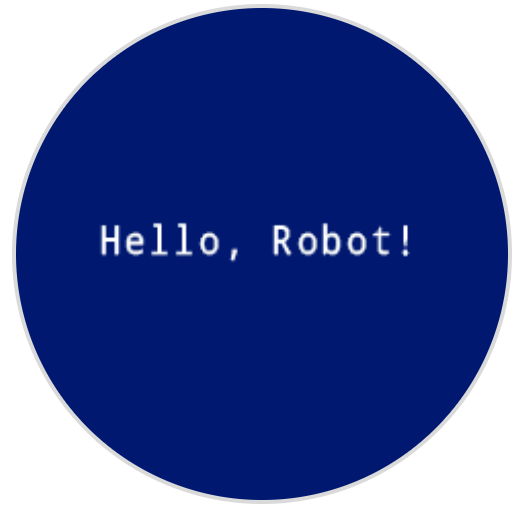
# Display a message at the starting cursor position
robot.screen.print("Hello, Robot!")
set_cursor#
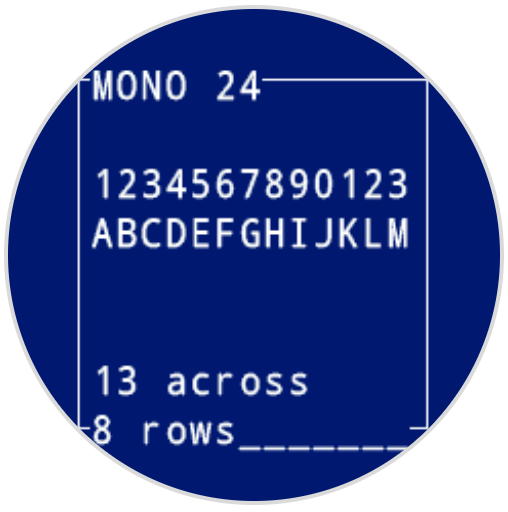
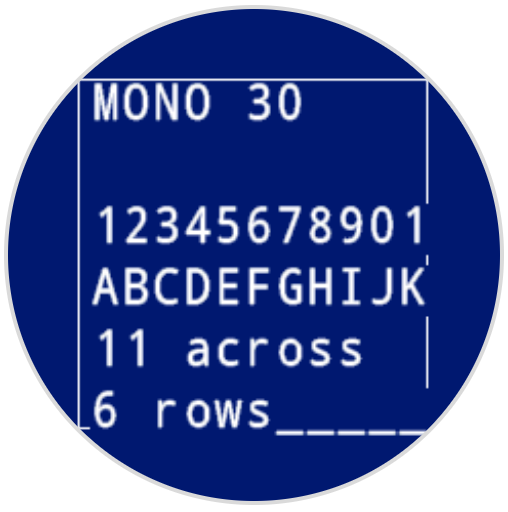
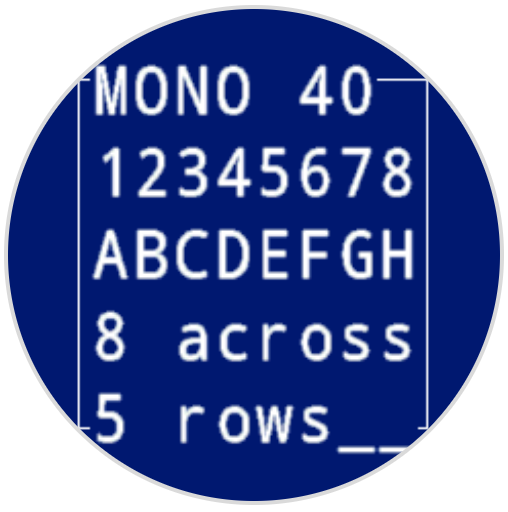
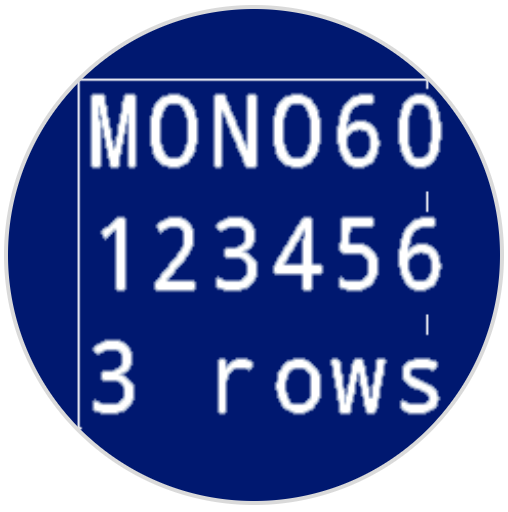
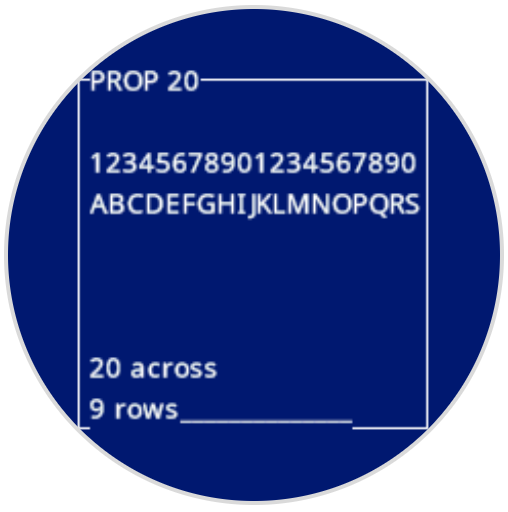
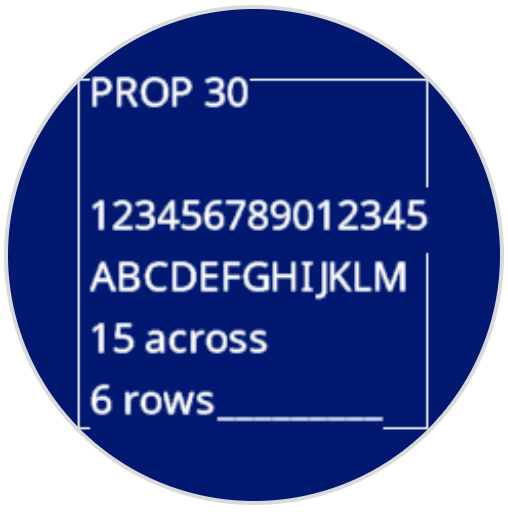
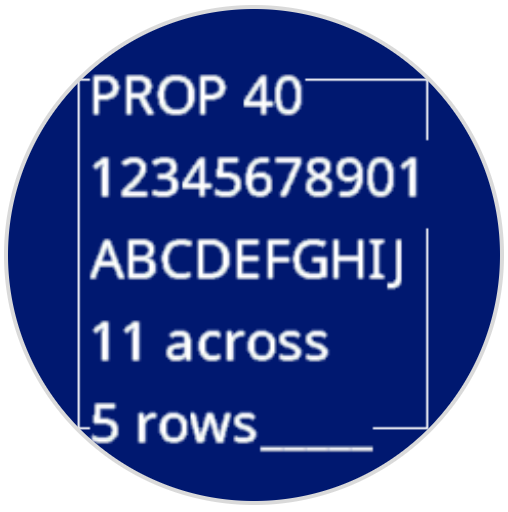
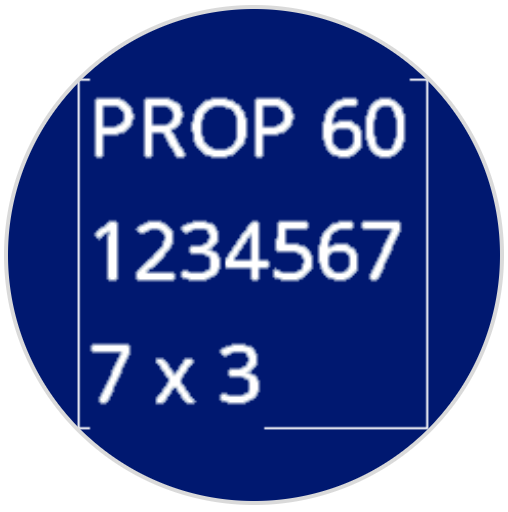
set_cursor moves the text cursor to a specific row and column on the robot’s screen. The next print call will start printing at that location. The number of rows and columns that fit depends on the selected font. With the default monospaced medium font, the screen can clearly display up to 8 rows and 13 columns. Text placed beyond this range may be cut off or harder to read.
Monospaced fonts have characters that are all the same width, making text placement consistent. In contrast, proportional fonts vary in character width, so some letters take up more space than others. However, regardless of which type is used, set_cursor positions the cursor based on row and column size, not font style. The font size can be adjusted using set_font.
Usage:robot.screen.set_cursor(row, column)
Parámetros |
Descripción |
|---|---|
|
La fila a la que mover el cursor. |
|
La columna a la que se debe mover el cursor. |
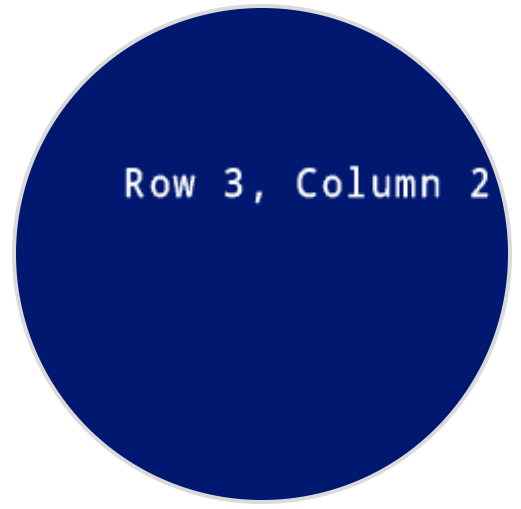
# Display text starting at Row 3 Column 2
robot.screen.set_cursor(3, 2)
robot.screen.print("Row 3, Column 2")
next_row#
next_row moves the cursor to column 1 on the next row on the robot’s screen.
Usage:robot.screen.next_row()
Parámetros |
Descripción |
|---|---|
Este método no tiene parámetros. |
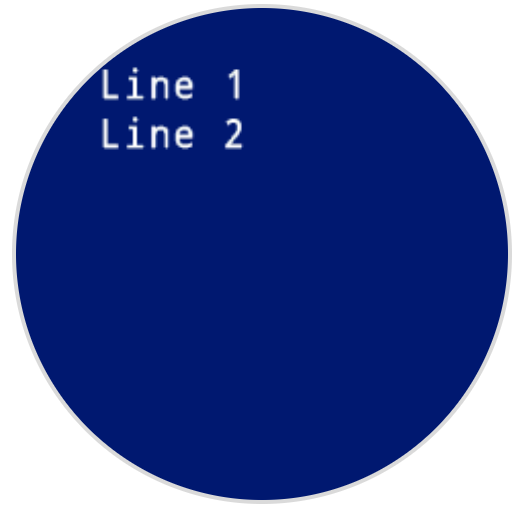
# Display two lines of text
robot.screen.print("Line 1")
robot.screen.next_row()
robot.screen.print("Line 2")
clear_row#
clear_row clears a single row of text on the robot’s screen.
Usage:robot.screen.clear_row(row, color)
Parámetro |
Descripción |
|---|---|
|
Opcional. La fila que se va a borrar como un número entero. Por defecto, se utiliza la fila actual del cursor. |
|
Optional. The color to apply to the cleared row. Options include:
|
# Display text on two rows
robot.screen.print("This text stays")
robot.screen.next_row()
robot.screen.print("This text disappears")

# Wait 3 seconds before clearing only the second row
wait(3, SECONDS)
robot.screen.clear_row()
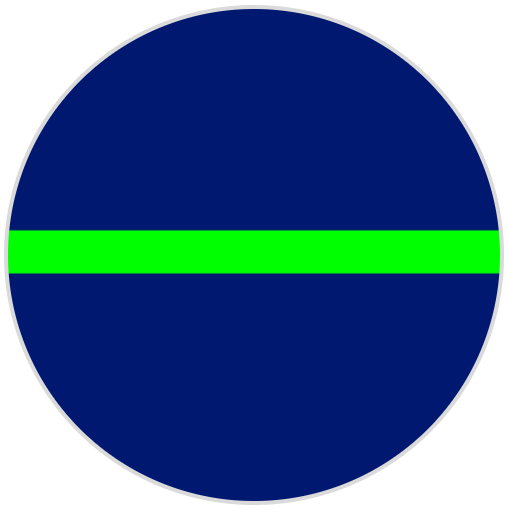
# Turn the 5th row green
robot.screen.clear_row(5, GREEN)
get_row#
get_row returns the current row where text will be printed as an integer.
Usage:robot.screen.get_row()
Parámetros |
Descripción |
|---|---|
Este método no tiene parámetros. |
# Set cursor to (3,2) and print row number
robot.screen.set_cursor(3, 2)
robot.screen.print(robot.screen.get_row())
get_column#
get_column returns the current column where text will be printed as an integer.
Usage:robot.screen.get_column()
Parámetros |
Descripción |
|---|---|
Este método no tiene parámetros. |
# Set cursor to (3,2) and print column number
robot.screen.set_cursor(3, 2)
robot.screen.print(robot.screen.get_column())
Impresión XY#
print_at#
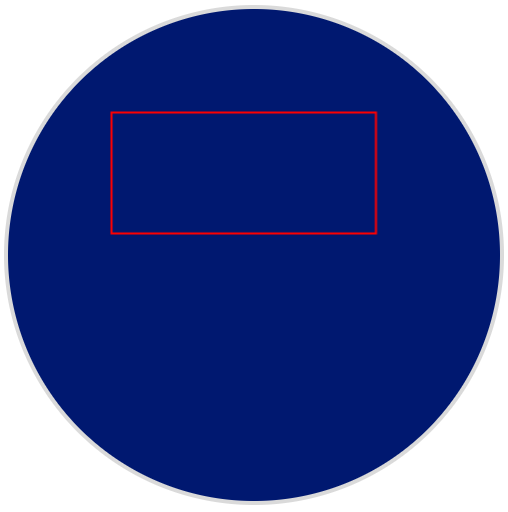
print_at prints text, numbers, or variable values on the robot’s screen at a specific x and y coordinate in pixels, using the currently set font and origin. x sets how far from the left side the text begins, and y sets where the bottom of the letters sit. This method disregards the current cursor position.
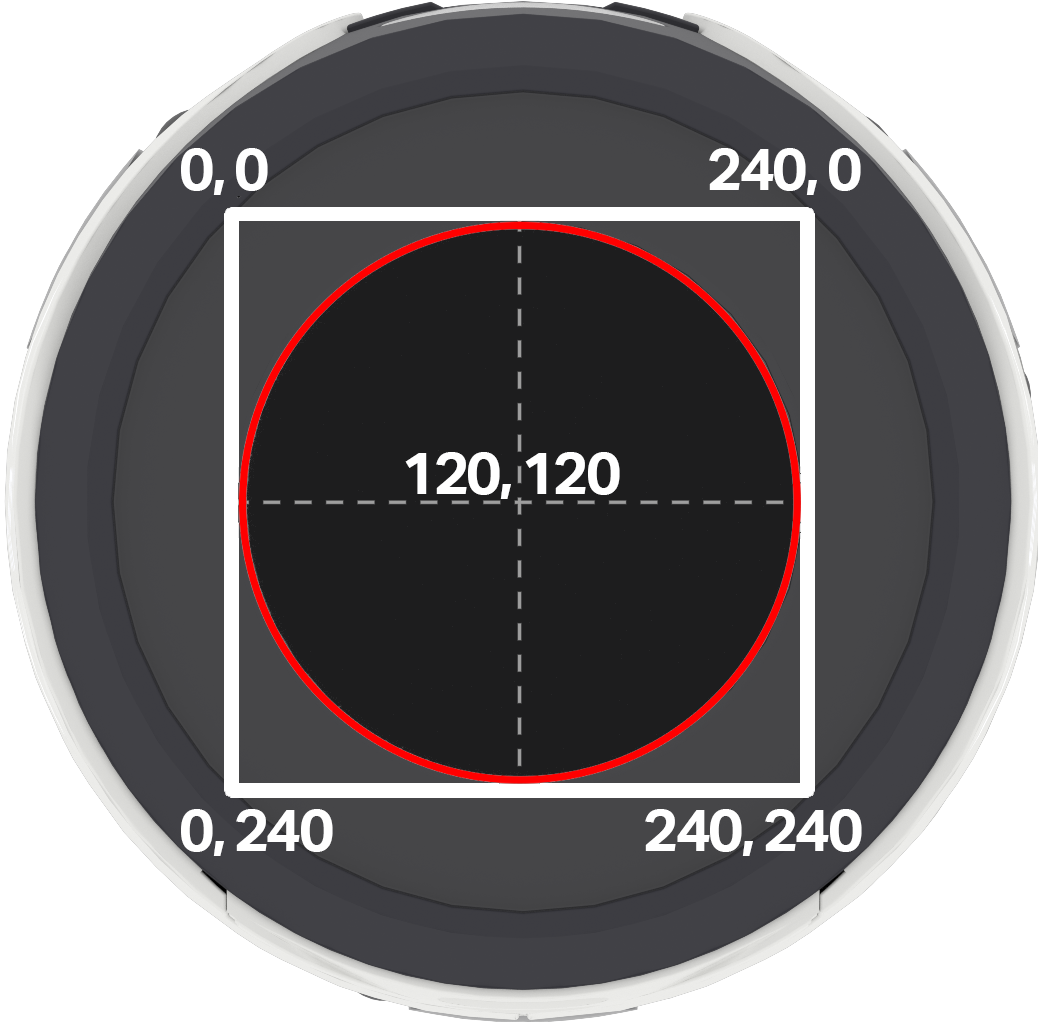
Nota: El círculo rojo muestra las coordenadas que serán visibles en la pantalla circular del robot AIM. Las coordenadas que quedan fuera del círculo rojo se encuentran dentro del rango de 0 a 240, pero no aparecerán en la pantalla.
Usage:
robot.screen.print_at(text, x, y)
Parámetro |
Descripción |
|---|---|
|
El texto, número o valor de variable que se imprimirá en la pantalla. |
|
La posición horizontal del texto, como un entero de 0 a 240 píxeles. 0 es izquierda; 240 es derecha. |
|
La posición vertical del texto, como un entero de 0 a 240 píxeles. 0 es la parte superior; 240 es la parte inferior. |
# Display a message in the middle of the screen
robot.screen.print_at("Hello, Robot!", x=40, y=120)
set_origin#
set_origin sets the origin used for drawing and coordinate-based printing on the robot’s screen. By default, the origin is the top-left corner of the screen.
Usage:
robot.screen.set_origin(x, y)
Parámetro |
Descripción |
|---|---|
|
La nueva coordenada x que se establecerá como origen, expresada como un número entero de 0 a 240. |
|
La nueva coordenada y que se establecerá como origen, expresada como un número entero de 0 a 240. |
# Set the origin to the center of the screen
robot.screen.set_origin(120, 120)

# Draw a rectangle at the new origin
robot.screen.draw_rectangle(0, 0, 80, 40)
Mutadores#
clear_screen#
clear_screen clears all drawings and text from the robot’s screen. By default, it also resets the cursor position to row 1, column 1.
Usage:
robot.screen.clear_screen(color)
Parámetro |
Descripción |
|---|---|
|
Optional. Sets the screen color. Options include:
|
# Draw a circle, and clear it after 2 seconds
robot.screen.draw_circle(120, 120, 60)
wait(2, SECONDS)
robot.screen.clear_screen()
# Set the background color of the screen to red
robot.screen.clear_screen(RED)
set_font#
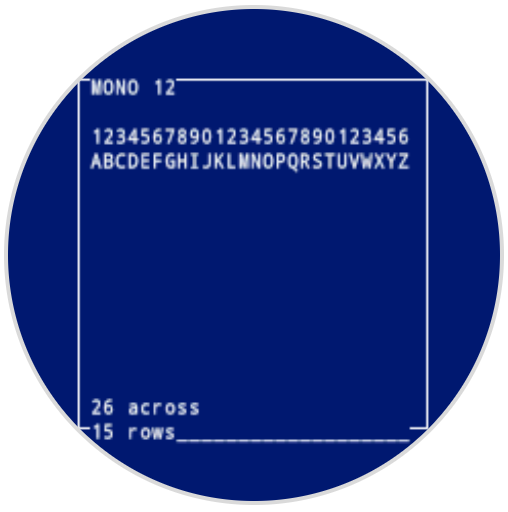
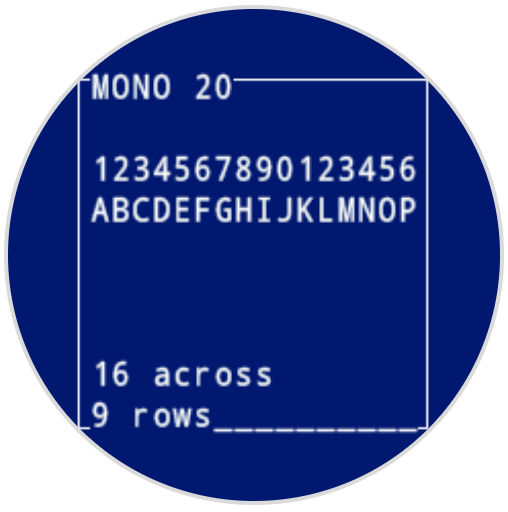
set_font sets the font used for displaying text on the robot’s screen. This font will apply to all text printed with print or print_at. The default font at the start of a project is MONO24.
Usage:
robot.screen.set_font(fontname)
Parámetro |
Descripción |
|---|---|
|
Sets the font to one of the following:
|
|
|
|
|---|---|---|
|
|
|
|
|
|
|
|

# Display text using a larger font
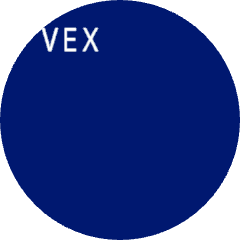
robot.screen.set_font(MONO40)
robot.screen.print("VEX")
set_pen_width#
set_pen_width sets the thickness of drawn lines and shape outlines.
Usage:
robot.screen.set_pen_width(width)
Parámetro |
Descripción |
|---|---|
|
El ancho del lápiz, en píxeles, va de 0 a 32. |
# Draw a rectangle with a pen width of 10
robot.screen.set_pen_width(10)
robot.screen.draw_rectangle(50, 50, 130, 60)
set_pen_color#
set_pen_color sets the color of text, pixels, lines, and shape outlines.
Usage:
robot.screen.set_pen_color(color)
Parámetro |
Descripción |
|---|---|
|
Optional. The pen and font color to use. Options include:
|
# Draw a rectangle with a red pen
robot.screen.set_pen_color(RED)
robot.screen.draw_rectangle(50, 50, 130, 60)
set_fill_color#
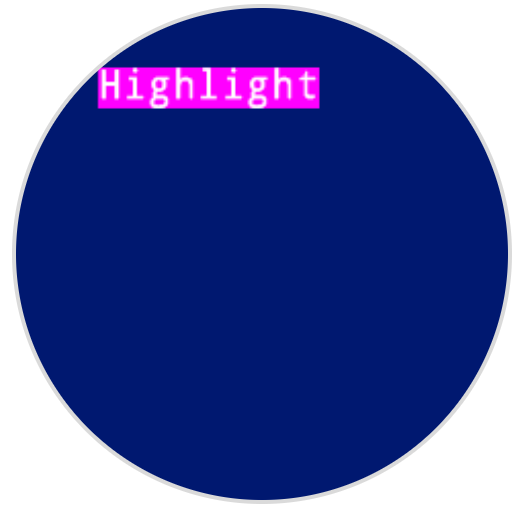
set_fill_color sets the fill color used when shapes are drawn and when printed text uses a background.
Usage:robot.screen.set_fill_color(color)
Parámetro |
Descripción |
|---|---|
|
Optional. The fill color to use. Options include:
|
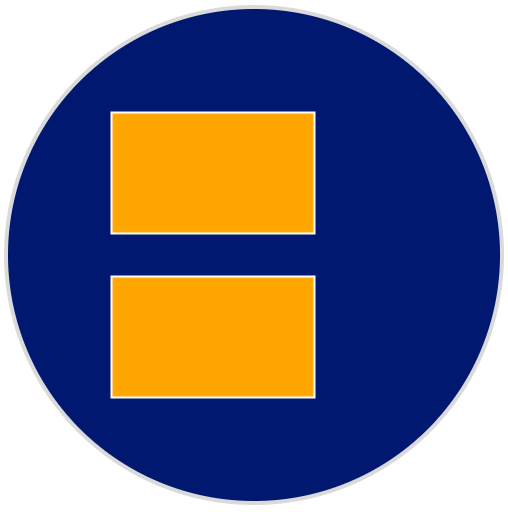
# Draw two orange rectangles
robot.screen.set_fill_color(ORANGE)
robot.screen.draw_rectangle(50, 50, 100, 60)
robot.screen.draw_rectangle(50, 130, 100, 60)
# Display text with a purple background
robot.screen.set_fill_color(PURPLE)
robot.screen.print("Highlight")
Dibujar#
draw_pixel#
draw_pixel draws one pixel at the selected x and y coordinate using the current pen color.
Usage:
robot.screen.draw_pixel(x, y)
Parámetro |
Descripción |
|---|---|
|
La coordenada x donde se dibujará el píxel, expresada como un número entero de 0 a 240. |
|
La coordenada y donde se dibujará el píxel, expresada como un número entero de 0 a 240. |
# Draw a pixel at the center of the screen
robot.screen.draw_pixel(120, 120)
![]()
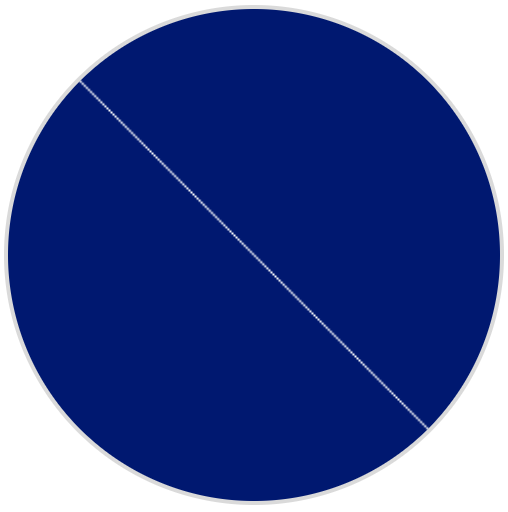
draw_line#
draw_line draws a line from the first screen coordinate (x1, y1) to the second screen coordinate (x2, y2) using the current pen width and pen color.
The x and y-coordinates use the default origin of (0, 0) unless a different origin has been set using set_origin.
Usage:
robot.screen.draw_line(x1, y1, x2, y2)
Parámetro |
Descripción |
|---|---|
|
La coordenada x inicial de la línea, expresada como un número entero entre 0 y 240. |
|
La coordenada y inicial de la línea, expresada como un número entero entre 0 y 240. |
|
La coordenada x final de la línea, expresada como un número entero entre 0 y 240. |
|
La coordenada y final de la línea, expresada como un número entero entre 0 y 240. |
# Draw a line from the top left to bottom right of the screen
robot.screen.draw_line(0, 0, 240, 240)
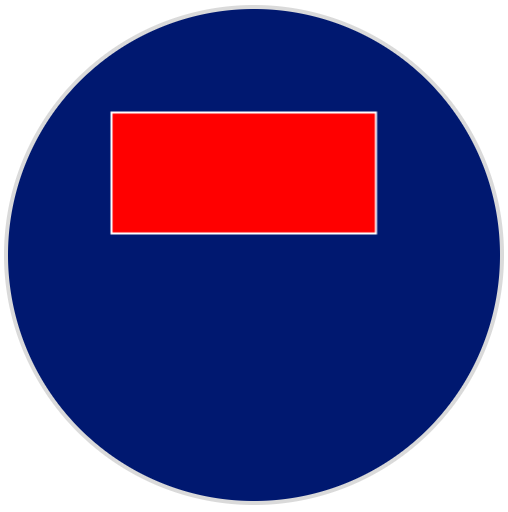
draw_rectangle#
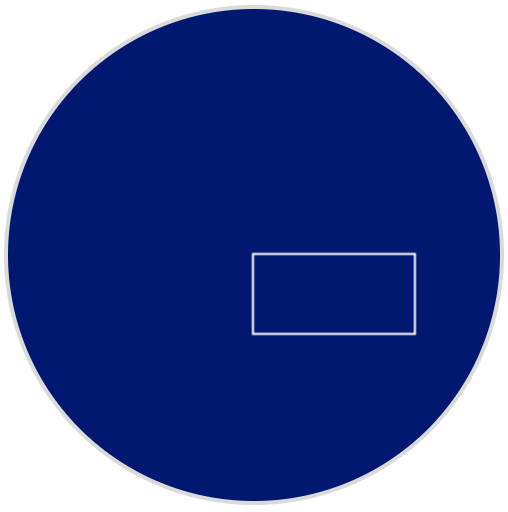
draw_rectangle draws a rectangle with its top-left corner at the selected (x, y) coordinate and a size determined by the given width and height, all measured in pixels. The rectangle’s outline is drawn using the current pen width and pen color. The interior is filled with the current fill color, unless the optional color parameter is used.
The x and y-coordinates use the default origin of (0, 0) unless a different origin has been set using set_origin.
Usage:robot.screen.draw_rectangle(x, y, width, height, color)
Parámetro |
Descripción |
|---|---|
|
La coordenada x de la esquina superior izquierda del rectángulo, expresada como un número entero de 0 a 240. |
|
La coordenada y de la esquina superior izquierda del rectángulo, expresada como un número entero de 0 a 240. |
|
El ancho del rectángulo, expresado como un número entero de 0 a 240. |
|
La altura del rectángulo, expresada como un número entero de 0 a 240. |
|
Optional. The fill color of the rectangle. Options include:
|
# Draw a red rectangle on the screen
robot.screen.draw_rectangle(50, 50, 130, 60, RED)
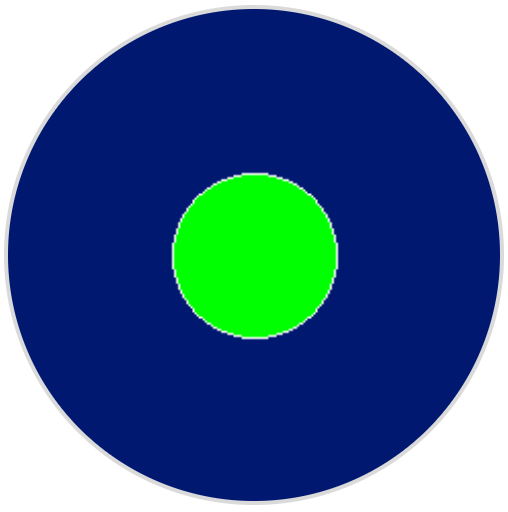
draw_circle#
draw_circle draws a circle with its center at the selected (x, y) coordinate and a size determined by the given radius, all measured in pixels. The circle’s outline is drawn using the current pen width and pen color. The interior is filled with the current fill color, unless the optional color parameter is used.
The x and y-coordinates use the default origin of (0, 0) unless a different origin has been set using set_origin.
Usage:robot.screen.draw_circle(x, y, radius, color)
Parámetro |
Descripción |
|---|---|
|
La coordenada x del centro del círculo, expresada como un número entero de 0 a 240. |
|
La coordenada y del centro del círculo, expresada como un número entero de 0 a 240. |
|
El radio del círculo, expresado como un número entero de 0 a 240 píxeles. |
|
Optional. The fill color of the circle. Options include:
|
# Draw a green circle on the screen
robot.screen.draw_circle(120, 120, 40, GREEN)
show_file#
show_file displays a custom uploaded image on the robot’s screen, with its position set using the x, y, and center parameters based on the image’s reference point.
Usage:
robot.screen.show_file(file, x, y, center)
Parámetro |
Descripción |
|---|---|
|
The custom image to use, from |
|
El desplazamiento horizontal de la imagen, expresado como un entero en píxeles. Los valores positivos lo desplazan hacia la derecha; los negativos, hacia la izquierda. |
|
El desplazamiento vertical de la imagen, expresado como un entero en píxeles. Los valores positivos lo desplazan hacia abajo; los negativos, hacia arriba. |
|
Optional. If |
# Display uploaded Image 1 in the top left corner
robot.screen.show_file(IMAGE1, 0, 0)
# Show the same image on both sides of the screen
# Image size is 120 x 120
robot.screen.show_file(IMAGE1, 65, 0, center=True)
robot.screen.show_file(IMAGE1, -65, 0, center=True)
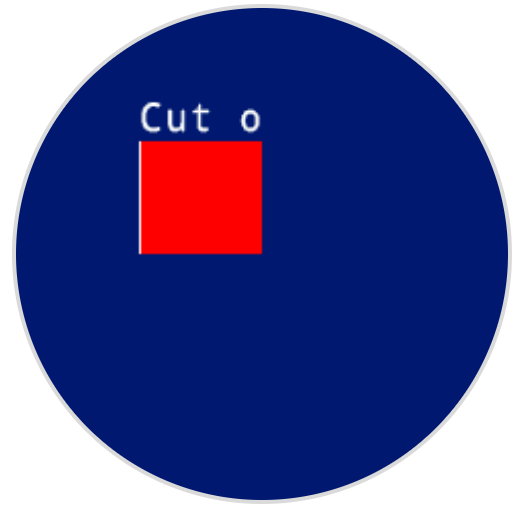
set_clip_region#
set_clip_region defines a rectangular area on the screen where all drawings and text will be confined. Any content outside this region will not be displayed.
Usage:
robot.screen.set_clip_region(x, y, width, height)
Parámetro |
Descripción |
|---|---|
|
The x-coordinate of the top-left corner of the clip region, given as an decimal ( |
|
The y-coordinate of the top-left corner of the clip region, given as an decimal ( |
|
The width of the clip region in pixels, given as an decimal ( |
|
The height of the clip region in pixels, given as an decimal ( |
# Restrict text and drawings to a specific region
robot.screen.set_clip_region(0, 0, 120, 120)
robot.screen.draw_rectangle(60, 60, 100, 100, RED)
robot.screen.print_at("Cut off!", x=60, y=60)
Devoluciones de llamada#
pressed#
pressed registers a method to be called when the robot’s screen is pressed.
Usage:robot.screen.pressed(callback, arg)
Parámetros |
Descripción |
|---|---|
|
Una función que se define previamente para ejecutarse cuando se presiona la pantalla del controlador. |
|
Opcional. Una tupla que contiene los argumentos que se pasarán a la función de devolución de llamada. Consulte Uso de funciones con parámetros para obtener más información. |
# Set the LEDs to green when the screen is pressed.
def screen_touched():
    robot.led.on(ALL_LEDS, GREEN)

robot.screen.pressed(screen_touched)
released#
released registers a method to be called when the robot’s screen is released.
Usage:robot.screen.released(callback, arg)
Parámetros |
Descripción |
|---|---|
|
Una función que se define previamente para ejecutarse cuando se presiona la pantalla del controlador. |
|
Opcional. Una tupla que contiene los argumentos que se pasarán a la función de devolución de llamada. Consulte Uso de funciones con parámetros para obtener más información. |
# Set the LEDs to blue when the screen is released.
def screen_released():
    robot.led.on(ALL_LEDS, BLUE)

robot.screen.released(screen_released)