Pantalla#
Introducción#
Los bloques de pantalla controlan cómo el robot de codificación VEX AIM muestra texto, números y gráficos en su pantalla, y cómo responde a las pulsaciones en la misma.
A continuación se muestra una lista de todos los bloques:
Impresión con cursor: Gestiona la visualización del texto mediante un sistema de cursor por filas y columnas.
imprimir en pantalla — Muestra texto en la pantalla en la posición actual del cursor.
establecer cursor en fila columna en pantalla — Mueve el cursor a una fila y columna específicas.
establecer cursor a la siguiente fila en la pantalla — Mueve el cursor a la columna 1 de la siguiente fila.
borrar fila en pantalla — Borra una fila de texto específica.
columna del cursor de pantalla — Indica el número de columna donde se imprimirá el texto.
fila del cursor de pantalla — Informa el número de fila donde se imprimirá el texto.
Impresión XY: Imprime texto en coordenadas basadas en píxeles.
imprimir en la coordenada en pantalla — Muestra texto en una coordenada x e y especificada.
establecer origen de pantalla — Cambia el origen utilizado para dibujar e imprimir.
Ajustes: Personaliza el formato del texto y la visualización en pantalla.
borrar pantalla — Borra todo el texto y los dibujos de la pantalla.
llenar pantalla — Borra todo el texto y los dibujos de la pantalla y luego establece el color de fondo de la pantalla.
establecer fuente en pantalla — Cambia el tipo y tamaño de fuente para la visualización del texto.
establecer precisión de impresión en pantalla — Establece cuántos lugares decimales se mostrarán al imprimir números.
establecer ancho del lápiz en pantalla — Establece el grosor de las líneas dibujadas y los contornos de las formas.
establecer color de lápiz/fuente en pantalla — Establece el color del texto, píxeles, líneas y contornos de formas.
establecer color de relleno en pantalla — Establece el color de relleno para las formas dibujadas.
Dibujar: crear gráficos y elementos visuales.
mostrar archivo de imagen en pantalla — Muestra una imagen subida por el usuario en la pantalla.
dibujar píxel en pantalla — Dibuja un solo píxel en una coordenada específica.
dibujar línea en la pantalla — Dibuja una línea entre dos puntos.
dibujar rectángulo en la pantalla — Dibuja un rectángulo con las dimensiones especificadas.
dibujar círculo en la pantalla — Dibuja un círculo con un radio dado.
Tocar: Detecta las interacciones con la pantalla.
pantalla presionada — Informa si la pantalla está siendo presionada en este momento.
posición de pantalla — Informa la coordenada x o y seleccionada de la última pulsación de pantalla.
evento de pantalla — Ejecuta los bloques adjuntos cuando se presiona o se suelta la pantalla.
Cursor Imprimir#
imprimir en pantalla#
El bloque de pila imprimir en pantalla imprime texto, números o valores de variables en la pantalla del robot en la posición actual del cursor y la fuente.
imprimir [VEXcode] en la pantalla ▶
Parámetros |
Descripción |
|---|---|
valor |
El texto, número o valor de variable que se mostrará en la pantalla. |
y colocar el cursor en la siguiente fila |
Seleccione la flecha ( ▶ ) para expandir el bloque y decir y colocar el cursor en la siguiente fila, de modo que el cursor se mueva a la columna 1 de la siguiente fila después de imprimir. |
Ejemplo
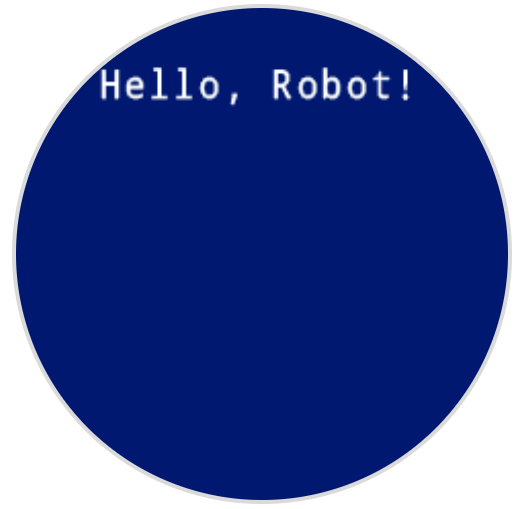
cuando empezó
[Display a message at the starting cursor position.]
imprimir [Hello, Robot!] en la pantalla ▶
Colocar el cursor en la fila o columna de la pantalla.#
El bloque Colocar cursor en fila y columna en pantalla mueve el cursor a una fila y columna específicas en la pantalla del robot. El siguiente bloque Imprimir en pantalla comenzará a imprimir en esa ubicación. La cantidad de filas y columnas que se pueden mostrar cómodamente depende de la fuente seleccionada. Con la fuente monoespaciada mediana predeterminada, se pueden mostrar claramente hasta 8 filas y 13 columnas. El texto colocado fuera de este rango puede quedar cortado o ser difícil de leer.
Las fuentes monoespaciadas tienen caracteres del mismo ancho, lo que garantiza una colocación uniforme del texto. En cambio, las fuentes proporcionales varían en ancho de carácter, por lo que algunas letras ocupan más espacio que otras. Sin embargo, independientemente del tipo de fuente, el bloque de pila establecer cursor en fila y columna en pantalla posiciona el cursor según el tamaño de fila y columna, no según el estilo de fuente. El tamaño de la fuente se puede ajustar mediante el bloque de pila establecer fuente en pantalla.
Coloque el cursor en la fila [1] columna [1] en la pantalla
Parámetros |
Descripción |
|---|---|
fila |
La fila a la que mover el cursor. |
columna |
La columna a la que se debe mover el cursor. |
Ejemplos
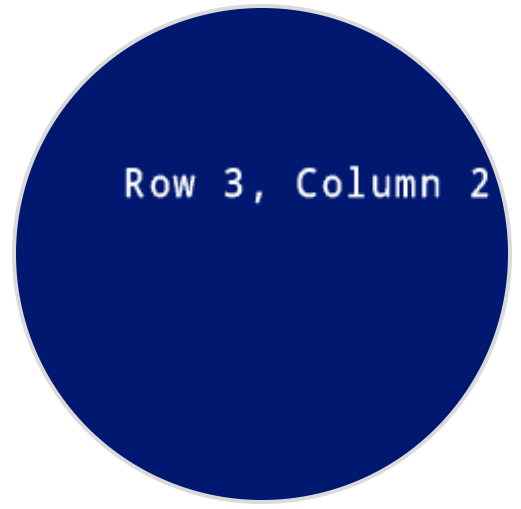
cuando empezó
[Display text starting at Row 3 Column 2.]
Coloque el cursor en la fila (3) columna (2) en la pantalla
imprimir [Row 3, Column 2] en la pantalla ▶
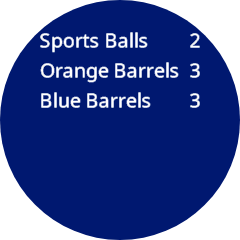
cuando empezó
[Display cargo amounts in an organized list.]
Establezca la fuente en [proporcional v] [grande v] en la pantalla
imprimir [Sports Balls] en la pantalla ◀ y coloque el cursor en la siguiente fila
imprimir [Orange Barrels] en la pantalla ◀ y coloque el cursor en la siguiente fila
imprimir [Blue Barrels] en la pantalla ▶
Coloque el cursor en la fila [1] columna [11] en la pantalla
imprimir [2] en la pantalla ▶
Coloque el cursor en la fila [2] columna [11] en la pantalla
imprimir [3] en la pantalla ▶
Coloque el cursor en la fila [3] columna [11] en la pantalla
imprimir [3] en la pantalla ▶
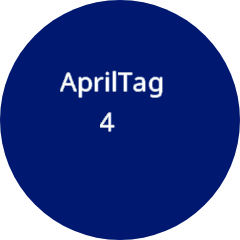
cuando empezó
[Display the ID of the detected AprilTag.]
Establezca la fuente en [proporcional v] [extra grande v] en la pantalla
para siempre
pantalla clara
imprimir [AprilTag] en la pantalla ▶
obtener [all AprilTags v] datos de AI Vision
si <¿Existe el objeto AI Vision?> entonces
Coloque el cursor en la fila [3] columna [4] en la pantalla
imprimir (Objeto de visión de IA [ID de etiqueta v]) en la pantalla ▶
fin
esperar [0.1] segundos
Colocar el cursor en la siguiente fila de la pantalla.#
El bloque de pila establecer cursor a la siguiente fila en la pantalla mueve el cursor a la columna 1 de la siguiente fila en la pantalla del robot.
Colocar el cursor en la siguiente fila de la pantalla
Parámetros |
Descripción |
|---|---|
Este bloque no tiene parámetros. |
Ejemplo
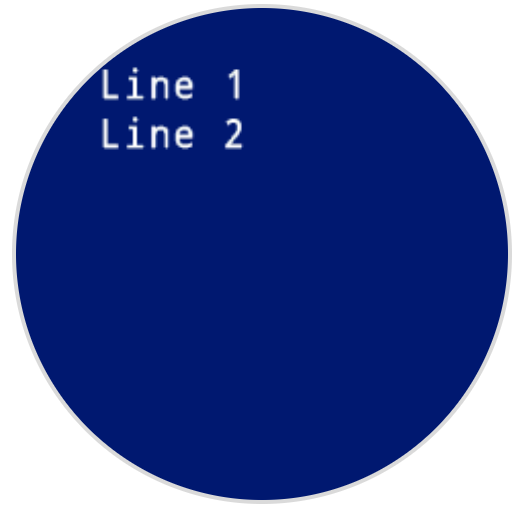
cuando empezó
[Display two lines of text.]
imprimir [Line 1] en la pantalla ▶
Colocar el cursor en la siguiente fila de la pantalla
imprimir [Line 2] en la pantalla ▶
Borrar fila en la pantalla#
El bloque de pila borrar fila en pantalla borra una sola fila de texto en la pantalla del robot.
Limpiar la fila [1] de la pantalla
Parámetros |
Descripción |
|---|---|
fila |
El número de fila a borrar. |
Ejemplo
cuando empezó
[Display text on two rows.]
imprimir [This text stays] en la pantalla ▶
Colocar el cursor en la siguiente fila de la pantalla
imprimir [This text disappears] en la pantalla ▶
esperar [3] segundos
Limpiar la fila [2] de la pantalla
columna del cursor de la pantalla#
El bloque de informe Columna del cursor de pantalla informa el número de columna donde se imprimirá el texto como un número entero.
(columna del cursor de la pantalla)
Parámetros |
Descripción |
|---|---|
Este bloque no tiene parámetros. |
Ejemplo
cuando empezó
[Display the cursor's current column.]
Coloque el cursor en la fila [3] columna [2] en la pantalla
imprimir (columna del cursor de la pantalla) en la pantalla ▶
fila del cursor de la pantalla#
El bloque de informe fila del cursor de pantalla informa el número de fila donde se imprimirá el texto como un número entero.
(fila del cursor de la pantalla)
Parámetros |
Descripción |
|---|---|
Este bloque no tiene parámetros. |
Ejemplo
cuando empezó
[Display the cursor's current row.]
Coloque el cursor en la fila [3] columna [2] en la pantalla
imprimir (fila del cursor de la pantalla) en la pantalla ▶
Impresión XY#
Imprimir en la coordenada que aparece en pantalla.#
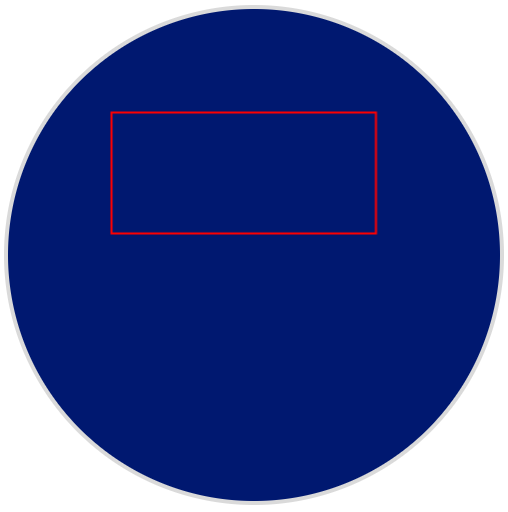
El bloque de pila imprimir en la coordenada en pantalla imprime texto, números o valores de variables en la pantalla del robot en una coordenada x e y especificada en píxeles con la fuente actualmente configurada.
Por defecto, el origen se encuentra en la esquina superior izquierda de la pantalla, en (0, 0). En el eje x, 0 se sitúa a la izquierda de la pantalla y 240 a la derecha. En el eje y, 0 se sitúa en la parte superior de la pantalla y 240 en la inferior. Puedes usar el bloque establecer origen de pantalla para mover el origen a otra ubicación. Al cambiar el origen, los rangos de coordenadas x e y también cambiarán.
Por ejemplo, si el origen se establece en (120, 120), el rango de x e y será de -120 a 120 para las coordenadas x e y.
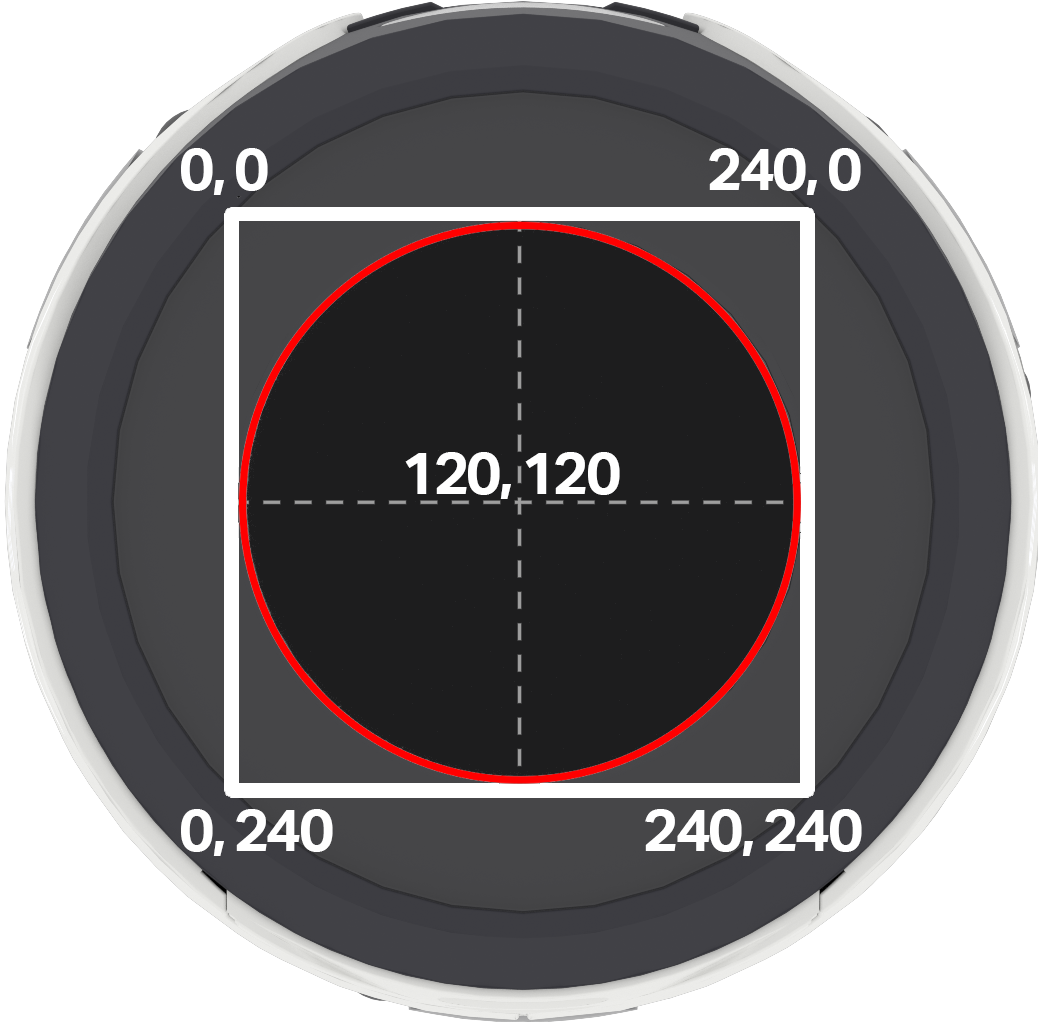
Nota: El círculo rojo muestra las coordenadas que serán visibles en la pantalla circular del robot AIM. Las coordenadas que quedan fuera del círculo rojo se encuentran dentro del rango de 0 a 240, pero no aparecerán en la pantalla.
imprimir [VEXcode] en x:[80] y:[120] en pantalla
Parámetros |
Descripción |
|---|---|
valor |
El texto, número o valor de variable que se mostrará en la pantalla. |
incógnita |
La coordenada x en píxeles, de 0 a 240 con el origen predeterminado. |
y |
La coordenada y en píxeles, de 0 a 240 con el origen predeterminado. |
Ejemplo
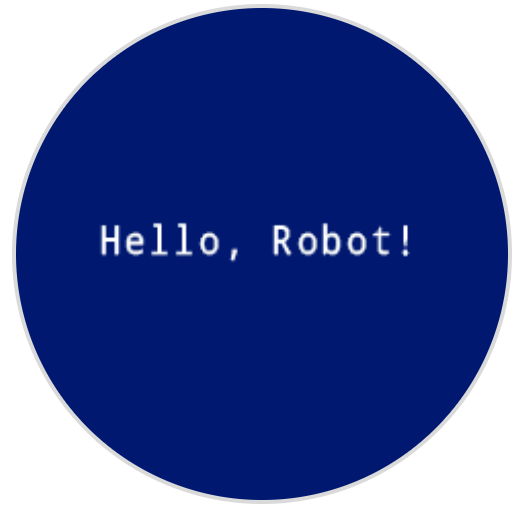
cuando empezó
[Display a message in the middle of the screen.]
imprimir [Hello, Robot!] en x:[40] y:[120] en pantalla
establecer el origen de la pantalla#
El bloque establecer origen de pantalla modifica el origen (0, 0) utilizado para dibujar o imprimir en la pantalla del robot. Por defecto, el origen es la esquina superior izquierda de la pantalla. Este bloque permite restablecer el origen a una ubicación de coordenadas (x, y) alternativa en la pantalla.
establecer origen de pantalla x: [0] y: [0]
Parámetros |
Descripción |
|---|---|
incógnita |
La coordenada x en píxeles que se establecerá como nuevo origen. |
y |
La coordenada y en píxeles que se establecerá como nuevo origen. |
Ejemplo
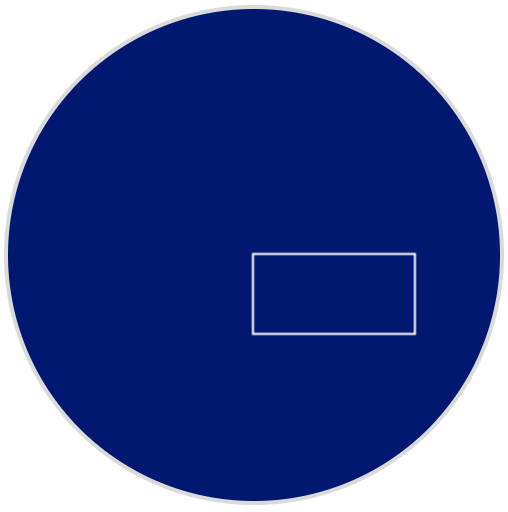
cuando empezó
[Set the origin to the center of the screen.]
establecer origen de pantalla x: [120] y: [120]
[Draw a rectangle at the new origin.]
dibuja el rectángulo [0] [0] [80] [40] en la pantalla
Ajustes#
pantalla clara#
El bloque de pila borrar pantalla borra todos los dibujos y el texto de la pantalla del robot y restablece la posición del cursor a la fila 1, columna 1.
pantalla clara
Parámetros |
Descripción |
|---|---|
Este bloque no tiene parámetros. |
Ejemplo
cuando empezó
[Draw a circle, and clear it after 2 seconds.]
dibuja el círculo [120] [120] [40] en la pantalla
esperar [2] segundos
pantalla clara
llenar la pantalla#
El bloque de pila Rellenar pantalla borra todos los dibujos y el texto de la pantalla del robot y, a continuación, cambia el fondo a un color específico.
llenar la pantalla con [rojo v]
Parámetros |
Descripción |
|---|---|
color |
Color de fondo a utilizar:
|
Ejemplo
cuando empezó
[Say "Hello" then turn screen yellow.]
imprimir [Hello] en la pantalla ▶
esperar [2] segundos
llenar la pantalla con [amarillo v]
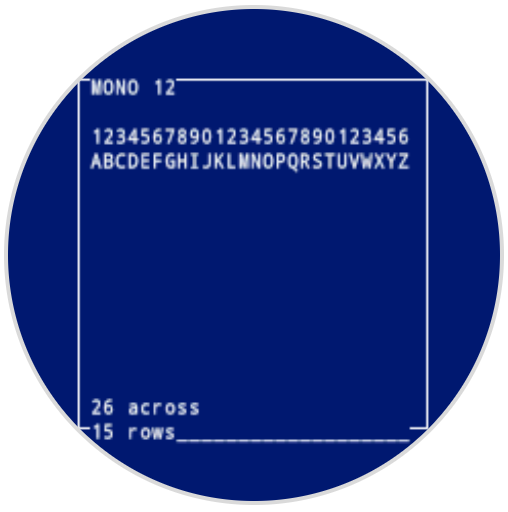
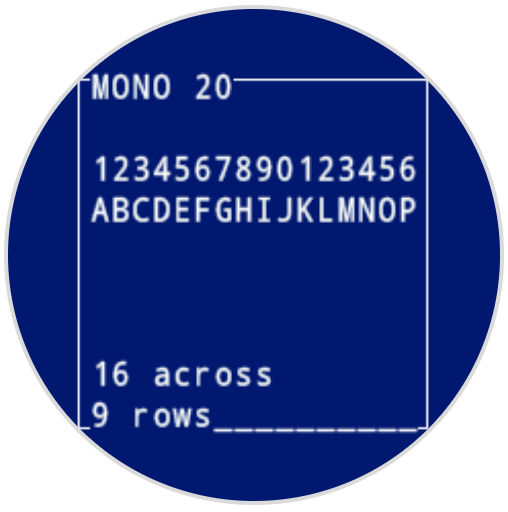
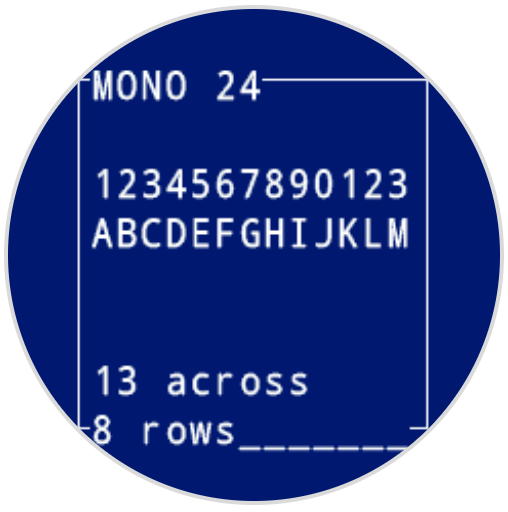
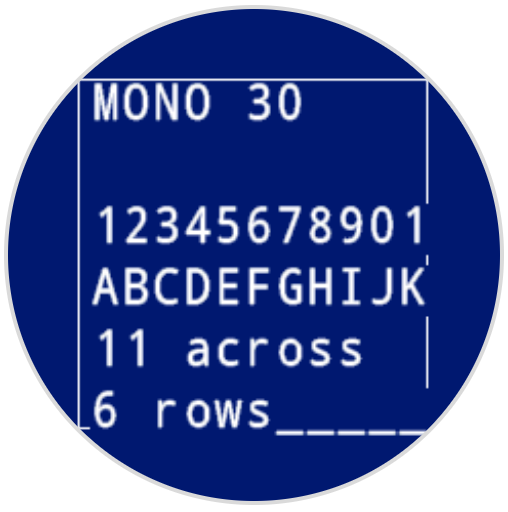
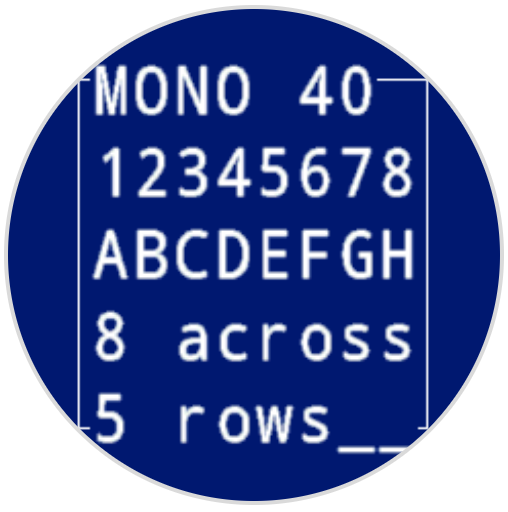
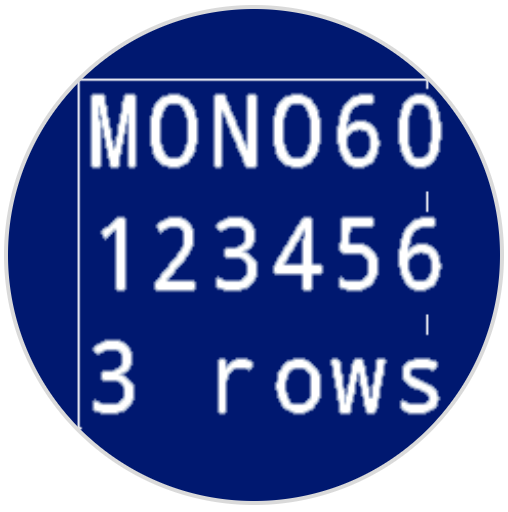
establecer fuente en pantalla#
El bloque establecer fuente en pantalla define la fuente y el tamaño que se utilizarán para mostrar el texto en la pantalla del robot. Esta fuente se aplicará a todo el texto que se imprima posteriormente.
Establezca la fuente en [monoespaciado v] [superpequeño v] en la pantalla
Parámetros |
Descripción |
|---|---|
tipo |
Tipo de fuente: monoespaciada o proporcional |
tamaño |
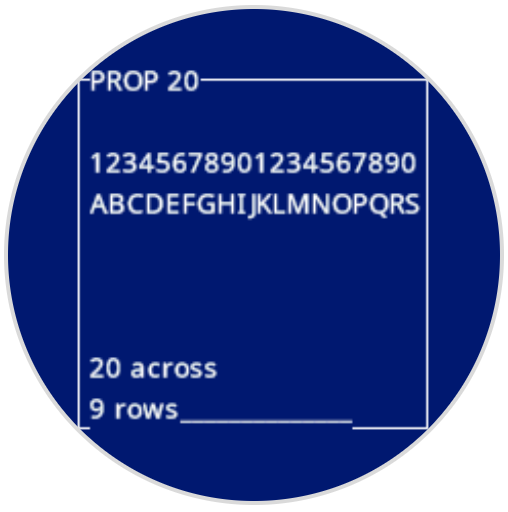
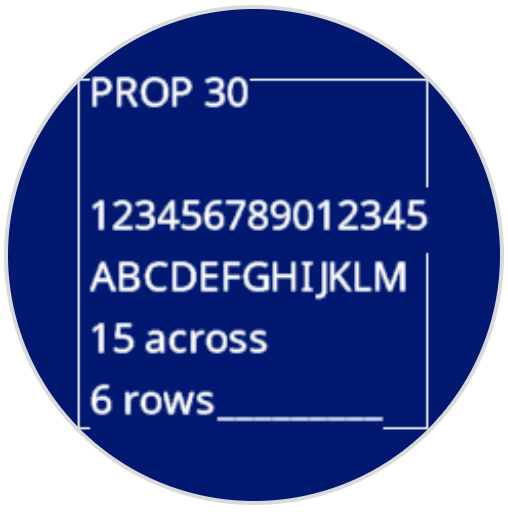
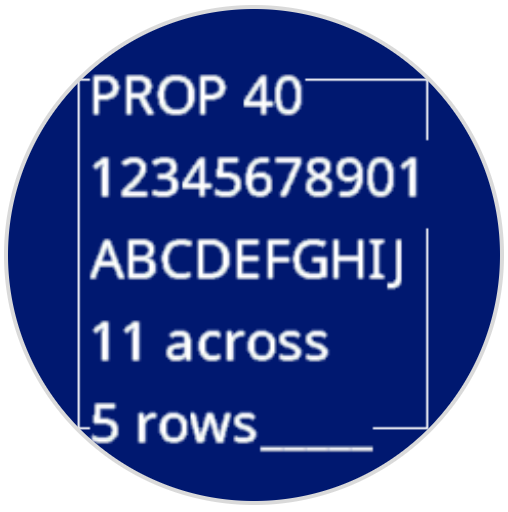
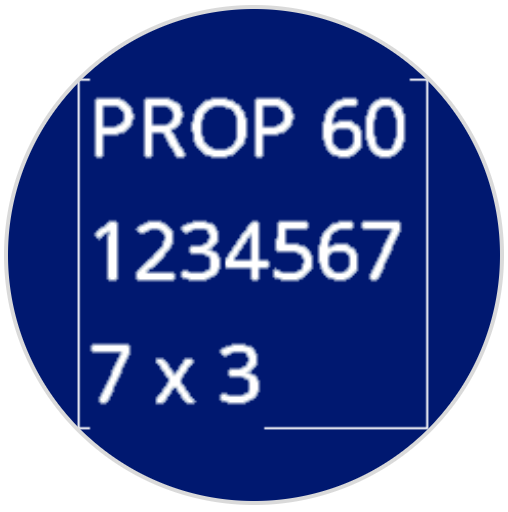
Tamaño de fuente (mostrado a continuación):
|
|
|
|
|---|---|---|
|
|
|
|
|
|
|
|

Ejemplo
cuando empezó
[Display text using a larger font]
Establezca la fuente en [monoespaciado v] [extra grande v] en la pantalla
imprimir [VEX] en la pantalla ▶
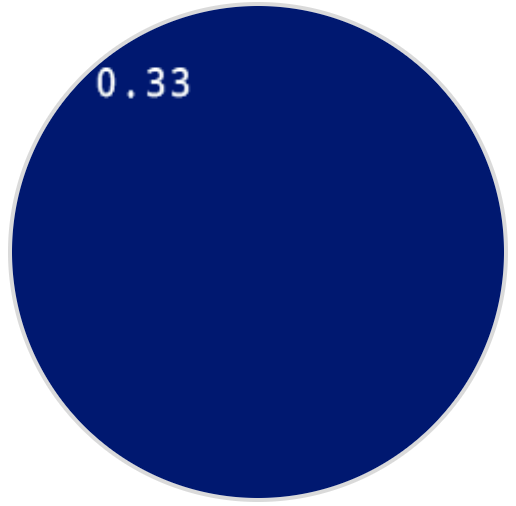
Ajustar la precisión de impresión en pantalla#
El bloque establecer precisión de impresión en pantalla define la cantidad de decimales que se mostrarán al imprimir números en la pantalla del robot. Esta precisión de impresión se aplicará a todos los números que se impriman posteriormente.
Establezca la precisión de impresión en [0.1 v] en la pantalla
Parámetros |
Descripción |
|---|---|
precisión |
Precisión de impresión a utilizar:
|
Ejemplo
cuando empezó
[Print 1/3 as 0.33.]
Establezca la precisión de impresión en [0.01 v] en la pantalla
imprimir ([1] [math_division v] [3]) en la pantalla ▶
Ajustar el ancho del lápiz en la pantalla#
El bloque establecer ancho del lápiz en pantalla permite ajustar el grosor de las líneas dibujadas y los contornos de las formas.
Establezca el ancho del lápiz en [10] en la pantalla
Parámetros |
Descripción |
|---|---|
ancho |
El ancho del lápiz, en píxeles, va de 0 a 32. |
Ejemplo
cuando empezó
[Draw a rectangle with a pen width of 10.]
Establezca el ancho del lápiz en [10] en la pantalla
dibuja el rectángulo [50] [50] [130] [60] en la pantalla
Configurar el color del lápiz/fuente en la pantalla#
El bloque de pila establecer color de lápiz/fuente en pantalla establece el color del texto, los píxeles, las líneas y los contornos de las formas.
Establezca el color del lápiz/fuente en [rojo v] en la pantalla
Parámetros |
Descripción |
|---|---|
color |
El color del bolígrafo y la fuente a utilizar:
|
Ejemplo
cuando empezó
[Draw a rectangle with a red pen.]
Establezca el color del lápiz/fuente en [rojo v] en la pantalla
dibuja el rectángulo [50] [50] [130] [60] en la pantalla
establecer color de relleno en la pantalla#
El bloque de pila establecer color de relleno en pantalla establece el color de relleno que se utiliza al dibujar formas.
Establezca el color de relleno en [rojo v] en la pantalla
Parámetros |
Descripción |
|---|---|
color |
Color de relleno a utilizar:
|
Ejemplos
cuando empezó
[Draw two orange rectangles.]
Establezca el color de relleno en [naranja v] en la pantalla
dibuja el rectángulo [50] [50] [100] [60] en la pantalla
dibuja el rectángulo [50] [130] [100] [60] en la pantalla

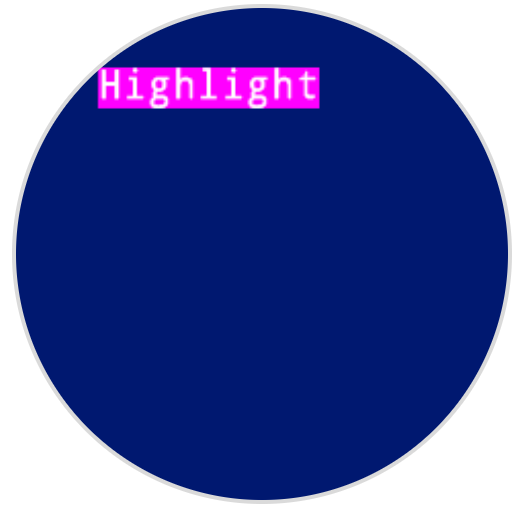
cuando empezó
[Display text with a purple background.]
Establezca el color de relleno en [púrpura v] en la pantalla
imprimir [Highlight] en la pantalla ▶
Dibujar#
Mostrar archivo de imagen en pantalla#
El bloque de pila mostrar archivo de imagen en pantalla dibuja una imagen personalizada subida por el usuario en la pantalla del robot.
mostrar archivo de imagen [1 v]
Parámetros |
Descripción |
|---|---|
número de ranura de imagen |
La imagen personalizada a utilizar, número del 1 al 10. El número de la imagen se alinea con el número que se muestra en el panel de control de AIM. |
Ejemplo
cuando empezó
[Draw uploaded Image 1.]
mostrar archivo de imagen [1 v]
dibujar píxeles en la pantalla#
El bloque de pila dibujar píxel en pantalla dibuja un píxel en la coordenada x e y seleccionada utilizando el [color del lápiz] actual (#set-pen–font-color-on-screen).
Por defecto, el origen se encuentra en la esquina superior izquierda de la pantalla, en (0, 0). En el eje x, 0 se sitúa a la izquierda de la pantalla y 240 a la derecha. En el eje y, 0 se sitúa en la parte superior de la pantalla y 240 en la inferior. Puedes usar el bloque establecer origen de pantalla para mover el origen a otra ubicación. Al cambiar el origen, los rangos de coordenadas x e y también cambiarán.
Por ejemplo, si el origen se establece en (120, 120), el rango de x e y será de -120 a 120 para las coordenadas x e y.
Dibuja el píxel [0] [0] en la pantalla
Parámetros |
Descripción |
|---|---|
incógnita |
La coordenada x para dibujar el píxel, de 0 a 240 con el origen predeterminado. |
y |
La coordenada y para dibujar el píxel, de 0 a 240 con el origen predeterminado. |
Ejemplo
cuando empezó
[Draw a pixel at the center of the screen.]
Dibuja el píxel [120] [120] en la pantalla
![]()
dibujar una línea en la pantalla#
El bloque de pila dibujar línea en pantalla dibuja una línea desde la primera coordenada de la pantalla (x1, y1) hasta la segunda coordenada de la pantalla (x2, y2) utilizando el [ancho del lápiz] (#set-pen-width-on-screen) y el [color del lápiz] (#set-pen–font-color-on-screen ) actuales.
Por defecto, el origen se encuentra en la esquina superior izquierda de la pantalla, en (0, 0). En el eje x, 0 se sitúa a la izquierda de la pantalla y 240 a la derecha. En el eje y, 0 se sitúa en la parte superior de la pantalla y 240 en la inferior. Puedes usar el bloque establecer origen de pantalla para mover el origen a otra ubicación. Al cambiar el origen, los rangos de coordenadas x e y también cambiarán.
Por ejemplo, si el origen se establece en (120, 120), el rango de x e y será de -120 a 120 para las coordenadas x e y.
dibuja la línea [0] [0] [10] [10] en la pantalla
Parámetros |
Descripción |
|---|---|
x1 |
La coordenada x en píxeles del inicio de la línea, de 0 a 240 con el origen predeterminado. |
año1 |
La coordenada y en píxeles del inicio de la línea, de 0 a 240 con el origen predeterminado. |
x2 |
La coordenada x en píxeles del extremo de la línea, de 0 a 240 con el origen predeterminado. |
Año 2 |
La coordenada y en píxeles del extremo de la línea, de 0 a 240 con el origen predeterminado. |
Ejemplo
cuando empezó
[Draw a line from the top left to bottom right of the screen.]
dibuja la línea [0] [0] [240] [240] en la pantalla
Dibujar un rectángulo en la pantalla#
El bloque de pila dibujar rectángulo en pantalla dibuja un rectángulo usando el [ancho del lápiz] (#set-pen-width-on-screen), el [color del lápiz] (#set-pen–font-color-on-screen) y el [color de relleno] (#set-fill-color-on-screen ) actuales.
Por defecto, el origen se encuentra en la esquina superior izquierda de la pantalla, en (0, 0). En el eje x, 0 se sitúa a la izquierda de la pantalla y 240 a la derecha. En el eje y, 0 se sitúa en la parte superior de la pantalla y 240 en la inferior. Puedes usar el bloque establecer origen de pantalla para mover el origen a otra ubicación. Al cambiar el origen, los rangos de coordenadas x e y también cambiarán.
Por ejemplo, si el origen se establece en (120, 120), el rango de x e y será de -120 a 120 para las coordenadas x e y.
dibuja el rectángulo [0] [0] [10] [10] en la pantalla
Parámetros |
Descripción |
|---|---|
incógnita |
La coordenada x en píxeles de la esquina superior izquierda del rectángulo, de 0 a 240 con el origen predeterminado. |
y |
La coordenada y en píxeles de la esquina superior izquierda del rectángulo, de 0 a 240 con el origen predeterminado. |
ancho |
El ancho del rectángulo en píxeles. |
altura |
La altura del rectángulo en píxeles. |
Ejemplo
cuando empezó
[Draw a rectangle on the screen.]
dibuja el rectángulo [50] [50] [130] [60] en la pantalla
dibujar un círculo en la pantalla#
El bloque de pila dibujar círculo en la pantalla dibuja un círculo usando el [ancho del lápiz] (#set-pen-width-on-screen), el [color del lápiz] (#set-pen–font-color-on-screen) y el [color de relleno] (#set-fill-color-on-screen ) actuales.
Por defecto, el origen se encuentra en la esquina superior izquierda de la pantalla, en (0, 0). En el eje x, 0 se sitúa a la izquierda de la pantalla y 240 a la derecha. En el eje y, 0 se sitúa en la parte superior de la pantalla y 240 en la inferior. Puedes usar el bloque establecer origen de pantalla para mover el origen a otra ubicación. Al cambiar el origen, los rangos de coordenadas x e y también cambiarán.
Por ejemplo, si el origen se establece en (120, 120), el rango de x e y será de -120 a 120 para las coordenadas x e y.
dibuja el círculo [0] [0] [10] en la pantalla
Parámetros |
Descripción |
|---|---|
incógnita |
La coordenada x en píxeles del centro del círculo, de 0 a 240 con el origen predeterminado. |
y |
La coordenada y en píxeles del centro del círculo, de 0 a 240 con el origen predeterminado. |
radio |
El radio del círculo en píxeles. |
Ejemplo
cuando empezó
[Draw a circle on the screen.]
dibuja el círculo [120] [120] [40] en la pantalla
Tocar#
pantalla pulsada#
El bloque booleano screen pressed indica si la pantalla del robot está siendo presionada en ese momento.
Verdadero — Se está presionando la pantalla.
Falso — No se está pulsando la pantalla.
<¿pantalla presionada?>
Parámetros |
Descripción |
|---|---|
Este bloque no tiene parámetros. |
Ejemplo
cuando empezó
[Turn LEDs white only when the screen is pressed.]
para siempre
si <¿pantalla presionada?> entonces
Establezca el color del LED [lightall v] en [blanco v]
demás
Establezca el color del LED [lightall v] en [apagado v]
fin
fin
posición de la pantalla#
El bloque de información posición en pantalla informa la coordenada seleccionada de la última pulsación en pantalla. La coordenada x va de 0 (izquierda) a 240 (derecha). La coordenada y va de 0 (arriba) a 240 (abajo).
(posición de pantalla [incógnita v])
Parámetros |
Descripción |
|---|---|
coordinar |
La coordenada de la última pulsación de pantalla a informar: x informa la posición horizontal, y y informa la posición vertical. |
Ejemplo
cuando empezó
[Display the x and y coordinate of where the screen is pressed.]
para siempre
si <¿pantalla presionada?> entonces
pantalla clara
imprimir (posición de pantalla [incógnita v]) en la pantalla ▶
Colocar el cursor en la siguiente fila de la pantalla
imprimir (posición de pantalla [y v]) en la pantalla ▶
fin
fin
cuando el evento de pantalla#
El bloque de sombrero when screen event ejecuta la pila de bloques adjunta cuando se presiona o se suelta la pantalla del robot.
cuando la pantalla [presionado v]
Parámetros |
Descripción |
|---|---|
acción |
Cuándo ejecutar la pila de bloques adjunta: pressed se ejecuta cuando se presiona la pantalla, y released se ejecuta cuando se suelta la pantalla. |
Ejemplo
cuando la pantalla [presionado v]
[Set the LEDs to green when the screen is pressed.]
Establezca el color del LED [lightall v] en [verde v]