屏幕#
介绍#
VEX IQ(第二代)大脑屏幕提供了多种方法来显示信息、绘制形状和控制屏幕的视觉元素。
以下是所有方法的列表:
方法——控制大脑屏幕上的显示。
print – 在当前光标位置打印文本。
print_at – 在特定的 x 和 y 位置打印文本。
set_cursor – 将光标设置到特定的行和列。
set_origin – 设置打印和绘图的新原点。
set_font – 设置打印文本的字体。
set_pen_width - 设置绘制形状和线条的粗细。
set_pen_color - 设置轮廓和文本的颜色。
set_fill_color - 设置形状和背景的填充颜色。
column – 返回当前光标列。
row – 返回当前光标行。
get_string_width - 返回字符串的宽度(以像素为单位)。
get_string_height - 返回字符串的高度(以像素为单位)。
clear_screen – 清除屏幕上的所有图形和文本。
clear_row – 清除一行文本。
next_row – 将光标移动到下一行的第 1 列。
draw_pixel – 在特定的 x 和 y 位置绘制像素。
draw_line – 在两点之间画一条线。
draw_rectangle – 绘制一个矩形。
draw_circle – 绘制一个圆圈。
[render] – 仅在被调用时使用文本和绘图更新 Brain 的屏幕。
set_clip_region - 限制绘图和文本出现的位置。
打印#
print 在 Brain 屏幕上的当前 光标位置 和 字体 显示文本。
用法:
brain.screen.print(text, precision, opaque)
参数 |
描述 |
|---|---|
|
要在屏幕上显示的文本、数字或变量值。 |
|
可选。显示数字时显示的小数位数。必须使用关键字参数,例如:precision=3。默认值为 2。 |
|
可选。
|
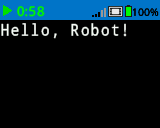
# Display a message at the starting cursor position
brain.screen.print("Hello, Robot!")
# Display a percentage with 4 decimal places and a blue background
brain.screen.set_fill_color(Color.BLUE)
brain.screen.print((42/100), precision = 4, opaque = True)
打印#
print_at 在 Brain 屏幕上指定的 x 和 y 坐标(以像素为单位)处显示文本,当前设置的 [font] 为#set-font, [origin] 为#set-origin。此方法忽略当前光标位置。
用法:
brain.screen.print_at(text, x, y, precision, opaque)
参数 |
描述 |
|---|---|
|
要打印的文本。 |
|
作为关键字参数打印的 x 位置,即: |
|
作为关键字参数打印的 y 位置,即: |
|
可选。显示数字时显示的小数位数。必须使用关键字参数,例如:precision=3。默认值为 2。 |
|
可选。
|
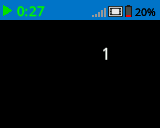
# Print the number 1 on the Brain's screen at position (100, 40)
brain.screen.print_at(1, x=100, y=40)
# Display 1/3 with 3 decimal places and a blue background
brain.screen.set_fill_color(Color.BLUE)
brain.screen.print_at((1/3), x=100, y=40, precision=3, opaque=True)
设置光标#
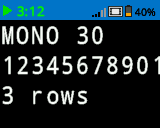
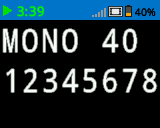
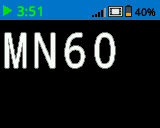
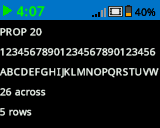
set_cursor 将光标设置在 Brain 屏幕上的特定行和列。实际能容纳的行数和列数取决于所选的字体。
等宽字体的字符宽度相同,使文本位置保持一致。相比之下,比例字体的字符宽度各不相同,因此某些字母比其他字母占用更多空间。但是,无论使用哪种类型,“set_cursor”都会根据行和列的大小(而不是字体样式)来定位光标。可以使用 set_font 调整字体大小。
用法:
brain.screen.set_cursor(row, column)
参数 |
描述 |
|---|---|
|
游标所在行。 |
|
光标所在的列。 |
# Repeatedly print the Brain's timer at the
# top left of the screen
while True:
    brain.screen.print(brain.timer.time(SECONDS))
    brain.screen.next_row()
    wait(1, SECONDS)
    brain.screen.clear_screen()
    brain.screen.set_cursor(1, 1)
设置原点#
set_origin 设置 Brain 屏幕上用于绘图或打印的原点 (0,0)。默认情况下,绘图或打印方法将屏幕左上角视为原点。此方法可以将原点重置为另一个 (x, y) 屏幕坐标位置。
用法:
brain.screen.set_origin(x, y)
范围 |
描述 |
|---|---|
|
设置为原点的新 x 坐标,以 0 至 160 之间的整数形式给出。 |
|
设置作为原点的新 y 坐标,以 0 至 108 之间的整数形式给出。 |
# Draw a line with the origin set to (50, 50)
brain.screen.set_origin(50, 50)
brain.screen.draw_line(1, 1, 159, 107)
设置字体#
set_font 设置 Brain 屏幕上显示文本的字体。此字体将应用于所有使用 print 或 print_at 打印的文本。项目开始时的默认字体为 MONO20。
用法:
brain.screen.set_font(fontname)
范围 |
描述 |
|---|---|
|
将字体设置为下列之一:
|
|
|
|
|---|---|---|
|
|
|
|
|
|
|
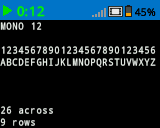
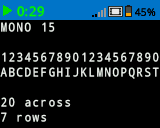
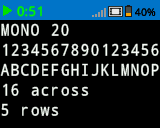


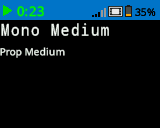
# Display two different fonts on two separate lines
brain.screen.set_font(FontType.MONO20)
brain.screen.print("Mono Medium")
brain.screen.next_row()
brain.screen.set_font(FontType.PROP20)
brain.screen.print("Prop Medium")
设置笔宽#
set_pen_width 设置用于绘制线条和形状的笔宽。
用法:
brain.screen.set_pen_width(width)
范围 |
描述 |
|---|---|
|
笔的宽度,以像素为单位的整数,范围是 0 到 32。 |
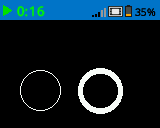
# Draw two circles with different pen widths
brain.screen.draw_circle(40, 70, 20)
brain.screen.set_pen_width(5)
brain.screen.draw_circle(100, 70, 20)
设置画笔颜色#
set_pen_color 设置用于绘制线条、形状和文本的画笔颜色。
用法:
brain.screen.set_pen_color(color)
范围 |
描述 |
|---|---|
|
可选。设置画笔颜色。选项包括:
|
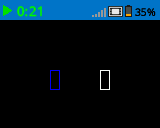
# Draw two rectangles with different colors
brain.screen.draw_rectangle(100, 50, 10, 20)
brain.screen.set_pen_color(Color.BLUE)
brain.screen.draw_rectangle(50, 50, 10, 20)
设置填充颜色#
set_fill_color 方法设置绘制形状时使用的填充颜色。
用法:
brain.screen.set_fill_color(color)
范围 |
描述 |
|---|---|
|
可选。设置填充颜色。选项包括:
|
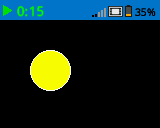
# Draw a yellow circle
brain.screen.set_fill_color(Color.YELLOW)
brain.screen.draw_circle(50, 50, 20)
柱子#
column 返回当前列,其中文本将以整数形式打印。
用法:
brain.screen.column()
参数 |
描述 |
|---|---|
该方法没有参数。 |
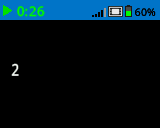
# Set cursor to (3,2) and print column number
brain.screen.set_cursor(3, 2)
brain.screen.print(brain.screen.column())
排#
row 返回当前行,其中文本将以整数形式打印。
用法:
brain.screen.row()
参数 |
描述 |
|---|---|
该方法没有参数。 |
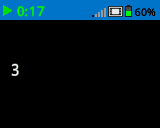
# Set cursor to (3,2) and print row number
brain.screen.set_cursor(3, 2)
brain.screen.print(brain.screen.row())
获取字符串宽度#
get_string_width 返回字符串在 Brain 屏幕上的显示宽度(以像素为单位)。宽度取决于字符串的长度和 当前字体。
用法:
brain.screen.get_string_width(string)
参数 |
描述 |
|---|---|
|
要测量的字符串。 |
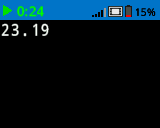
# Display the width of a string in pixels
brain.screen.print("String width ")
brain.screen.print(brain.screen.get_string_width("Hello, Robot!"))

获取字符串高度#
get_string_height 返回字符串在 Brain 屏幕上的显示高度(以像素为单位)。宽度取决于字符串的长度和 当前字体。
用法:
brain.screen.get_string_height(string)
参数 |
描述 |
|---|---|
细绳 |
要测量的字符串。 |
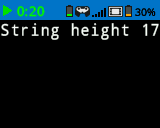
# Display the height of a string in pixels
brain.screen.print("String height ")
brain.screen.print(brain.screen.get_string_height("Hello, Robot!"))
清除屏幕#
clear_screen 清除 Brain 屏幕上的所有绘图和文本。
用法:
brain.screen.clear_screen(color)
参数 |
描述 |
|---|---|
颜色 |
可选。设置屏幕颜色。选项包括:
|
# Draw a circle and clear it after 2 seconds
brain.screen.draw_circle(80, 50, 20)
wait(2, SECONDS)
brain.screen.clear_screen()
# Turn the screen red
brain.screen.clear_screen(Color.RED)
![]()
清除行#
clear_row 清除 Brain 屏幕上的一行图画和文本。
用法:
brain.screen.clear_row(row, color)
参数 |
描述 |
|---|---|
排 |
可选。要清除的行。默认值为当前光标所在行。 |
颜色 |
可选。应用于已清除行的颜色。选项包括:
|
# Display text on two rows
brain.screen.print("This text stays")
brain.screen.next_row()
brain.screen.print("This disappears")

# Wait 3 seconds before clearing only the second row
wait(3, SECONDS)
brain.screen.clear_row()
# Turn the 5th row green
brain.screen.clear_row(5, Color.GREEN)
![]()
下一行#
next_row 将光标移动到 Brain 屏幕上下一行的第 1 列。
用法:
brain.screen.next_row()
参数 |
描述 |
|---|---|
该方法没有参数。 |
# Display two lines of text
brain.screen.print("Line 1")
brain.screen.next_row()
brain.screen.print("Line 2")

绘制像素#
draw_pixel 使用当前画笔颜色在指定的 (x, y) 屏幕坐标处绘制一个像素。它使用由 set_pen_color 设置的当前画笔颜色。
用法:
brain.screen.draw_pixel(x, y)
范围 |
描述 |
|---|---|
|
将绘制像素的 x 坐标,以 0 至 160 之间的整数表示。 |
|
将绘制像素的 y 坐标,以 0 至 108 之间的整数表示。 |
# Draw one pixel at the center of the screen
brain.screen.draw_pixel(80, 50)
![]()
画线#
draw_line 从第一个指定的屏幕坐标 (x1, y1) 到第二个指定的屏幕坐标 (x2, y2) 绘制一条线。它使用当前由 set_pen_width 设置的画笔宽度和由 set_pen_color 设置的画笔颜色。
x 和 y 坐标使用默认原点 (0, 0),除非使用 set_origin 设置了不同的原点。
用法:
brain.screen.draw_line(x1,y1,x2,y2)
范围 |
描述 |
|---|---|
|
线的起始 x 坐标,以 0 至 160 之间的整数表示。 |
|
线的起始 y 坐标,以 0 至 108 之间的整数表示。 |
|
线的结束 x 坐标,以 0 至 160 之间的整数表示。 |
|
线的结束 y 坐标,以 0 至 108 之间的整数表示。 |
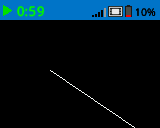
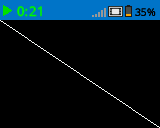
# Draw a line from the top left to bottom right of the screen
brain.screen.draw_line(0, 0, 159, 107)
绘制矩形#
draw_rectangle 绘制一个矩形,其左上角位于指定的 (x, y) 坐标,其大小由给定的宽度和高度决定,所有值均以像素为单位。矩形的轮廓使用由 set_pen_width 设置的当前画笔宽度和由 set_pen_color 设置的画笔颜色绘制。矩形内部填充由 set_fill_color 设置的颜色。
x 和 y 坐标使用默认原点 (0,0),除非使用 set_origin 设置了不同的原点。
用法:
brain.screen.draw_rectangle(x, y, width, height, color)
范围 |
描述 |
|---|---|
|
矩形左上角的 x 坐标,以 0 至 160 之间的整数表示。 |
|
矩形左上角的 y 坐标,以 0 至 108 之间的整数表示。 |
|
矩形的宽度,以 0 到 160 之间的整数表示。 |
|
矩形的高度,以 0 到 108 之间的整数表示。 |
|
可选。矩形的填充颜色。选项包括:
|
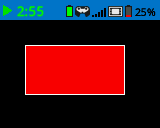
# Draw a red rectangle on the screen
brain.screen.draw_rectangle(25, 25, 100, 50, Color.RED)
画圆#
draw_circle 绘制一个圆,其圆心位于指定的 (x, y) 坐标,大小由给定的半径决定,所有尺寸均以像素为单位。圆的轮廓使用由 set_pen_width 设置的当前画笔宽度和由 set_pen_color 设置的画笔颜色绘制。圆的内部填充由 set_fill_color 设置的颜色。
x 和 y 坐标使用默认原点 (0,0),除非使用 set_origin 设置了不同的原点。
用法:
brain.screen.draw_circle(x, y, radius, color)
范围 |
描述 |
|---|---|
|
圆心的 x 坐标,以 0 至 160 之间的整数表示。 |
|
圆心的 y 坐标,以 0 至 160 之间的整数表示。 |
|
圆的半径,以 0 到 108 像素之间的整数表示。 |
|
可选。圆的填充颜色。选项包括:
|
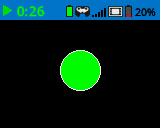
# Draw a green circle on the screen
brain.screen.draw_circle(80, 50, 20, Color.GREEN)
使成为#
render 为 Brain 的屏幕启用双缓冲。一旦调用,任何绘图命令(例如文本、形状或图像)将不再立即显示在项目的其余部分。相反,更新仅在再次使用 render 时才会显示。这使得屏幕更新更加流畅且更可控,但这意味着在使用 render 之前什么都不会显示。
用法:
brain.screen.render()
参数 |
描述 |
|---|---|
该方法没有参数。 |
# Render text after moving
brain.screen.render()
brain.screen.print("Render later...")
drivetrain.drive_for(FORWARD, 100, MM)
drivetrain.turn_for(RIGHT, 90, DEGREES)
brain.screen.render()
设置剪辑区域#
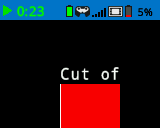
set_clip_region 在屏幕上定义一个矩形区域,所有绘图和文本都将被限制在该区域内。该区域之外的任何内容都不会显示。
用法:
brain.screen.set_clip_region(x, y, width, height)
范围 |
描述 |
|---|---|
|
剪辑区域左上角的 x 坐标,以 0 到 160 之间的整数或浮点数给出。 |
|
剪辑区域左上角的 y 坐标,以 0 到 108 之间的整数或浮点数给出。 |
|
剪辑区域的宽度(以像素为单位),以 0 到 160 之间的整数或浮点数表示。 |
|
剪辑区域的高度(以像素为单位),以 0 到 108 之间的整数或浮点数表示。 |
# Restrict text and drawings to a specific region
brain.screen.set_clip_region(0, 0, 120, 120)
brain.screen.draw_rectangle(60, 60, 100, 100, Color.RED)
brain.screen.print_at("Cut off!", x=60, y=60)